

AppExchange
What Is AppExchange?
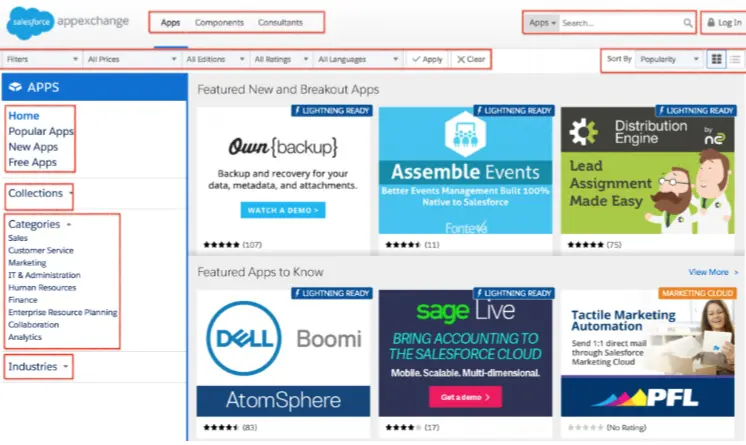
AppExchange is a marketplace offering solutions, such as apps, components,
and consulting services. To make your own solution publicly available to potential
customers, you must be a Salesforce partner.
How Does AppExchange work?
The creative power behind each AppExchange solution is a Salesforce partner.
AppExchange gives partners a place to create and publish extensions to Salesforce.
AppExchange is also the place for Salesforce admins to choose and install solutions
that fit their org’s needs. Here’s how AppExchange works.
Create:
A Salesforce partner initiates the process by creating an innovation that can improve
a business process, such as a custom object, custom tab, or component. Partners
share their customizations with other Salesforce users as a packaged AppExchange
solution, whether an app, a Bolt solution, a Flow solution, Lightning data, or a
component.
Publish:
The Salesforce partner registers, packages, and publishes their solution on
AppExchange.
They can also create a demo of the functionality included in their solution for
others to view before installing and include a trial version.
Install:
Salesforce customers browse solutions published on AppExchange and choose
which solutions to install in their orgs. Installing a published AppExchange solution
is safe and simple. Customers can:
Browse—View the descriptions, reviews, and demos of solutions on AppExchange.
They choose the solution that fits their needs.
Test Drive—Review a fully functional demo of the solution as a read-only user, and plan their implementation with their admins.
Install— Add the solution and all its components to their Salesforce environment.
Deploy— Immediately give their users access to the solution or customize it for aselect group of users.
Installation of an App:
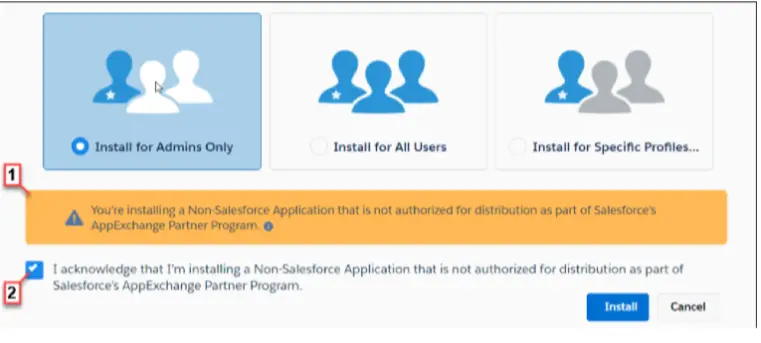
– In a browser, go to AppExchange website and search for the App.
– Click get it now, from the application information page.
– Click login and enter your username and pswd.
– Accept the terms and conditions, them click conform and install.
– On the next page there will be 3 options to install it for users.
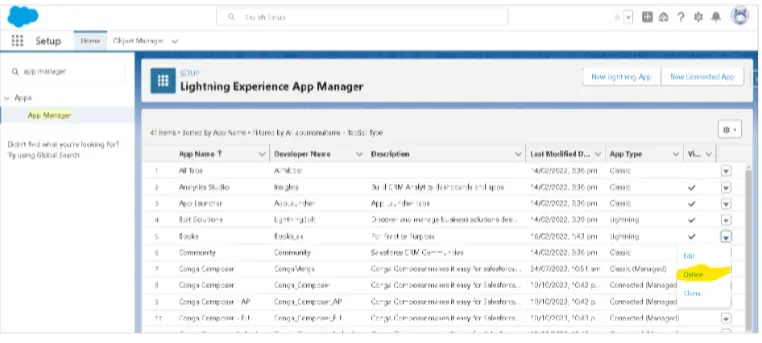
Uninstall an App:
From Setup, enter Apps in the Quick Find box, then select App Manager.
Locate the connected app, click Action dropdown, and then select View.
Click Delete, and click Delete again to confirm.
Create a custom app:
1. Application is a collection of tabs .
2. There are two types of application
a. Standard Application
b. Custom Application
3. Standard Application :
a. Applications created by the Salesforce are called standard Application .
b. Example : Sales ,Call Center, Marketing….
c. Standard Application cannot be deleted ,but they can be customized.
4. Custom Applications :
a. Applications created by the user are called custom Applications .
b. They can be deleted or Customized as per business requirement.
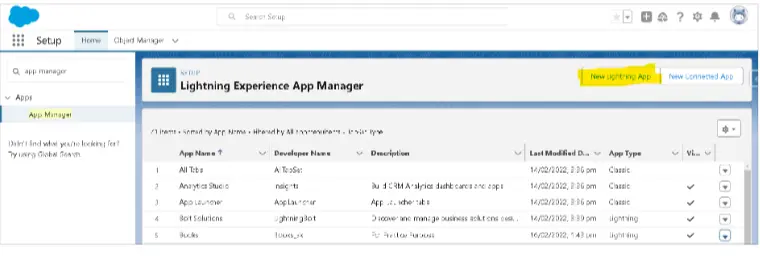
Setup
|— > Platform Tools
|— > Apps
|— > App Manager
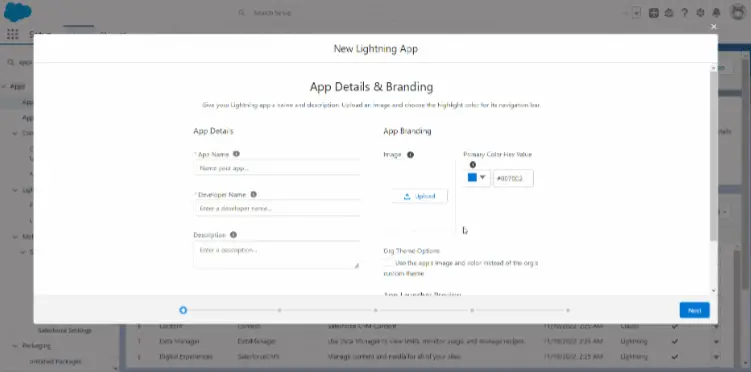
|— >New Lightning App
Step 1: Enter App Details
a. Enter App Name : Mutual Funds (Application is displayed using this name)
b. Developer Name : Mutual_Funds (Application is accessed using this name)
c. Enter Description :
d. Choose the Logo
Step 2: Choose the Navigation Type
a. Choose Navigation as Standard Navigation
Step 3: Choose Utility Bar items
Choose Chatter, History, etc.
Step 4: Choose the tabs for the application
Account, Case, Contact
Step 5: Choose the profile for whom the application should be visible.
Example : System Administration
Today’s Task.
1. Install one free app from the app exchange for all users.
YouTube Reference :
1) AppExchange in Hindi/Urdu
2) AppExchange in English
AppExchange is Salesforce’s enterprise cloud marketplace that provides apps, components, and consulting services to enhance Salesforce functionality.
AppExchange offers both free and paid apps. Users can search for apps based on their budget and requirements.
In Salesforce, go to the App Launcher and click “Visit AppExchange” to explore available apps and solutions.
AppExchange includes apps, Lightning components, Bolt solutions, and consulting services tailored to various industries and business needs.
You can evaluate apps by reading customer reviews, checking ratings, and exploring demos or trial versions if available.
All apps on AppExchange go through a rigorous security review by Salesforce to ensure data safety and compliance with standards.
Yes, many AppExchange apps are customizable to meet specific business requirements, depending on their design.
Popular categories include sales, marketing, customer service, IT management, analytics, and productivity tools.
You can update apps by visiting the Installed Packages section in Salesforce Setup and following the update instructions provided by the app developer.
Most Salesforce editions support AppExchange, but some apps may require specific licenses or editions.
