

What is a Flow in Salesforce?

What is a Flow in Salesforce?
A Flow is a tool that automates complications of business processes in Salesforce. In a few words, it fetches data and then Proceeds with that data.
Flow Builder is the declarative interface used to make separate flows. Flow Builder can be used to make logic like coding logic without using a programming language.
This feature of Salesforce state that hiring a salesforce admin is a good decision for an organization.
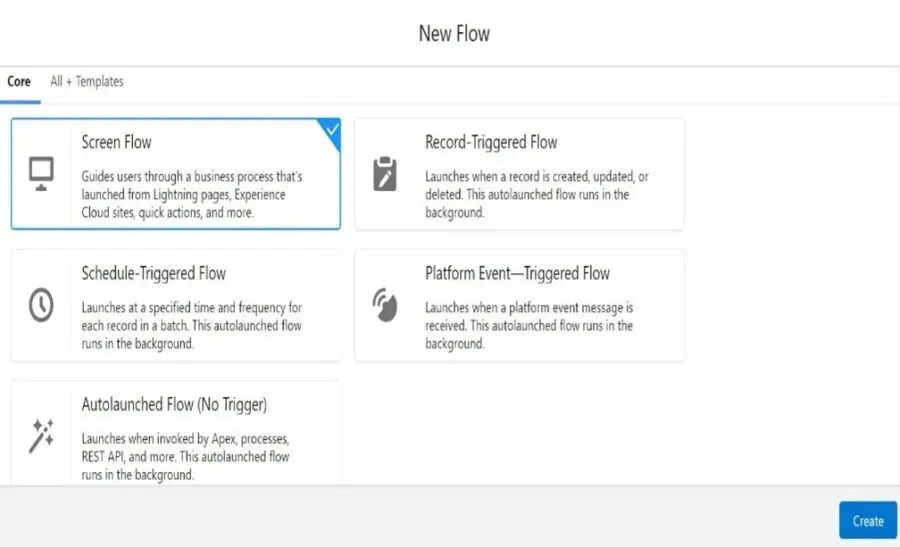
A Flow comes in five categories:
1) Screen Flows:
A flow that contains a user interface element that requires users for input is called a SCREEN Flow. These types of flows are either embedded as an element on a Lightning page or launched as an action.
2) Schedule-Triggered Flows:
These Auto -launched flows run in the background and launch at a designated time and frequency for each record in a batch.
3) Auto-launched Flows:
This type of Flows is used to run the automated task. Auto-launched flows can be put forward from other flows (sub-flow), process builders, record changes, from within an Apex class, from a set schedule, and platform events.
4) Record-Triggered Flows:
A Flow that runs in the background either before a record is saved or after the record is saved and when a record is created, updated, or deleted is known as Record-Triggered Flows.
5) Platform Event-Triggered Flows:
Whenever a platform event message is received, these auto-launched flows run in the background.
How do You create a Flow in Salesforce?
1. From the Gear icon click on Setup,
2. In the Quick Find box, Enter Flows and select Flows from the list, and then click the New Flow button. Choose the type of Flow you want to build, then click on Create button.
The Flows will influence your experience Based on the type of flow you create. An auto-created global variable called $Record is accessible by record-triggered and scheduled flows. This gives you access to all the fields on the record that triggered the flow (and its parent records!!!). You’ll have to create any required input variables yourself for Auto-launched flows.
What Is a Screen Flow in Salesforce?
Screen flows provide avenues to escort users through a business process; they deliver instructions or call scripts, and prompt users to fill certain fields after that execute actions back of the scenes such as Create or Update Record. Your users will come across a sequence of screens that are created by you– all without having a single line of code.
The Screen Flows functionality seem very interesting when I first heard about it. This tool boosts the hiring of a salesforce administrator. However, I not at all expected it to be so user-friendly, notably when creating from scratch without being an experienced developer. Salesforce proved me wrong!
Layout and Features of Screen Flows:
The Chief element that separates this flow from all other types of flow is the Screen Element. This is what we will lay out and what users will see.
As earlier mentioned, a single Salesforce Screen Flow can have multiple screens. These displayed screens will sit on your Flow canvas with your other elements. You can learn more about each flow element here.
On the screen flow window, the components panel shown on the left side depicts the items available to be displayed within the screen element itself. This is where you will detect standard components such as picklist and text, as well as custom components that have either been developed internally or come from managed packages.
Here are a few illustrations of useful components:
• Email: This component is very user-friendly when an email address is needed from the user running the screen flow.
• File Upload: As the name says, this will allow users to import files quickly through the screen flow. This is very user-friendly as users won’t have to navigate to other pages to add files.
• Toggle: This element is fun for the user experience within a screen flow as it can be substituted for a checkbox or a yes/no picklist.
The Fields section will not be used in this post. However, you should for sure explore this further, as it let us add the fields directly from an object inside the screen flow with some of the attributes already set up. This saves a lot of time, especially if you are adding many fields. In addition, as you will see in the image below, it Prompts you about the required fields that should be completed for the record. You can discover more information about this feature here.
Where Can a Screen Flow Be Used?
I’d state everywhere! If the process can be separated into steps that need user input (or acknowledgment) and it should be displayed for users based on record criteria or previous choices of the flow, then a screen flow is suitable.
A Salesforce Screen Flow can be useful to different types of users and teams. There are enough use cases for screen flows that can be accessed in many ways in Salesforce, including Lightning Record Pages, custom actions, buttons, or even a utility bar.
One of the most popular illustrations is using a screen flow to collect data to create a record.
How to Create a Screen Flow
Now that we have revealed the basics of a screen flow, it’s time to get hands-on! We’ll go through step-by-step guidance on how to create a screen flow, how to expose it to your users, and of course, how to make sure your flow works as expected.
Create the Flow
For this illustration, I have chosen to create a flow that will allow users to create Contact.
Keep in mind that while I have only used some fields, multiple fields and screens can be added to support your use case. Don’t forget to consider any existing validation rules!
Make the Flow Available in the Interface
As above mentioned, the flow can be accessed in certain ways – we will explore one of them, but feel free to try any other option that suits your use case well.
From the Lighting Home Page inside the Sales Lighting App, we will add the Flow we just created. For the sales team, it is essential to make this process as seamless and accessible as possible (with the least number of clicks).
Test Your Screen Flow
When the flow is ready, it should be carefully tested before reaching your user base in production. To use flow in the interface in a sandbox and see if it works as expected is the easiest way to test the Screen Flow.
Taking into consideration the flow complexity, testing in a developer sandbox might be sufficient for simple automation. But if a flow has a broader impact, either on the existing implementation or on the user experience, testing should be completed A-Z including the UAT – as well as any integration testing, if needed.
You should surely use the Debug button which appears when the flow is opened inside Flow Builder. The screen behavior will be the same as the interface (including the required fields), but it will give accurate information as far as the values for each component are concerned, and any errors if they occur.

NOTE:
If any errors show while the flow is live in production (and even in the sandbox when used from the interface), you will get the details of troubleshooting through email.

Remember that Trailhead is also a great resource to learn. This trail not only consists of information about Salesforce Flow but also truly fun hands-on challenges and even a module on testing.
Note: Testing should be done for any flow, not just for screen flows!
