

ORDER TO CASH PROCESS
The Order to Cash (O2C) process is a series of steps that a business follows to complete a sale. It starts when a customer sends an inquiry and ends when the business receives the payment. Here’s a step-by-step guide to the O2C process. The diagram below illustrates the flow of CRM information, starting with the Order-to-cash process when a customer makes an inquiry. The company then generates a lead, sends a quote, and, once the quote is accepted, processes the order, ships the product, and issues an invoice. Finally, payment is collected and reconciled to complete the transaction.

INQUIRY
The Order-to-Cash process starts when a business receives an order inquiry from a customer for a product or service. Customers can place an inquiry in various ways, such as on a website, using a mobile app, by calling a sales representative, or by visiting a store. When the inquiry is received, it includes important details like the product or service the customer wants, the quantity needed, delivery instructions, and any special requests.
Lead/Opportunity
This inquiry is added to the company’s system, generally in the form of a lead or opportunity (object). Here, all the details, such as the requested item, quantity, and any special instructions from the customer, are carefully reviewed to ensure accuracy. The business then checks if the item is in stock and ready to be shipped or delivered.
SYSTEM OVERVIEW
A business application is an app that allows us to run the entire order-to-cash process smoothly. It will enable us to record and manage all sales-related details, ensuring a streamlined workflow from order placement to payment collection. Generally, this process is executed in an ERP system (Enterprise Resource Planning).
Here are the steps to follow and record all the required sales details in this system:
Step 1: Sales Application – Log In
Step 2: Enter the username and password to log in to the system.
Step 3: Click on the “Sign in” button.


After Completing these steps you successfully logged in.
CUSTOMER DETAILS
Customer details are the information a business collects about its customers, such as their contact information, preferences, and past purchases. This helps the business understand customers better and provide improved service.
Here are the steps for creating a customer:
1. In the left navigation, click on “Customer”.
2. Click the “Create Customer” button to proceed to the next step.

The Customer Details form will open.
Note: The pharmacy customer is just an example. You can create customers according to your preferences and requirements.
3. Fill Out the Customer Details Form and complete all the required fields.

4. Select the customer name/Enter Customer Name, customer type, Customer Sector, Customer Category, Industry, Country, Location City, and Owing User.
5. Click “Create” Once you have filled in all the customer information.
After following these steps the customer is successfully

generated and shown on screen above mentioned image.
Create Contact:
Step 1: Select a customer for whom you are creating contact details.

Step 2: Click on the “Contact” button.
Step 3: Click on the “Create Contact” button.

Step 4: Select the first or last name, or enter the name according to your contact’s name.

Step 5: Click on the “Create Contact” button.

After following these steps you have successfully created a contact. If you need to add more contacts, click on “Create Contact” again to create a new contact.
Site Location:
Step 1: Click on the “Site Location” button.
Step 2: Click on the “Create site” which is located on the left-hand side.

Step 3: Enter all the details which are shown on the screen.

Step 4: Enter the site name, postal code, location number, location name, and full address. Then select the country, site type, and city from the dropdown menus.
Step 5: Click on the “Create” button.

The site location has been successfully created, as shown in the image above. If you need to add more site locations, click on the “Create Site” button again and add additional locations.
QUOTES
The salesperson will provide a quote to the customer. The customer may negotiate and finalize the price and other details. Once everything is confirmed, the customer will provide a purchase order.
SALES ORDER CREATION
Once the company receives the PO from the customer and creates a sales order in the system. This sales order includes important details about the customer’s order, such as the item description, quantity, price, and more. It serves as an official record of the customer’s request and helps track the order throughout the entire Order-to-Cash (O2C) process.
Here are the steps for creating a sales order:
1. On the left navigation click on the “sales order” button.
2. Select the “Create Order” button.

3. Enter the details displayed on the screen.
4. Select Customer Name, Select Customer Number, Order Type, PO Number, Order Date, Sales Person, Order Status, Location Name, Location Number, and Payment Term.

5. Click on the “Add Product” button.

5. Enter Item Details: Enter all the required information about the item name and item quantity.
6. Select the Item Code from the drop-down, and Select the Quantity and selling price.
7. After entering the product details, click the “Add Sales Line” button.

- Finally, click the “Create Order” button on the right side.

By following these steps, you can successfully create a sales order.
If we require more items so we click on “Add Products” and add more items according to our requirements.
SHIPPING (ORDER DELIVERY)
A shipping or order delivery is a document used when delivering goods to a customer. It lists all the items being delivered, including their names and quantities. This document helps both the business and the customer keep track of what has been sent. When the delivery arrives, the customer checks the items against the order delivery to ensure everything is correct. After reviewing the items and confirming that they match the order delivery, the customer signs it as confirmation of receipt and returns it to the company. The order delivery serves as proof that the goods were delivered, making the process clear and organized for everyone involved.
Here are the steps for creating an order Delivery:
1. On the left navigation click on the “Order Delivery” button.
2. Select the “Create Delivery” button.

3. Enter the Sales order number selected from the drop-down.
4. Select Customer Name, Status, and Fill Out the shown on the screen.
5. After filling in all the details, click the “Create” button located on the right side.


By following these steps, you can successfully create an Order Delivery.
INVOICING
A sales invoice is a document that a business sends to a customer to request payment for goods or services. It includes important details like the invoice number, the issue date, the customer’s name and contact information, and a list of items sold along with their prices. It also shows the total amount the customer needs to pay and any payment terms. In simple terms, a sales invoice is a bill that informs the customer how much they owe for their purchase.
Here are the steps for creating an invoice:
1. Click on the left navigation “Invoices” button.
2. Then click on the “Create Invoice” Button.

3. Enter all the details on the screen.
4. Select the sales order, customer name, and payment term.

- Click the “Create” button located on the right side.

By following these steps, you can successfully create an invoice.
PAYMENT COLLECTION
The payment collection process begins when the customer receives an invoice. This invoice shows how much they owe for the product or service they purchased and includes a due date, which is the last day the payment should be made. For example, if the invoice date is May 1st and the payment terms are 30 days, then the invoice due date is May 31st. Payment terms indicate the number of days from the invoice date by which the payment must be made.
To make it easy for customers, the business may offer different payment methods, such as credit card, bank transfer, or online payment. Once the customer pays, the business records the payment, and the transaction is complete. Keeping track of the due date helps ensure payments are received on time, which is essential for the business’s cash flow and for maintaining a good relationship with the customer.
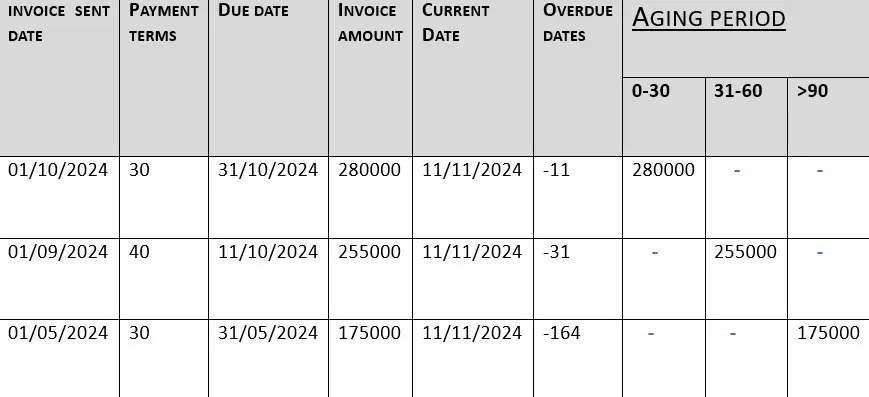
Aging Cycle in the Payment Collection Process:
The aging cycle helps businesses track overdue payments by organizing unpaid invoices into time periods, or “age brackets,” such as 0-30 days, 31-60 days, 61-90 days, and over 90 days past due. This makes it easy to see how late each payment is.
For example, if a payment was due on May 1st but still isn’t paid by June 1st, it moves from the 0-30 days bracket to the 31-60 days bracket. The older the overdue payment, the greater the risk of not getting paid, so businesses often follow up on the oldest payments first. This process helps maintain cash flow and avoid losses from unpaid invoices.
Example:
Here are the steps for recording a payment or generating a receipt:
1. Go to the “customers” button on the left navigation.
2. Select the customer for whom you want to create a receipt.


3. Click on the “Receipt” option.
4. After clicking the “Receipt” button, the next page will open. On the left-hand side, you’ll see the “Create” option. Click on it to create a new receipt.

5. Select the invoice number, enter the amount, choose the payment collection date, and select the receipt payment method from the dropdown.
6. After that click on the “Create receipt” button.

You have now successfully completed the creation of the receipt, following the format displayed on the screen above.
PAYMENT RECONCILIATION
Payment reconciliation is the process of verifying payments received from customers with the corresponding invoices in the company’s records. When a customer makes a payment, whether through bank transfer, credit card, or other methods, the payment details are first recorded. These payments are then matched with the relevant invoices to ensure that the correct amount has been received. Once verified, the invoice status is updated as “Paid” in the system. If there are any Differences, such as underpayments or overpayments, they are investigated and resolved by coordinating with the customer. This process helps maintain accurate and up-to-date financial records for the company.
Course Video
Below is the Entity Relationship Diagram

