

DOM HTML/CSS Manipulation
JavaScript empowers developers to dynamically manipulate the Document Object Model (DOM) and control the styling of HTML and CSS elements. Here’s a breakdown of how you can select, manipulate, and style elements in the DOM using JavaScript:
1. Selecting Elements:
– Use `document.querySelector()` to select the first element that matches a CSS selector.
– Use `document.querySelectorAll()` to select all elements that match a CSS selector.
Example:
// Find the first element with the class ‘my-button’
const button = document.querySelector(‘.my-button’);
// Find all elements with the class ‘my-text’
const textElements = document.querySelectorAll(‘.my-text’);
2. Changing Text Inside an Element:
Once we have selected an element, we can change its text or content. This is great for things like changing button labels or headlines.
Example:
// This changes the text of an <h1> heading to “Hello, JavaScript!”
const heading = document.querySelector(‘h1’);
heading.textContent = ‘Hello, JavaScript!’;
3. Adding/Removing Classes:
Classes in CSS are like labels that can change the look of things. We can add or remove classes using JavaScript. This helps us make things look different when something happens (like clicking a button or hovering over an image).
• Add a class using .classList.add()
• Remove a class using .classList.remove()
Example:
const box = document.querySelector(‘.box’);
// Add a class ‘highlight’ to make the box look brighter
box.classList.add(‘highlight’);
// Remove a class ‘old-class’ from the box
box.classList.remove(‘old-class’);
4. Changing the Style (CSS) of an Element:
We can also change how things look by adjusting the style of an element directly in JavaScript. This is like using inline CSS to change colors, sizes, and other design properties.
To change the color, size, or other styles, we can use the style property.
Example:
const button = document.querySelector(‘.my-button’);
button.style.backgroundColor = ‘blue’; // Makes the button blue
button.style.fontSize = ’20px’; // Makes the text bigger
5. Creating New Elements:
Sometimes, we need to add new things to the webpage, like adding new paragraphs or images. JavaScript can help us create new elements and add them to the page.
• Create new elements using document.createElement().
• Add them to the page with appendChild().
Example:
// Create a new <div> element
const newDiv = document.createElement(‘div’);
newDiv.textContent = ‘I am a brand new div!’;
// Add the new <div> to the body of the page
document.body.appendChild(newDiv);
Learn How to Control Webpage Elements with JavaScript!
| Method / Property | Description | Example |
|---|---|---|
| style.property | Change or get the value of a CSS property like color, size, or background for an element. | Const element=document.querySelector(‘.my-element’); element.style.backgroundColor = ‘red’; |
| className | Get or set the class of an element, which controls its style. | const element = document.querySelector(‘.my-element’); element.className = ‘new-class’; |
| classList.add(className) | Add a new class to an element (helps to change its style). | const element = document.querySelector(‘.my-element’); element.classList.add(‘new-class’); |
| setAttribute(name, value) | Set a new attribute value for an element (like a custom ID or data). | const element = document.querySelector(‘.my-element’); element.setAttribute(‘data-id’, ‘123’); |
| getAttribute(name) | Get the value of an attribute for an element (like checking the ID or data). | const element = document.querySelector(‘.my-element’); const id = element.getAttribute(‘data-id’); |
| removeAttribute(name) | Remove an attribute (like data or ID) from an element. | const element = document.querySelector(‘.my-element’); element.removeAttribute(‘data-id’); |
| element.offsetHeight | Get the height of an element, including its padding and border. | var element=document.getElementById(‘myElement’); console.log(element.offsetHeight); |
| element.offsetWidth | Get the width of an element, including its padding and border. | var element =document.getElementById(‘myElement’); console.log(element.offsetWidth); |
| style.display | Show or hide an element (you can make it disappear or appear!). | document.getElementById(‘myElement’).style.display = ‘none’; document.getElementById(‘myElement’).style.display = ‘block’; |
| style.visibility | Change whether an element is visible or hidden (but it still takes up space). | document.getElementById(‘myElement’).style.visibility = ‘hidden’; document.getElementById(‘myElement’).style.visibility = ‘visible’; |
| style.opacity | Set how transparent or see-through an element is. | document.getElementById(‘myElement’).style.opacity = ‘0.5’; |
| style.backgroundColor | Change the background color of an element (like making a button red). | document.getElementById(‘myElement’).style.backgroundColor = ‘red’; |
| style.color | Change the text color of an element (like making text blue). | document.getElementById(‘myElement’).style.color = ‘blue’; |
| style.fontFamily | Change the font of the text in an element (like making it Arial or Times New Roman). | document.getElementById(‘myElement’).style.fontFamily = ‘Arial’; |
| style.fontSize | Change the size of the text in an element (like making it bigger or smaller). | document.getElementById(‘myElement’).style.fontSize = ’20px’; |
| style.fontWeight | Make the text bold or change its weight. | document.getElementById(‘myElement’).style.fontWeight = ‘bold’; |
| style.textAlign | Change the alignment of the text (like making it center, left, or right). | document.getElementById(‘myElement’).style.textAlign = ‘center’; |
| style.padding | Change the padding (space inside the element, around the content). | document.getElementById(‘myElement’).style.padding = ’10px’; |
| style.margin | Change the margin (space outside the element, around the edges). | document.getElementById(‘myElement’).style.margin = ’10px’; |
| style.border | Change the border of an element (like making it a solid line or dotted). | document.getElementById(‘myElement’).style.border = ‘1px solid black’; |
Course Video
Course Video English:
YouTube Reference :
1) JavaScript DOM CSS Styling Methods Tutorial in Hindi / Urdu
2) JavaScript DOM Tutorial – Changing Text & HTML Content in English
Examples for Practice
You have to solve all the questions given below in the editor without copy-pasting.
1. Create a Web Page in which we have to add a "div" Element of class "myDiv" and insert Text inside this Div Element. Note:- Do it using DOM Elements.
The task is to create a web page where you use JavaScript and the Document Object Model (DOM) to add a <div> element with the class “myDiv” and insert text inside this <div>.
Use DOM to Create and Modify Elements:
– Inside the JavaScript code, use the DOM to create a new <div> element.
– Set the class attribute of the <div> to “myDiv”.
– Insert text content inside the <div>.
Here's an example program:
// Create a new div element
var myDiv = document.createElement(“div”);
// Set the class attribute of the div to “myDiv”
myDiv.className = “myDiv”;
// Insert text content inside the div
myDiv.textContent = “Hello, I am inside myDiv!”;
// Append the div to the body of the HTML document
document.body.appendChild(myDiv);
Output

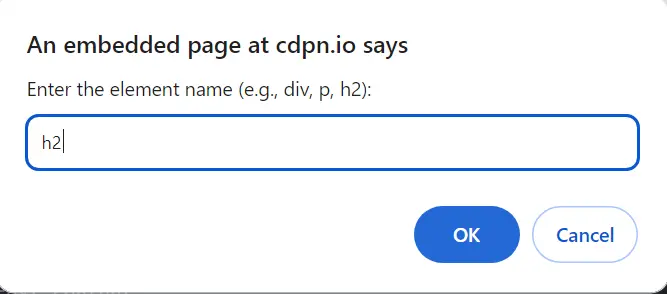
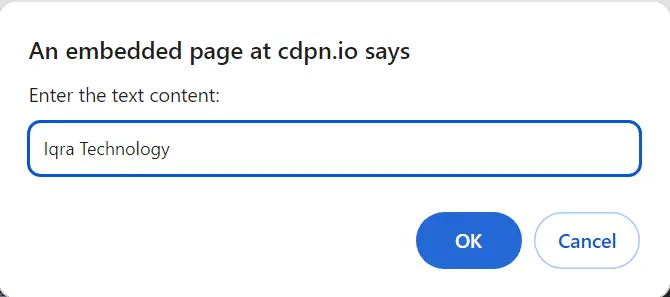
2. Create a Web Page in which we have to add an Element of class "myDiv" and insert Text inside this Element but take the Element name and Text node from User and also pass the Element name and Text node as a parameter to a Function. Note:- Do it using DOM Elements
The task is to create a web page where you use JavaScript and the Document Object Model (DOM) to add an element with a specified class and insert text inside it. The element name and text content should be taken from the user, and a function should be used to achieve this.
Use DOM and Function:
– Inside the JavaScript code, create a function that takes parameters for the element name and text content.
– Use the DOM to create the specified element, set its class, and insert text content.
– Call the function with values taken from the user.
Here's an example program:
// Function to create an element with class and text content
function createAndInsertElement(elementName, textContent) {
// Create a new element based on user input
var newElement = document.createElement(elementName);
// Set the class attribute of the element to “myDiv”
newElement.className = “myDiv”;
// Insert text content inside the element
newElement.textContent = textContent;
// Append the element to the body of the HTML document
document.body.appendChild(newElement);
}
// Get user input for element name and text content
var userElementName = prompt(“Enter the element name (e.g., div, p, h2):”);
var userTextContent = prompt(“Enter the text content:”);
// Call the function with user input as parameters
createAndInsertElement(userElementName, userTextContent);
Output

3. Create a Web Page in which we have to add a "div" Element of class "myDiv" Insert text inside this Div Element and change the style of the div using DOM Element.
The task is to create a web page where you use JavaScript and the Document Object Model (DOM) to add a <div> element with the class “myDiv,” insert text inside it, and change the style of the <div>.
Use DOM to Create and Modify Elements:
– Inside the JavaScript code, create a new <div> element.
– Set the class attribute of the <div> to “myDiv.”
– Insert text content inside the <div>.
– Change the style of the <div> using the DOM.
Here's an example program:
// Create a new div element
var myDiv = document.createElement(“div”);
// Set the class attribute of the div to “myDiv”
myDiv.className = “myDiv”;
// Insert text content inside the div
myDiv.textContent = “Hello, I am inside myDiv!”;
// Change the style of the div
myDiv.style.backgroundColor = “lightblue”;
myDiv.style.padding = “20px”;
myDiv.style.border = “2px solid navy”;
myDiv.style.color = “white”;
// Append the div to the body of the HTML document
document.body.appendChild(myDiv);
Output

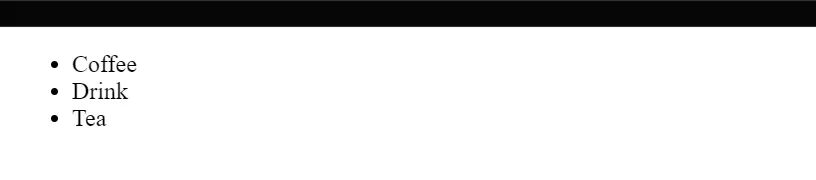
4. Create a Web Page with two unordered list items and add the third one before the second item using Dom Element. Before:- Coffee After:- Coffee Tea Drink Tea
The task is to create a web page with two unordered list items and then add a third item before the second one using JavaScript and the Document Object Model (DOM).
Use DOM to Create and Modify Elements:
– Create a new <li> element and store it in the variable.
– Set the text content of the new list item to “Drink.”
– Get the reference to the existing second list item using its index within the <ul> with the ID “myList.”
– Insert the new list item before the second list item by using the insertBefore method.
Here's an example program:
<body>
<ul id=”myList”>
<li>Coffee</li>
<li>Tea</li>
</ul>
<script>
// Create a new list item for “Drink”
var newListItem = document.createElement(“li”);
newListItem.textContent = “Drink”;
// Get the reference to the existing second list item
var secondListItem = document.getElementById(“myList”).getElementsByTagName(“li”)[1];
// Insert the new list item before the second list item
secondListItem.parentNode.insertBefore(newListItem, secondListItem);
</script>
</body>
Output
5. Modify an Existing Element’s Text Content
Objective:
• Select an element by class name: Use document.querySelector() to find the element you want to modify.
• Change the text content: Using textContent, you can dynamically change the text of an element after the page has loaded.
Here's an example program:
<body>
<div class=”myElement”>Old Text</div> <!– Original text –>
<script>
const element = document.querySelector(‘.myElement’); // Find the element with class “myElement”
element.textContent = ‘New text content!’; // Modify the text content
</script>
</body>
Output
Before Modifying:

After Modifying:

6. Create a New Element and Add It to the DOM
Objective:
• Create a new element using JavaScript: You’ll learn how to dynamically generate an element (<p> in this case) using JavaScript.
• Add text inside the element: After creating the element, you can modify its content using the textContent property, allowing you to make it interactive.
• Insert the element into the DOM: After creating the element, you will need to add it to the document so that it appears on the webpage. You can do this by using appendChild().
Here's an example program:
<body>
<script>
const newElement = document.createElement(‘p’); // Create a new <p> element
newElement.textContent = ‘Hi, I am a paragraph text!’; // Add text inside the <p> element
document.body.appendChild(newElement); // Add the new <p> to the body of the page
</script>
</body>
Output

DOM manipulation involves using JavaScript to dynamically change the content, structure, or styling of an HTML document. Learn more in our JavaScript DOM HTML CSS manipulation free course.
Use the .innerHTML or .textContent property to update an element’s content.
Example:
document.getElementById(“example”).innerHTML = “Updated Content”;
Explore this topic in the JS DOM HTML CSS tutorial with free course video.
Use the .style property to apply CSS directly to an element.
Example:
document.getElementById(“example”).style.color = “red”;
Learn this technique in the JS DOM and CSS manipulation with free video tutorial.
- Inline CSS manipulation applies styles directly to elements using the .style property.
- External CSS manipulation involves adding or removing CSS classes with .classList.
Discover more in our Free JavaScript course for DOM and CSS manipulation.
Use the .classList property with add() and remove() methods.
Example:
document.getElementById(“example”).classList.add(“new-class”);
This is explained step-by-step in the JavaScript DOM HTML CSS manipulation free course.
Yes, use the .classList.toggle() method to add a class if it doesn’t exist or remove it if it does.
Example:
document.getElementById(“example”).classList.toggle(“highlight”);
Learn how to use this in our JS DOM HTML CSS tutorial with free course video.
Use the setAttribute() and getAttribute() methods to modify or retrieve attributes.
Example:
document.getElementById(“link”).setAttribute(“href”, “https://example.com”);
This is covered in the JS DOM and CSS manipulation with free video tutorial.
Apply predefined styles using a CSS class and add it to the element with .classList.
Example:
document.getElementById(“example”).classList.add(“custom-style”);
Explore this method in the Free JavaScript course for DOM and CSS manipulation
Yes, use createElement() and appendChild() to dynamically create and insert elements.
Example:
let newDiv = document.createElement(“div”);
document.body.appendChild(newDiv);
Find a hands-on tutorial in the JS DOM HTML CSS tutorial with free course video.
Use the DOMContentLoaded event to ensure your script runs only after the DOM is fully loaded.
document.addEventListener(“DOMContentLoaded”, function () {
console.log(“DOM is ready”);
});
Watch the explanation in our JavaScript DOM HTML CSS manipulation free course.
