

Loops
A loop is a programming construct that allows you to execute a block of code repeatedly based on a given condition. Loops help automate repetitive tasks, so you don’t have to write the same code multiple times.
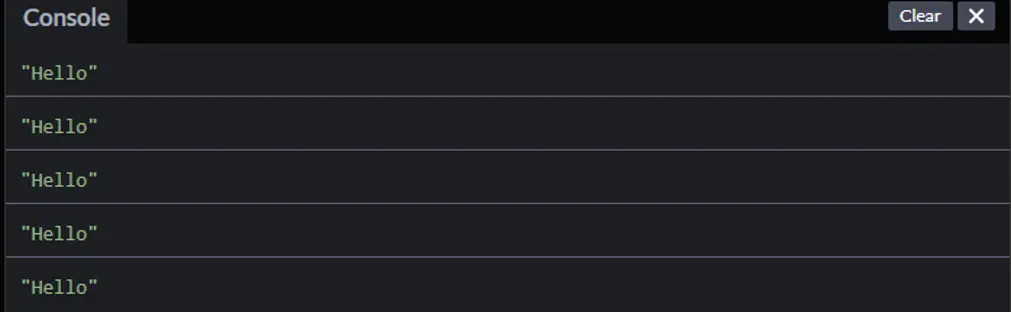
Imagine you’re asked to say “Hello” five times. Instead of writing console.log(“Hello”); five times, you can use a loop to do it for you, like this:
for (let i = 0; i < 5; i++) {
console.log(“Hello”);
}
Code Explanation:
1. Initialization (let i = 0):
• This part runs only once, at the start of the loop.
• It sets up the starting point for the loop. In this case, we start with i = 0.
• i is the loop counter (or loop variable) that we will use to track the number of times the loop has run.
2. Condition (i < 5):
• This part is checked before each loop iteration.
• If the condition is true, the code inside the loop will run.
• Once the condition becomes false, the loop will stop.
• Here, the condition is i < 5, meaning “keep looping as long as i is less than 5.”
3. Increment (i++):
• After the code inside the loop runs, this part happens.
• i++ means “increase the value of i by 1” after each iteration.
• This ensures that the loop will eventually stop when i reach 5, because the condition i < 5 will no longer be true.
Output:
Why are loops useful?
• Efficiency: They save you from writing repetitive code.
• Automation: You can automate tasks that need to be repeated multiple times, like going through items in a list or numbers in a sequence.
Why are loops useful?
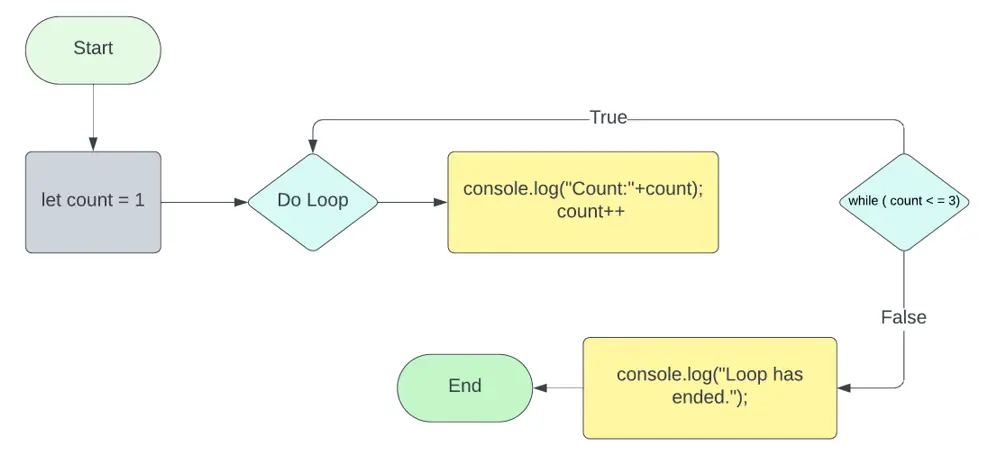
1. While Loop:
A while loop keeps repeating the instructions until the condition is true. If the condition is false at the start, the loop will not run at all.
How It Works:
1. Check if the condition is true.
2. If true, the loop runs the code inside it.
3. After running, the condition is checked again.

Scenario: Write a JavaScript program that prints the numbers from 1 to 3, each on a new line, and then prints “Loop has ended.” on 4th.
<!DOCTYPE html>
<html>
<head>
<title>Loop</title>
</head>
<body>
<h2>While Loop</h2>
<script>
let count = 1;
while (count <= 3) {
console.log(“Count: ” + count);
count++;
}
console.log(“Loop has ended.”); </script>
</body>
</html>
Code Explanation:
let count = 1;
This line declares a variable named count and initializes it with the value 1.
let is used to declare a variable in JavaScript. It allows the variable’s value to be changed later.
while (count <= 3)
This is the while loop statement. The loop will continue executing the code inside the curly braces {} as long as the condition count <= 3 is true.
Initially, the count is 1, so the loop will run until the count exceeds 3.
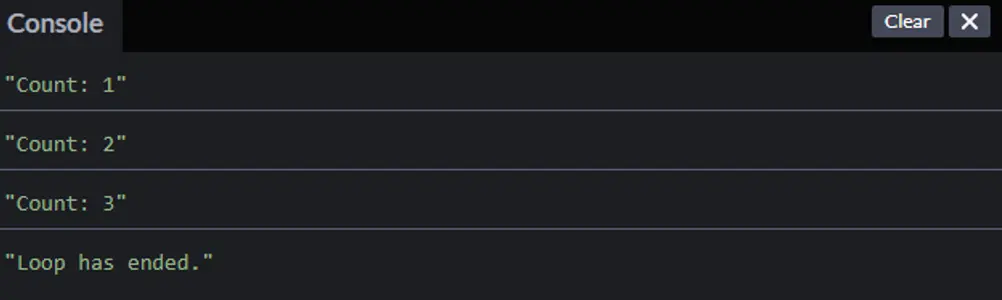
1. First Iteration:
The initial value of the count is 1.
The loop checks if count (1) is less than or equal to 3. Since 1 is less than 3, the code inside the loop runs.
The value of count (which is 1) is printed using console.log(). The output is “Count: 1”.
Then, the count value is increased by 1 (count++), so the count becomes 2.
2. Second Iteration:
The value of the count is now 2.
The loop checks if count (2) is less than or equal to 3. Since 2 is less than 3, the code inside the loop runs.
The value of the count (which is 2) is printed. The output is “Count: 2”.
Then, the value of the count is increased by 1 (count++), so the count becomes 3.
3. Third Iteration:
The value of the count is now 3.
The loop checks if count (3) is less than or equal to 3. Since 3 is equal to 3, the code inside the loop runs.
The value of the count (which is 3) is printed. The output is “Count: 3”.
Then, the value of the count is increased by 1 (count++), so the count becomes 4.
4. Fourth Iteration:
The value of the count is now 4.
The loop checks if count (4) is less than or equal to 3. Since 4 is greater than 3, the condition is no longer true, and the loop stops running.
console.log(“Loop has ended.”);
This line is executed after the loop finishes. It prints the message “Loop has ended.” to the console to indicate that the loop has finished running and the program is done.
Output:

2. do...while Loop:
The do…while loop is similar to the while loop, but it guarantees that the loop will run at least once before checking the condition.
How It Works:
1. Run the code inside the loop once.
2. Check if the condition is true.
3. If true, repeat the loop; if false, stop.
Scenario: Write a JavaScript program using a do-while loop that prints the numbers from 1 to 3, along with the message “Count: “. After printing the numbers, the program should print “Loop has ended on 4th.
<!DOCTYPE html>
<html>
<head>
<title>Loop</title>
</head>
<body>
<h2>Do While Loop</h2>
<script>
let count = 1;
do {
console.log(“Count: ” + count);
count++;
} while (count <= 3);
console.log(“Loop has ended.”); </script>
</body>
</html>
Code Explanation:
let count = 1;
This line declares a variable named count and initializes it with the value 1.
let is used to declare the variable, which allows its value to be modified later.
do { } while (count <= 3);
This is a do-while loop in JavaScript. The key difference between the do-while loop and a regular while loop is that the do-while loop executes its code block at least once before checking the loop condition.
After executing the code block once, the loop checks the condition to determine whether to continue running.
Inside the do block:
The first action inside the loop is to print the current value of the count to the console using
console.log(“Count: ” + count);.
Then, count++ is used to increment the value of count by 1, moving it to the next number.
Code Explanation:
1. First Iteration:
o The value of the count is initially 1.
o The loop executes the code inside the block (prints “Count: 1”) and then increases the count to 2.
o The condition count <= 3 is checked, and since 2 <= 3 is true, the loop continues.
2. Second Iteration:
o The value of the count is now 2.
o The loop executes the code inside the block (prints “Count: 2”) and then increases the count to 3.
o The condition count <= 3 is checked, and since 3 <= 3 is true, the loop continues.
3. Third Iteration:
o The value of the count is now 3.
o The loop executes the code inside the block (prints “Count: 3”) and then increases the count to 4.
o The condition count <= 3 is checked, and since 4 <= 3 is false, the loop stops.
Post-loop Execution:
Once the loop ends (when count becomes 4), the program executes the statement console.log(“Loop has ended.”);, printing “Loop has ended.” to the console.
Output:
3. for Loop:
The for loop is perfect when you know exactly how many times you want the loop to run. It’s like saying, “I want to repeat something for a specific number of times.”
How It Works:
1. Initialization: Set up a starting value.
2. Condition: Keep running the loop while the condition is true.
3. Increment/Decrement: Increase or decrease the value after each loop.

Scenario : Sum of all number from 1 to 5 i.e. 1 + 2 + 3 + 4 + 5 = 15 using for Loop i.e define the loop from 1 to 5
<!DOCTYPE html>
<html>
<head>
<title>Loop</title>
</head>
<body>
<h2>For Loop</h2>
<script>
// Sum of numbers from 1 to 5
let sum = 0; // Initialize sum variable to 0
for (let i = 1; i <= 5; i++) {
sum += i; // Add the current value of i to sum
}
console.log(“Sum of numbers from 1 to 5: ” + sum); // Output the result </script>
</body>
</html>
Code Explanation:
let sum = 0;
This line declares a variable named sum of type integer and initializes it with the value 0.
It will be used to store the running total of the numbers from 1 to 5.
for (let i = 1; i <= 5; i++)
This is a for loop that runs from i = 1 to i = 5. The loop has three main parts:
1. Initialization: The variable i is set to 1 (let i = 1), which is the starting value of the loop counter.
2. Condition Checking: The loop will continue as long as i is less than or equal to 5 (i <= 5).
3. Increment: At the end of each iteration, i is increased by 1 (i++). This moves the loop counter forward to the next value in the sequence.
Each time the loop runs, the code inside the curly braces {} will be executed.
sum += i;
This line adds the current value of i to the variable sum using the += operator.
The += operator means “add the value on the right to the variable on the left and store the result in the left variable.”
For each iteration:
1st iteration: sum += i → (sum = 0, i = 1) → sum = 0 + 1 = 1
2nd iteration: sum += i → (sum = 1, i = 2) → sum = 1 + 2 = 3
3rd iteration: sum += i → (sum = 3, i = 3) → sum = 3 + 3 = 6
4th iteration: sum += i → (sum = 6, i = 4) → sum = 6 + 4 = 10
5th iteration: sum += i → (sum = 10, i = 5) → sum = 10 + 5 = 15
After the 5th iteration, the loop checks the condition i <= 5. Now, i = 6, which is greater than 5.
Since the condition i <= 5 is false, the loop ends.
console.log(“Sum of numbers from 1 to 5: ” + sum);
After the loop ends, the total sum (which is 15 at this point) is printed to the console.
The console.log() function is used to display output in the browser’s console.
It concatenates the string “Sum of numbers from 1 to 5: ” with the value of the sum variable, resulting in the output: Sum of numbers from 1 to 5: 15.
Output:

4. for...in Loop:
The for…in loop is used to loop over an object’s properties. It’s great for going through all the keys and values inside an object.
How It Works:
• It loops over the keys (properties) of an object.
Scenario:
Write a JavaScript program using a for…in the loop that iterates over the properties of an object representing a person. The object contains the following properties: name, age, and city. The program should print each property and its value to the console. After printing all the properties, the program should print “Loop has ended.”
<!DOCTYPE html>
<html>
<head>
<title>Loop</title>
</head>
<body>
<h2>For in Loop</h2>
<script>
let person = {name: “Saad”, age: 25, city: “Wonderland”};
for (let key in person) { // Loop through each property of the person object
console.log(key + “: ” + person[key]); // Print the property and its value
}
</script>
</body>
</html>
Code Explanation:
let person = { name: “Saad”, age: 25, city: “Wonderland” };
This line creates an object person with three properties: name, age, and city. Each property has an associated value.
for (let key in person) { … }
This is the for…in a loop, which iterates over each property of the person object. During each iteration, the key variable holds the name of the current property (e.g., “name”, “age”, “city”).
console.log(key + “: ” + person[key]);
Inside the loop, this line outputs the name of the property (key) and its corresponding value (person[key]) to the console. The value is accessed by using person[key], where the key is the property name (such as “name”, “age”, etc.).
How the Loop Works:
1. 1st iteration: The first property is name, so key = “name” and person[key] = “Saad”. The output is “name: Saad”.
2. 2nd iteration: The next property is age, so key = “age” and person[key] = 25. The output is “age: 25”.
3. 3rd iteration: The final property is city, so key = “city” and person[key] = “Wonderland”. The output is “city: Wonderland”.
Output:

5. for...of Loop:
The for…of loop is used to loop over the values in an array or any iterable object (like a string). It’s great for accessing values directly without needing to use the index.
How It Works:
• It loops over the values of an iterable (like an array or string).
Scenario:
Write a JavaScript program using a for…of the loop that iterates over an array of numbers. The array contains the numbers from 1 to 3. The program should print each number with the message “Count: ” before it. After printing all the numbers, the program should print “Loop has ended.”
<!DOCTYPE html>
<html>
<head>
<title>Loop</title>
</head>
<body>
<h2>For of Loop</h2>
<script>
// Create an array containing the numbers 1 to 3
let numbers = [1, 2, 3];
// Use a for…of loop to iterate over the numbers array
for (let count of numbers) {
console.log(“Count: ” + count);
}
// Print the message after the loop finishes
console.log(“Loop has ended.”); </script>
</body>
</html>
Code Explanation:
Array Initialization:
let numbers = [1, 2, 3];
We create an array of numbers that holds the values 1, 2, and 3. This will be used to loop through the numbers.
For...of loop:
We create an array of numbers that holds the values 1, 2, and 3. This will be used to loop through the numbers.
for (let count of numbers)
means that for each element in the numbers array, it will assign the element to the variable count and execute the code inside the loop body.
Logging the count:
Inside the loop,
console.log(“Count: ” + count);
prints the current value of the count to the console.
After the loop:
Once the loop finishes iterating through the array (i.e., when all numbers have been printed),
console.log(“Loop has ended.”);
prints the message “Loop has ended.”.
Output:

6. Nested Loop
Sometimes, you need to use loops inside other loops. This is called a nested loop. It’s useful when you’re working with two-dimensional data or patterns.
How It Works:
• An outer loop runs, and an inner loop runs for each iteration of that loop.

Scenario:
Write a C# program using a nested while loop to generate and print a multiplication table for the number 2. The table should display the multiplication results from 2 × 1 to 2 × 5. Each row of the table should represent the multiplication of 2 with a different number from 1 to 5.
<!DOCTYPE html>
<html>
<head>
<title>Loop</title>
</head>
<body>
<h2>Nested Loop</h2>
<script>
let i = 2;
while (i <= 2) {
let j = 1;
while (j <= 5) {
let result = i * j;
console.log (`${result}\t`); // Print the result followed by a tab
j++;
}
console.log(); // Move to the next line after each iteration of the inner loop
i++;
} </script>
</body>
</html>
Code Explanation:
let i = 2;
Declares and initializes the variable i to 2.
while (i <= 2)
This outer while loop ensures that the block of code will execute as long as i is less than or equal to 2. Since i is initialized to 2, it will only run once, essentially making the outer loop redundant for the number 2.
let j = 1;
Inside the outer loop, we declare and initialize the variable j to 1. This variable controls the inner loop.
while (j <= 5)
This inner while loop will execute as long as j is less than or equal to 5. It multiplies i by j, calculates the result, and prints it with a tab space between results.
let result = i * j;
Calculates the multiplication of i and j, storing the result in the variable result.
Console.log(${`result`}\t);
This writes the result followed by a tab (\t) to the console without moving to the next line, just like
j++
Increments the value of j by 1 to move to the next multiplication.
console.log();
Moves to the next line after printing all results for the current value of i.
i++
Increments the value of i by 1, but since i starts at 2 and the outer loop only runs once (because i is already 2 and the condition is i <= 2), the loop ends after one iteration.
Output:

Conclusion:
Loops are like shortcuts that help us repeat tasks without writing the same code repeatedly. Whether you’re counting numbers, accessing object properties, or looping through arrays, loops make our code cleaner and easier to manage.
Course Video
Course Video English
YouTube Reference :
1) Loops in Javascript | Web Development Course | Javascript in Hindi
2) How to use the JS For Loop | JavaScript Full Tutorial in English
3) While/do while loop | JavaScript Full Tutorial in English
4) For…in loop | JavaScript Full Tutorial in English
5) For…of loop | JavaScript Full Tutorial in English
Practice Scenarios
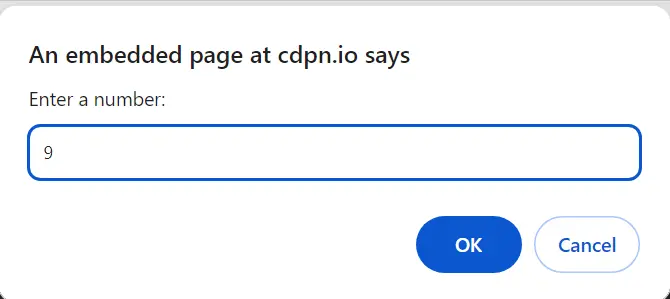
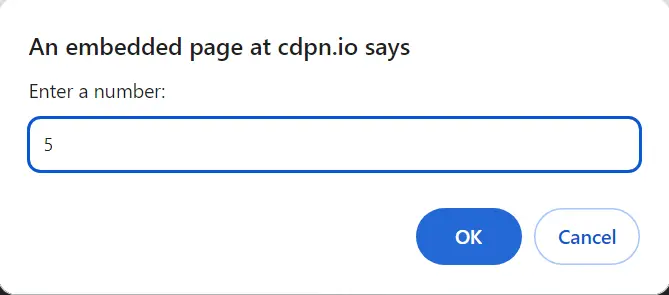
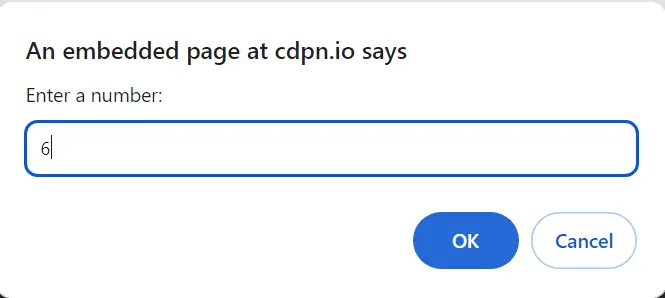
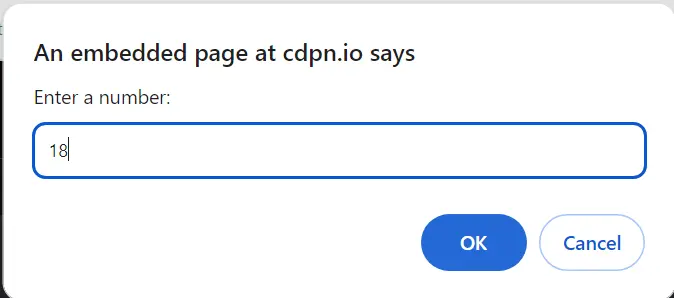
1. Write a program in which the user takes five numbers using a prompt by loop then stores and iterates over an array of numbers and prints out only the numbers that are divisible by 3.
The task is to create a simple program where the user inputs five numbers, and then the program stores and iterates over those numbers. It prints out only the numbers that are divisible by 3.
1. User Input: The program prompts the user to enter five numbers. This is done using a loop, likely a for loop, to iterate five times and ask the user for each number.
2. Store Numbers: The program stores the entered numbers in an array. An array is like a list that can hold multiple values.
3. Iterate Over Numbers: The program goes through each number in the array (using a loop) and checks if it’s divisible by 3.
4. Print Divisible Numbers: If a number is divisible by 3, it prints that number.
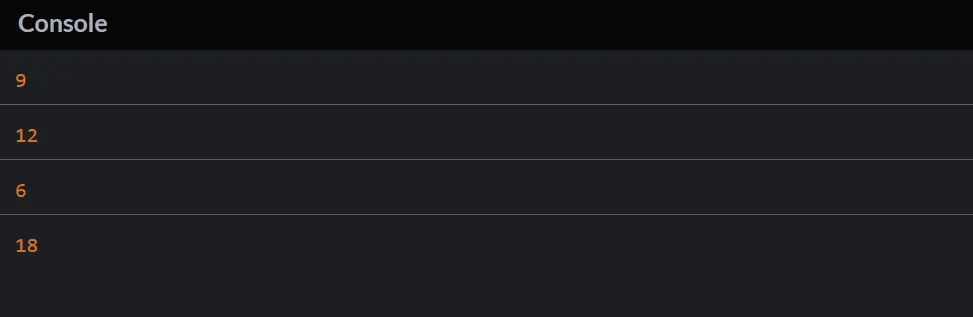
Example: If the user enters the numbers 9, 12, 5, 6, and 18.
– The program stores these numbers in an array: [9, 12, 5, 6, 18].
– It then checks each number in the array.
– It prints out only the numbers that are divisible by 3: 9, 12, 6, and 18.
Here's an example program:
// Prompt user for five numbers and store them in an array
var numbers = [];
for (var i = 0; i < 5; i++) {
var userInput = prompt(“Enter a number:”);
numbers.push(parseInt(userInput));
}
// Iterate over the array and print numbers divisible by 3
for (var i = 0; i < numbers.length; i++) {
if (numbers[i] % 3 === 0) {
console.log(numbers[i]);
}
}
Output

2. Create a form that takes an array of numbers to generate inputs and uses a while loop to compute(sum) the product of all the input value numbers in the array.
The task is to create a form that takes an array of numbers as input and uses a while loop to compute the product of all the input values.
1. Create Form: You need to create an HTML form that takes an array of numbers as input. Each input field in the form represents a number.
2. Use a While Loop: You’ll use a while loop to iterate through the form inputs and calculate the product of the entered numbers.
3. Compute Product: Inside the loop, you’ll multiply each input value to compute the product.
4. Display Result: Finally, you’ll display the result, which is the product of all the entered numbers.
Here's an example program:
<body>
<h2>Product Calculator</h2>
<form id=”numberForm”>
<label for=”numbers”>Enter Numbers (comma-separated):</label>
<input type=”text” id=”numbers” placeholder=”e.g., 2, 4, 6″>
<button type=”button” onclick=”calculateProduct()”>Calculate Product</button>
</form>
<p id=”result”></p>
<script>
function calculateProduct() {
var inputNumbers = document.getElementById(“numbers”).value.split(‘,’).map(Number);
var product = 1;
var i = 0;
while (i < inputNumbers.length) {
product *= inputNumbers[i];
i++;
}
document.getElementById(“result”).textContent = “Product: ” + product;
}
</script>
</body>
Output

3. Write a program that uses a for loop to iterate over an array of strings and prints out only the strings that contain the letter "e".
The task is to create a program that uses a for loop to iterate over an array of strings and prints out only the strings that contain the letter “e”.
1. Create an Array: Define an array of strings that you want to iterate over.
2. Use a For Loop: Use a for loop to go through each string in the array.
3. Check for the Letter “e”: Inside the loop, check if each string contains the letter “e”.
4. Print Strings with “e”: If a string contains “e”, print that string.
Example: [“apple”, “banana”, “orange”, “grape”, “kiwi”, “pear”]
Here's an example program:
// Example array of strings
var words = [“apple”, “banana”, “orange”, “grape”, “kiwi”, “pear”];
// Use a for loop to iterate over the array
for (var i = 0; i < words.length; i++) {
// Check if the string contains the letter “e”
if (words[i].includes(“e”)) {
// Print the string
console.log(words[i]);
}
}
Output

4. Create a JavaScript function called count Vowels that takes a string as input and returns the number of vowels (a, e, i, o, u) in the string:- IQRA TECHNOLOGY:- 5.
The task is to create a JavaScript function called countVowels that takes a string as input and returns the number of vowels (a, e, i, o, u) in the string.
1. Create a Function: Define a function named countVowels that takes a string as a parameter.
2. Initialize a Counter: Inside the function, initialize a counter variable to keep track of the number of vowels.
3. Iterate Over Characters: Use a loop to iterate over each character in the input string.
4. Check for Vowels: For each character, check if it is a vowel (a, e, i, o, u).
5. Increment Counter: If a character is a vowel, increment the counter.
6. Return Result: After the loop, return the final count of vowels.
Example: string:- IQRA TECHNOLOGY.
Here's an example program:
<body>
<script>
function countVowels(inputString) {
// Initialize counter
var vowelCount = 0;
// Convert the input string to lowercase to handle both uppercase and lowercase vowels
var lowercaseString = inputString.toLowerCase();
// Iterate over each character in the string
for (var i = 0; i < lowercaseString.length; i++) {
// Check if the character is a vowel
if (“aeiou”.includes(lowercaseString[i])) {
// Increment the counter
vowelCount++;
}
}
// Return the final count of vowels
Output

5. An Armstrong number is a special number. You take a number, do some math with its digits, and check if the result is the same as the original number. If it's the same, it's an Armstrong number!
An Armstrong number (also known as a narcissistic number, pluperfect digital invariant, or pluperfect number) is a special number where the sum of its digits each raised to the power of the number of digits is equal to the number itself.
1. Take a Number: Choose a number to check if it’s an Armstrong number.
2. Determine the Number of Digits: Count how many digits are there in the number. Let’s say there are n digits.
3. Raise Each Digit to the Power of n: For each digit in the number, raise it to the power of n.
4. Sum the Results: Add all the results obtained from step 3.
5. Check if the Result is Equal to the Original Number: If the sum from step 4 is equal to the original number, then it’s an Armstrong number.
Example with 153:
– Take the number 153.
– It has 3 digits.
– Raise each digit to the power of 3: \(1^3 + 5^3 + 3^3 = 1 + 125 + 27 = 153\).
– The sum is equal to the original number (153), so 153 is an Armstrong number.
Here's an example program:
function isArmstrongNumber(number) {
// Convert the number to a string to determine the number of digits
var numStr = number.toString();
var numDigits = numStr.length;
// Calculate the sum of each digit raised to the power of the number of digits
var sum = 0;
for (var i = 0; i < numDigits; i++) {
sum += Math.pow(parseInt(numStr[i]), numDigits);
}
// Check if the sum is equal to the original number
return sum === number;
}
// Example usage
var exampleNumber = 153;
if (isArmstrongNumber(exampleNumber)) {
console.log(exampleNumber + ” is an Armstrong number!”);
} else {
console.log(exampleNumber + ” is not an Armstrong number.”);
}
Output

6. Create a JavaScript program that generates a FizzBuzz variation for each number from 1 to 100. The rules are as follows:
– If a number is divisible by 3. print “Fizz.”
– If a number is divisible by 5, print “Buzz.”
– If a number is divisible by both 3 and 5, print “FizzBuzz.”
For other numbers, print the number itself.
Your program should display the results from 1 to 100.
– A for loop iterates from 1 to 100.
– The if-else conditions check whether the current number is divisible by 3, 5, both 3 and 5, or neither.
– Depending on the condition, it prints “Fizz,” “Buzz,” “FizzBuzz,” or the number itself.
Here's an example program:
<body>
<script>
for (var i = 1; i <= 100; i++) {
// Check if the number is divisible by both 3 and 5
if (i % 3 === 0 && i % 5 === 0) {
console.log(“FizzBuzz”);
}
// Check if the number is divisible by 3
else if (i % 3 === 0) {
console.log(“Fizz”);
}
// Check if the number is divisible by 5
else if (i % 5 === 0) {
console.log(“Buzz”);
}
// For other numbers, print the number itself
else {
console.log(i);
}
}
</script>
</body>
Output
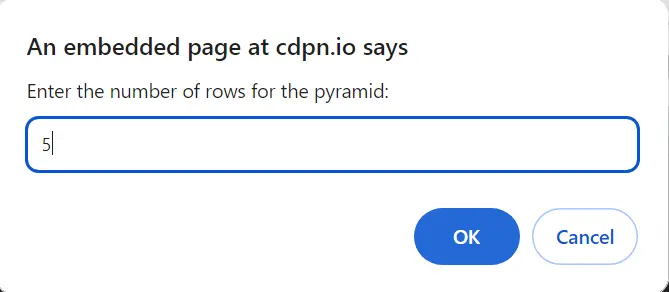
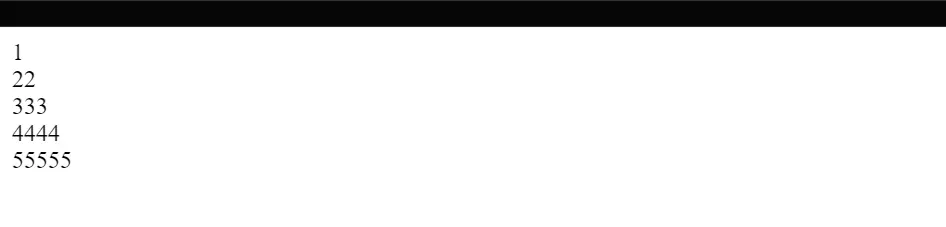
7. Write a JavaScript program that generates a number pyramid pattern based on user input. If the user enters the number 5, the program should produce the following pattern
1
22
333
4444
55555
This Task is to generate a number pyramid pattern based on user input, you can use nested loops.
1. Use Prompt for the user to enter the number of rows for the pyramid.
2. Take An outer loop (for) that iterates through each row from 1 to the specified number of rows.
3. Inside the outer loop, Take an inner loop (for) that prints the current row number repeatedly based on the row index.
4. After each row is printed, add a line break (<br>) to move to the next line.
Here's an example program:
<body>
<script>
// Get user input for the number of rows
var numberOfRows = parseInt(prompt(“Enter the number of rows for the pyramid:”));
// Outer loop for each row
for (var i = 1; i <= numberOfRows; i++) {
// Inner loop for each number in the row
for (var j = 1; j <= i; j++) {
// Print the current row number
document.write(i);
}
// Move to the next line after completing each row
document.write(“<br>”);
}
</script>
</body>
Output
Loops are control structures that allow you to execute a block of code repeatedly based on a condition. Learn more in our JavaScript loops free course video.
The types of loops include:
- for loop
- while loop
- do…while loop
- for…in loop
- for…of loop
Check out these types in the Learn JS loops with free video tutorial.
A for loop repeats a block of code a specific number of times.
Example:
for (let i = 0; i < 5; i++) {
console.log(i);
}
Find detailed explanations in the Free JavaScript loops tutorial for beginners.
- while loop: Executes the block as long as the condition is true.
- do…while loop: Executes the block at least once before checking the condition.
Explore this distinction in our JS loops explained with free course video.
The for…in loop iterates over the properties of an object or the indices of an array.
Example:
let obj = { a: 1, b: 2 };
for (let key in obj) {
console.log(key);
}
This is covered in the JavaScript loops with free tutorial.
The for…of loop iterates over iterable objects like arrays, strings, or maps.
Example:
let arr = [1, 2, 3];
for (let num of arr) {
console.log(num);
}
Watch this explained in the JavaScript loops free course video.
Yes, loops can be nested within each other to iterate over multidimensional structures.
Example:
for (let i = 0; i < 3; i++) {
for (let j = 0; j < 2; j++) {
console.log(i, j);
}
}
Learn more in the Learn JS loops with free video tutorial.
Use the break statement to exit a loop before it completes its normal iteration. This technique is explained in the Free JavaScript loops tutorial for beginners.
Use the continue statement to skip the rest of the code for the current iteration and proceed to the next.
Learn this in the JS loops explained with free course video.
Yes, JavaScript syntax is case-sensitive. Ensure proper capitalization when writing keywords like for, while, or do.
Find helpful tips in the JavaScript loops with free tutorial.
