C# Do-While Loop

while and do-while to Loops in C#:

while Loop:

In C#, a while loop is a control flow statement that repeatedly executes a block of code as long as a specified condition is true. It’s often used when you don’t know in advance how many times you need to execute the loop, but you want to keep executing as long as a condition remains true.
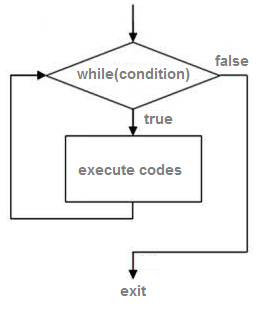
Structure of while loop

while (condition) // Checking condition
        {
            // Code to execute as long as the condition is true
        }

While Loop Statement

Scenario: Write a C# program that prints the numbers from 1 to 3, each on a new line, and then prints “Loop has ended.” on 4th.

using System;
class Program
{
    static void Main()
    {
        int count = 1;
        while (count <= 3)
        {
            Console.WriteLine(“Count: ” + count);
            count++;
        }

        Console.WriteLine(“Loop has ended.”);
    }
}
Output : Count: 1
   Count: 2
   Count: 3
   Loop has ended.

Code Explanation

using System;

This line is an import statement that allows you to use classes and methods from the System namespace. The System namespace contains fundamental types and base classes that are essential for all C# programs.

Public class Program

This defines a public class named Program. A class is a blueprint for creating objects, and public means that this class can be accessed from outside its containing assembly.

static void Main()

This is the entry point of your C# program. The Main method is where execution begins. It takes an array of strings (args) as its parameter, which allows you to pass command-line arguments to your program

int count = 1;

This line declares an integer variable named count and initializes it with the value 1

while (count <= 3)

This is a while loop that will execute the code inside the curly braces {} as long as the condition count <= 3 is true.

First Iteration:

The initial value of the count is 1. The loop checks if count (1) is less than or equal to 3. Since 1 is less than 3, the code inside the curly braces {} runs. The current value of count (1) is printed. The count is then increased by 1, so the count becomes 2.

Second Iteration:

The value of the count is now 2. The loop checks if count (2) is less than or equal to 3. Since 2 is less than 3, the code inside the curly braces {} runs. The current value of count (2) is printed. The count is then increased by 1, so the count becomes 3

Third Iteration:

The value of the count is now 3. The loop checks if count (3) is less than or equal to 3. Since 3 is equal to 3, the code inside the curly braces {} runs. The current value of count (3) is printed. The count is then increased by 1, so the count becomes 4.

Fourth Iteration:

The value of the count is now 4. The loop checks if count (4) is less than or equal to 3. Since 4 is not less than or equal to 3, the loop stops running.

Console.WriteLine(“Count: ” + count);

This line prints the current value of count to the console, along with the text “Count: “.

count++;

This line increments the value of the count by 1.

Console.WriteLine(“Loop has ended.”);

This line prints “Loop has ended.” to the console after the loop has finished executing.

Output : Count: 1
   Count: 2
   Count: 3
   Loop has ended.

You will see the above output in your console

Nested While Loop Statement

A nested while loop in C# is a control structure where one while loop is placed inside another while loop. This allows for complex iteration patterns where the inner loop completes all its iterations for each iteration of the outer loop. Nested while loops can be useful in various scenarios, such as processing multi-dimensional data structures or implementing certain algorithms that require multiple levels of iteration.

Structure of nested while loop

while (outer condition)
        {
            // Outer loop code
            while (inner condition)
            {
                // Inner loop code
            }
        }

Scenario: Write a C# program using a nested while loop to generate and print a multiplication table for the number 2. The table should display the multiplication results from 2 × 1 to 2 × 5. Each row of the table should represent the multiplication of 2 with a different number from 1 to 5.

using System;
public  class Program
    {
       static void Main(string[] args)
        {
           int i = 2;
            while (i <= 2)
            {
                int j = 1;
                while (j <= 5)
                {
                    int result = i * j;
                    Console.Write($”{result}\t”);
                    j++;
                }
                Console.WriteLine();
            i++;
            }
        }
    }
Output: 2   4   6   8   10 

Code Explanation

using System;

This line is an import statement that allows you to use classes and methods from the System namespace. The System namespace contains fundamental types and base classes that are essential for all C# programs.

public class Program

This defines a public class named Program. A class is a blueprint for creating objects, and public means that this class can be accessed from outside its containing assembly.

static void Main(string[] args)

This is the entry point of your C# program. The Main method is where execution begins. It takes an array of strings (args) as its parameter, which allows you to pass command-line arguments to your program

int i = 2;

This line declares an integer variable named i and initializes it with the value 2

while (i <= 2)

This is a while loop that will execute the code inside the curly braces {} as long as the condition count <= 2 is true.

1. The i variable value is 2 & while the loop will check i is smaller or equal to 2 i.e., the i is equal to 2 so under the curly braces {} code will execute and increase value by 1 because of i++ hence 2 + 1 = 3.

2. The i variable value is 3 & while the loop will check i is smaller or equal to 2 i.e., i is neither smaller nor equal to 2 so the loop will end.

int j = 1;

This line declares an integer variable named j and initializes it with the value 1

while (j <= 5)

This is a while loop that will execute the code inside the curly braces {} as long as the condition j <= 5 is true.

1. The value of j is 1. The loop checks if j (1) is less than or equal to 5. Since 1 is less than 5, the code inside the curly braces {} runs. The current value of j (1) is printed. The j is then increased by 1, so j becomes 2.

2. The value of j is now 2. The loop checks if j (2) is less than or equal to 5. Since 2 is less than 5, the code inside the curly braces {} runs. The current value of j (2) is printed. The j is then increased by 1, so j becomes 3.

3. The value of j is now 3. The loop checks if j (3) is less than or equal to 5. Since 3 is less than 5, the code inside the curly braces {} runs. The current value of j (3) is printed. The j is then increased by 1, so j becomes 4.

4. The value of j is now 4. The loop checks if j (4) is less than or equal to 5. Since 4 is less than 5, the code inside the curly braces {} runs. The current value of j (4) is printed. The j is then increased by 1, so j becomes 5.

5. The value of j is now 5. The loop checks if j (5) is less than or equal to 5. Since 5 is equal to 5, the code inside the curly braces {} runs. The current value of j (5) is printed. The j is then increased by 1, so j becomes 6.

6. The value of j is now 6. The loop checks if j (6) is less than or equal to 5. Since 6 is not less than or equal to 5, the loop stops running. This loop will print the values from 1 to 5 and then stop when j becomes 6.

int result = i * j;

Calculates the multiplication result of i and j and assigns it to the variable result.

Console.Write($”{result}\t”);

Prints the value of the result followed by a tab space (\t). This prints the multiplication result without moving to the next line.

j++;

Increments the value of j by 1 to move to the next number in the inner loop.

Console.WriteLine();

Move to the next line in the output after all numbers for the current value of i have been printed in the inner loop.

i++;

Increments the value of i by 1 to move to the next number in the outer loop. However, since i is already 2

Output: 2   4   6   8   10

You will see the above output in your console

Do While Loop

A do-while loop in C# is similar to a while loop, but with one key difference: it always executes its block of code at least once before checking the loop condition. After the first execution, it continues to execute as long as the specified condition remains true.
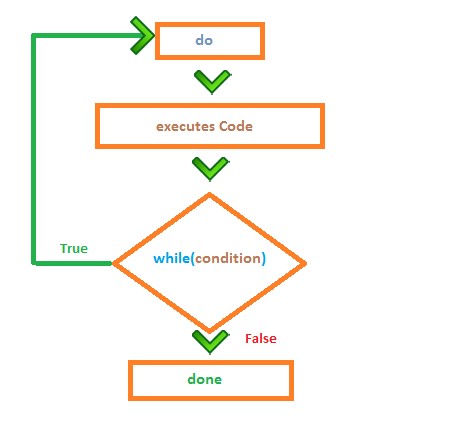
Structure of doing while loop

do          
// This keyword indicate the beginning of the do-while loop.
        {
            // Code to be executed
        } while (condition); // checking condition

Do while loop Statement

Scenario: Write a C# program using a do-while loop that prints the numbers from 1 to 3, along with the message “Count: “. After printing the numbers, the program should print “Loop has ended on 4th.

using System;
class Program
{
    static void Main()
    {
        int count = 1;
        do
        {
            Console.WriteLine(“Count: ” + count);
            count++;
        }
        while (count <= 3);       
Console.WriteLine(“Loop has ended.”);
    }
}
output : Count: 1
   Count: 2
   Count: 3
   Loop has ended.

Code Explanation

using System;

This line is an import statement that allows you to use classes and methods from the System namespace. The System namespace contains fundamental types and base classes that are essential for all C# programs.

Public class Program

This defines a public class named Program. A class is a blueprint for creating objects, and public means that this class can be accessed from outside its containing assembly.

int count = 1;

This line declares an integer variable named count and initializes it with the value 1.

do

This is a do-while loop. It first executes the code block inside the curly braces {} and then checks the loop condition. If the condition evaluates to true, the loop continues; otherwise, it exits..

Console.WriteLine(“Count: ” + count);

Prints the current value of count to the console, along with the text “Count: “.

count++;

Increments the value of count by 1.

while (count <= 3);

This is a do-while loop that will execute the code inside the curly braces {} as long as the condition count <= 3 is true.

1. The initial value of the count is 1. The code inside the do loop runs first, then the count is increased by 1 (count++), making the count equal to 2. The loop checks if count (2) is less than or equal to 3. Since it is, the loop continues.

2. The value of the count is now 2. The code inside the do loop runs again, then the count is increased by 1 (count++), making the count equal to 3. The loop checks if count (3) is less than or equal to 3. Since it is, the loop continues.

3. The value of the count is now 3. The code inside the do loop runs again, then the count is increased by 1 (count++), making the count equal to 4. The loop checks if count (4) is less than or equal to 3. Since it is not, the loop ends.

4. The value of the count is now 4. The loop condition count <= 3 is checked. Since 4 is not less than or equal to 3, the loop stops running. This loop will run three times, increasing the count from 1 to 4, and will stop when the count becomes 4.

Console.WriteLine(“Loop has ended.”);

Once the loop exits (when the count becomes greater than 5), this line prints “Loop has ended.” to the console

Course Video

Practices Tasks

1. In our group, there are 5 friends if any one friend is not there in the group we all will not go shopping.

For example: first take an array of string with 4 friends’ name and then use a while loop if the length of the array is less than 5 then show the below message and please use a break statement otherwise loop will never end 

Output

2. Imagine you are going with your 10 friends to the restaurant but in that restaurant, your favorite dish is not more than 4 plates, and you want 10 plates. Order another dish if your favorite dish is less than 10 plates using while loop

For example: first take an int variable name as a favorite with value 8, then check in the while loop if the favorite value is less than 10, then show the below message, and don’t forget to use break.

Output

3. Imagine we are playing ludo, and until 6 comes in dice, we can’t open our  game pieces 

For example: take a method of random and create a variable with the name dice value, run do while loop, check-in, and if dice value = 6, then show the below message

Output

If dice value is not equal to 6, then it should run like this until it does not come 6
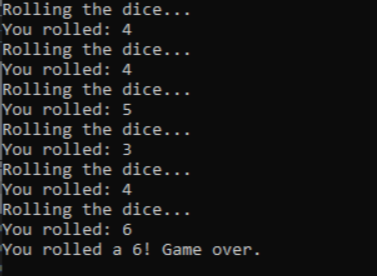
Output

4. Many times social media, we reset our passwords When we create new password, there is a confirmation password. If we do not add proper password as above, it will again tell us to add new password from start, so you must do this using  do while loop

Prompt for a new password after entering new password click enter to confirm password

Output

Prompt for a confirm password 

Output

After entering confirm password check both are similar or not 

If yes 

Output

If no then again ask for a new password and then confirm password

Output

5. Print Odd Numbers:
Use a while loop to print all odd numbers between 1 and 20.
Inside the loop, use an if-else statement to check if the number is odd before printing.

6. Guess the Number:
Use a do-while loop to implement a number guessing game.
Use an if-else statement to check if the guessed number is higher, lower, or equal to the target number.
Keep looping until the correct number is guessed.

7. Sum of Even Numbers:
Use a while loop to sum all even numbers between 1 and 50.
Inside the loop, use an if-else statement to check if the number is even before adding it to the sum.

8. Traffic Light Simulation:
Use a do-while loop to iterate through an array of traffic light colors (“Red”, “Yellow”, “Green”).
Inside the loop, use a switch statement to print the action for each color.
Use an if-else statement inside the switch case for “Yellow” to print different messages for day and night.

9. Temperature Conversion:
Use a while loop to iterate through an array of temperatures in Celsius.
Inside the loop, convert each temperature to Fahrenheit.
Use a switch statement to categorize the temperature (Cold, Warm, Hot) based on the Fahrenheit value.
Use an if-else statement inside each switch case to print an appropriate message.

10. Factorial Calculation:
Use a do-while loop to calculate the factorial of a number entered by the user.
Use an if-else statement to check if the number is positive before calculating the factorial.
Keep looping until a valid number is entered.

11. Student Grade Classification:
Use a while loop to iterate through an array of student grades.
Inside the loop, use a switch statement to classify the grades (‘A’, ‘B’, ‘C’, ‘D’, ‘F’).
Inside each switch case, use an if-else statement to print a motivational message for grades A and B.

12. Print Prime Numbers:
Use a while loop to print all prime numbers between 1 and 100.
Inside the loop, use an if-else statement to check if the number is prime before printing.

13. Weekday/Weekend Checker:
Use a do-while loop to iterate through an array of days of the week (“Monday”, “Tuesday”, etc.).
Inside the loop, use a switch statement to print “Weekday” for Monday to Friday and “Weekend” for Saturday and Sunday.
Repeat the loop until all days are processed.

14. Menu Options:
Use a while loop to display a menu of options to the user.
Use a switch statement to handle different menu selections.
Inside each switch case, use an if-else statement to perform specific actions based on user input.
Repeat the menu display until the user chooses to exit.