

Set-Up & organization Profile
1. Company Information Update
2. Users
3. Change Language
4. Multi- currencies Set-up
1. Company Information Update
What is the Settings Module in Odoo?
The Settings module is used to configure and control the whole Odoo system according to your business requirements.
From here, you can manage company details, users, permissions, apps, accounting, emails, security, and system preferences.
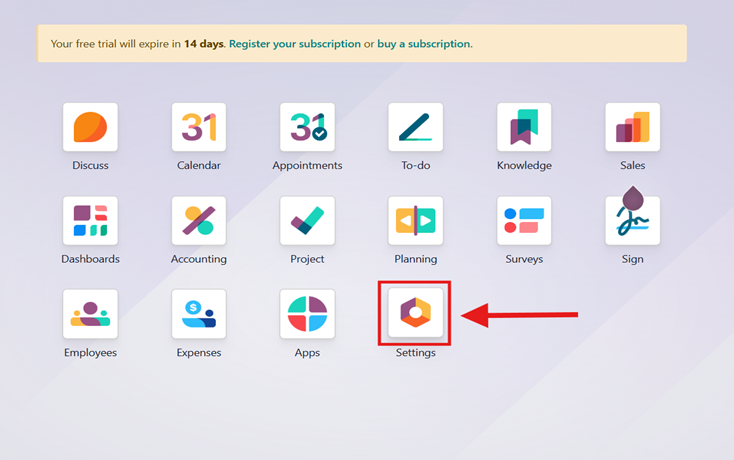
Step 1. After logging in to Odoo, you will see the dashboard with all installed apps.
Click on the Settings application.
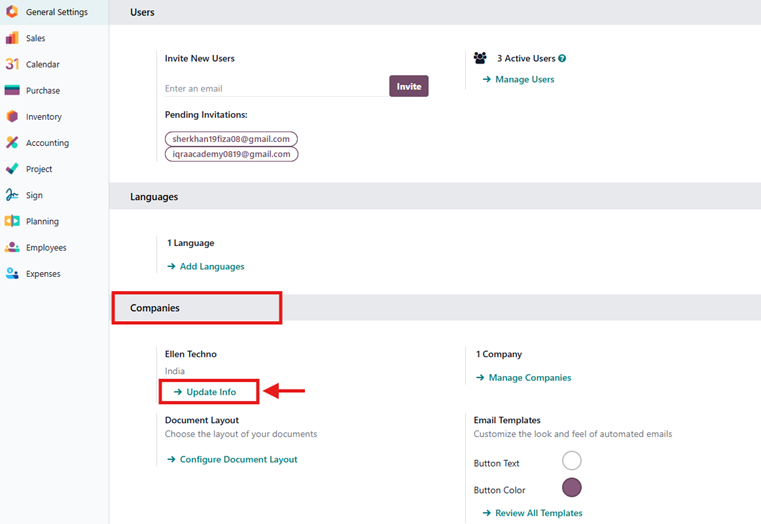
Step 2: After clicking on Settings, the General Settings page will open automatically. Here you can configure basic system settings for your organization.
In Company Settings, you can add and manage your business information.

Step 3: In the Setting section, you will see your Companies name here Click on Update Info for update Your Companies Details
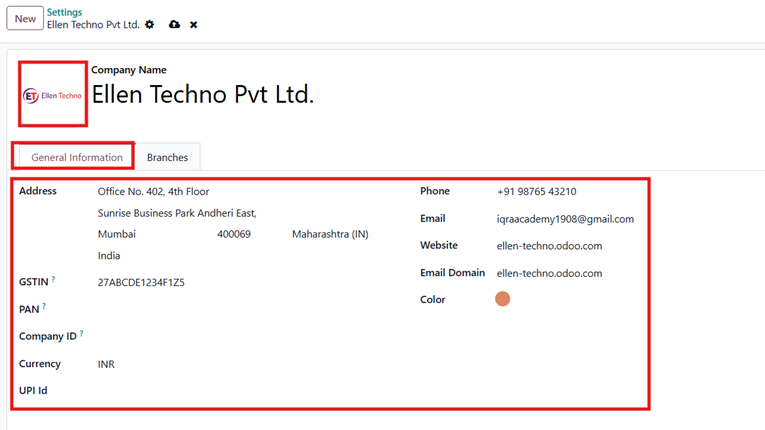
Step 4: In this step, you need to enter your company’s basic information to complete the setup. Carefully add your company name along with the full registered address so that all documents are generated correctly. Enter the official phone number and email address that will be used for business communication. Provide your GSTIN if your company is registered under GST, as this will be used for tax-related transactions and reports. Also, add your company’s website link, if available, to keep your business profile complete and professional.
Once all the details are filled in, review the information carefully and then save the changes to continue with the next step.
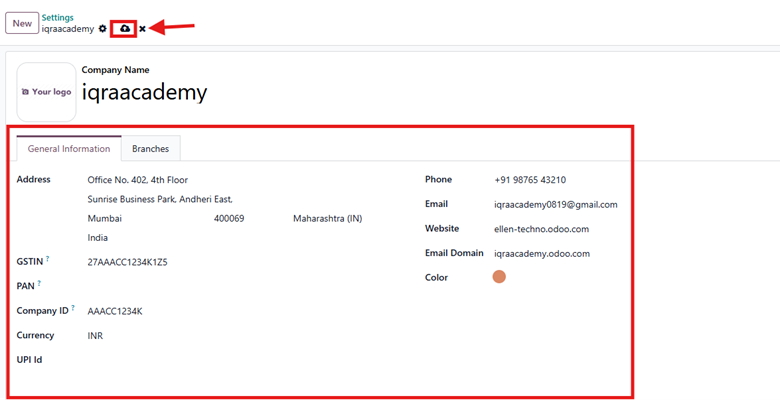
Step 5: click on the Save button (as shown in the image). All the changes you have made will be saved successfully.
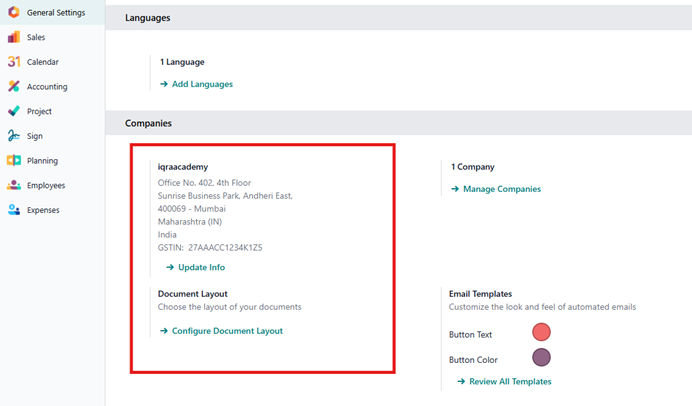
All your company details will be saved in the system, as shown in the image.
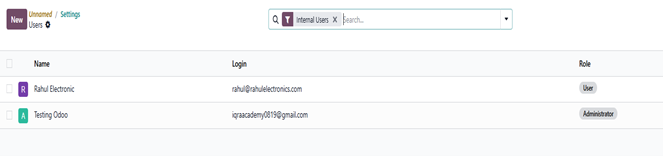
2. Users
Odoo ERP considers a user as a person who can access the database. An administrator can create as many users as the company needs. To control what information each user can see or use, the administrator can set access rules for every user. These users and their access rights can be added, updated, or changed anytime when required.
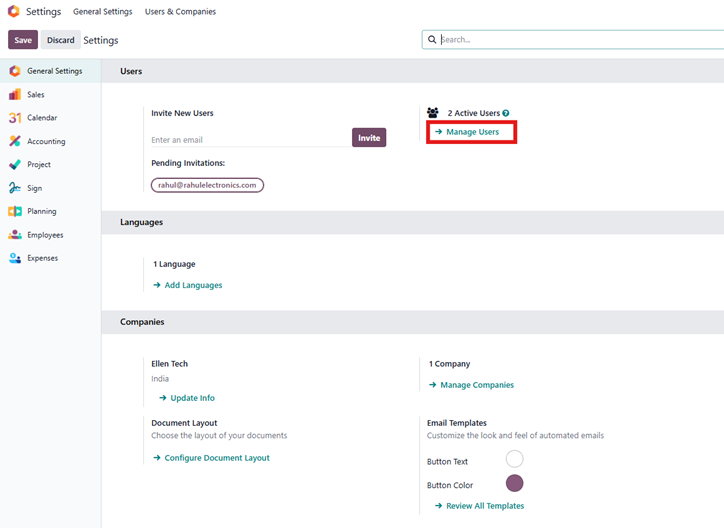
Step 1: To add a new user in the Odoo database, first go to the Settings app. In the Settings menu, click on Manage Users.
Step 2: The Users page will open, where you can see the list of existing users.
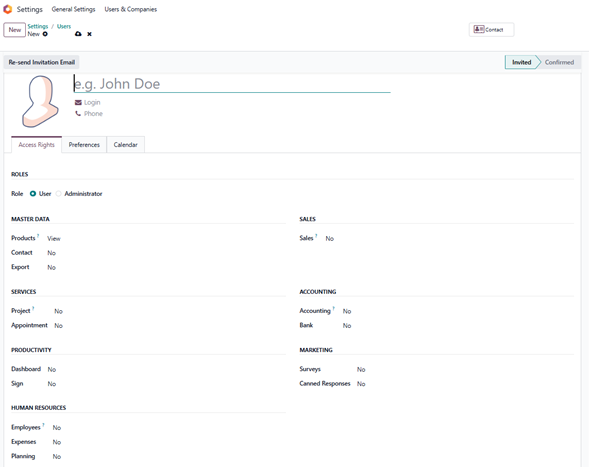
Now, click on the New button.

This page explains how an Invoice User is configured in Odoo and what access rights are given.
Odoo Invoice User Access Rights – Detailed Explanation.
This section shows the user’s basic information like name, email, and phone number.
It helps to identify who is using the Odoo system and allows communication through email or phone.
Step 3: Role Selection
In this step, the User role is selected.
User: Limited system access
Administrator: Full system control
Why:
The User role is chosen to give controlled access instead of full admin rights.
Step 4: Master Data Access
In this section, the user can manage basic records.
Products: Create
→ The user can create products for sales and invoicing.
Contacts: Creation
→ The user can add customers and vendors.
Export: No: The user cannot export data.
Why:
This allows daily operational work while keeping company data secure.
Step 5: Sales Access
Sales: Administrator
→ The user has full control over sales documents like quotations, sales orders, and invoices.
Why:
This access is given because the user is responsible for handling sales activities.
Step 6: Accounting Access
Accounting: Read-only
→ The user can view accounting data but cannot edit it.
Bank: No
→ The user cannot access bank transactions.
Why:
This ensures transparency without allowing financial changes.
Step 7: Services Access
Project: User
→ The user can work on assigned projects.
Appointment: No
→ Appointment scheduling is disabled.
Why:
Only project-related work is required for this user.
Step 8: Productivity Tools
Dashboard: Admin
→ The user can fully manage dashboards.
Sign: User – Own Templates
→ The user can use only their own signature templates.
Why:
This improves productivity while maintaining control.
Step 9: Marketing Access
Surveys: No
Canned Responses: Administrator
→ The user can manage predefined email responses but cannot access surveys.
Why:
This helps in customer communication without full marketing access.
Step 10: Human Resources Access
Employees: Officer – Manage all employees
Expenses: All Approver
Planning: User
Why:
This access is given to manage staff, approve expenses, and handle planning tasks.
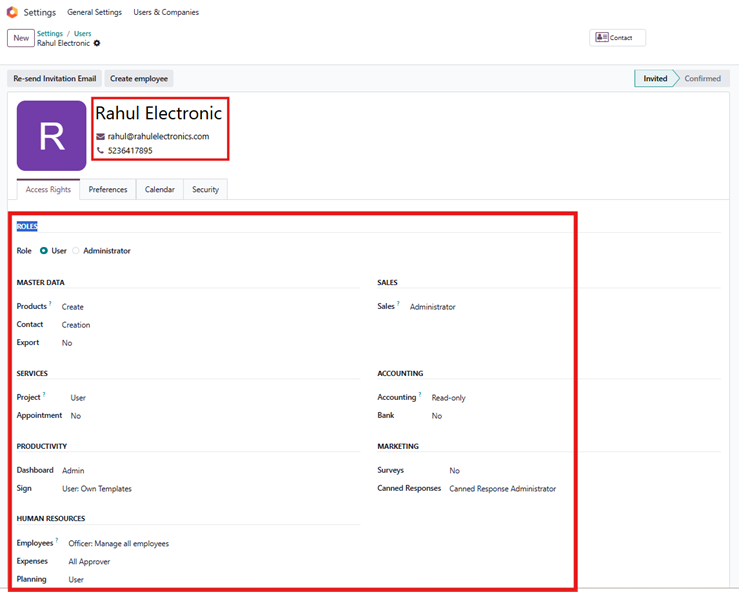
Note: For example, enter User Name: Rahul Electronic and Email: rahul@rahulelectronics.com & Phone Number: 5236417895
These details help identify the user and assign responsibilities in the system.
This setup is best for a senior sales or operations user who needs control over sales and team activities, but should not modify core accounting or bank data.
So, our user data has been saved and successfully created in the system
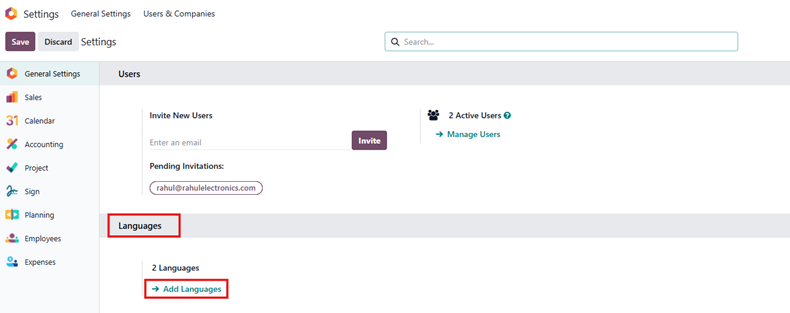
3. Change language
You choose the database language when you create it, and later you can add more languages so users can manage the database in different languages or translate the website.
See How to change Language:
Users can select their preferred language by clicking the profile icon in the top-right corner, opening My Profile, and choosing a language from the dropdown list.
Step 1: Open the Settings app and go to Manage Users under the Users section.
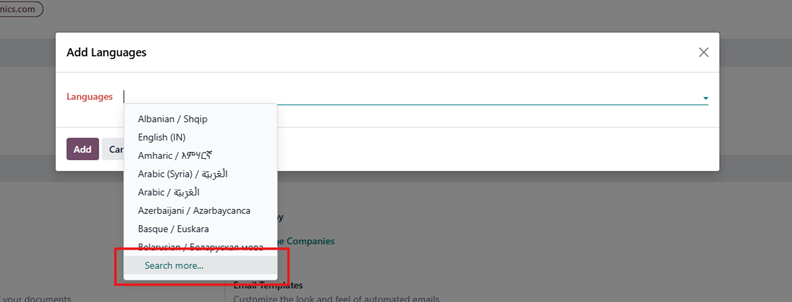
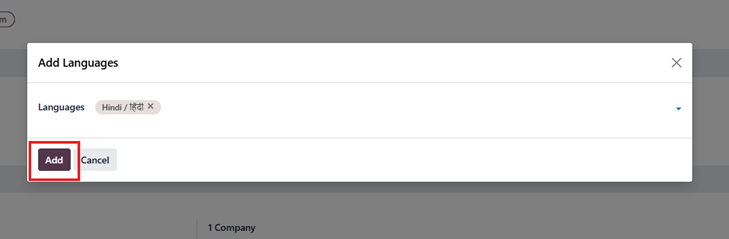
Step 2: Under Language, click the Add Language button. A dropdown list will appear, as shown in the image below. Click See More, select the language you want, and then click the Select button to add the new language.
For example, I selected Hindi for your understanding. You can choose any language according to your preference.
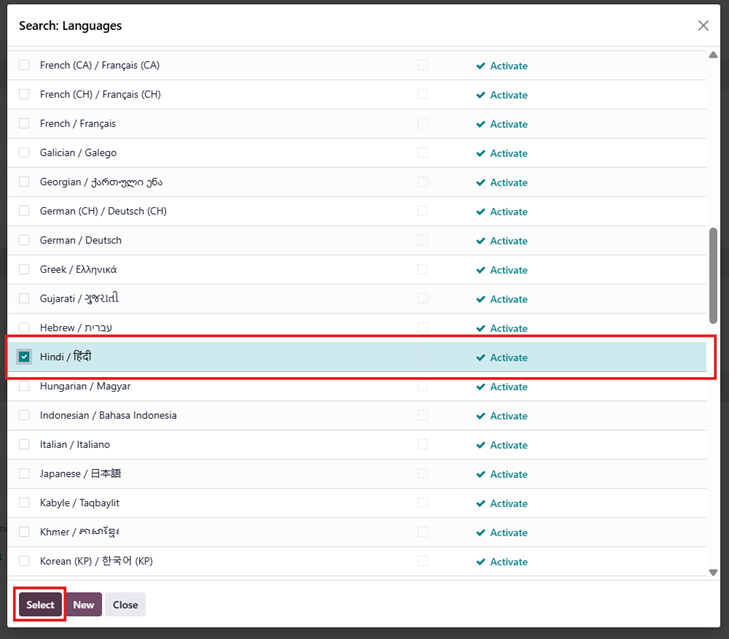
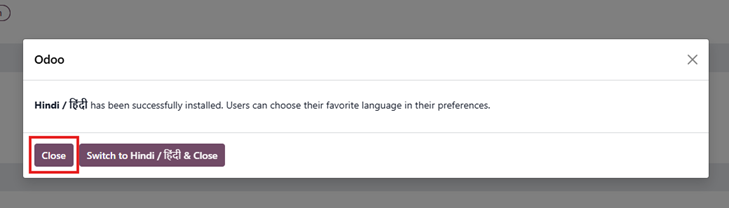
Step 3: After selecting the Hindi language, the Add Language option appears on the screen. Click Add, and another form will open. If you want to change your instance language, click Switch to Hindi and then Close. Otherwise, click Close only, because you do not want to change your instance language
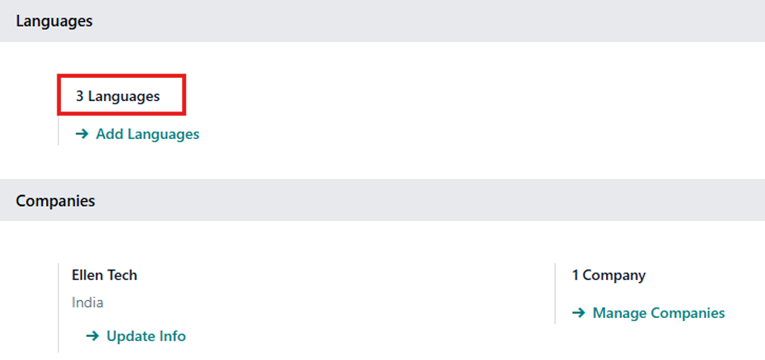
Now you can see that the Hindi language is installed in our instance.
4. Multi- currencies Set-up
Why do we set up currencies in Zoho Books?
We set up multiple currencies in Odoo ERP when we work with customers or vendors from different countries who pay or receive payments in other currencies. This helps us record invoices, bills, payments, and transactions accurately in different currencies. By setting up currencies, Odoo ERP automatically manages currency conversion, tracks exchange rates, and ensures that all financial reports such as Profit & Loss and Balance Sheet remain correct. Overall, multi-currency setup in Odoo ERP makes international business simple, accurate, and professional.
Why Currency Setup Is Required
Currency setup is required when:
You sell to foreign customers
You purchase from foreign vendors
You receive or make payments in another currency
You want accurate forex gain/loss calculation
Without currency setup:
You cannot create foreign currency invoices
Exchange difference will not be calculated correctly
Main Base Currency
The main currency is the default currency used by your company for all accounting records and financial reports such as Profit & Loss and Balance Sheet.
By default, Odoo sets the main currency based on the company’s country during setup.
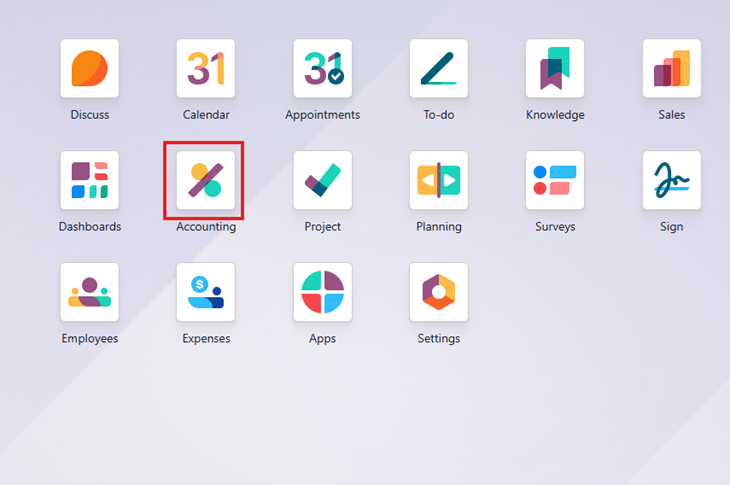
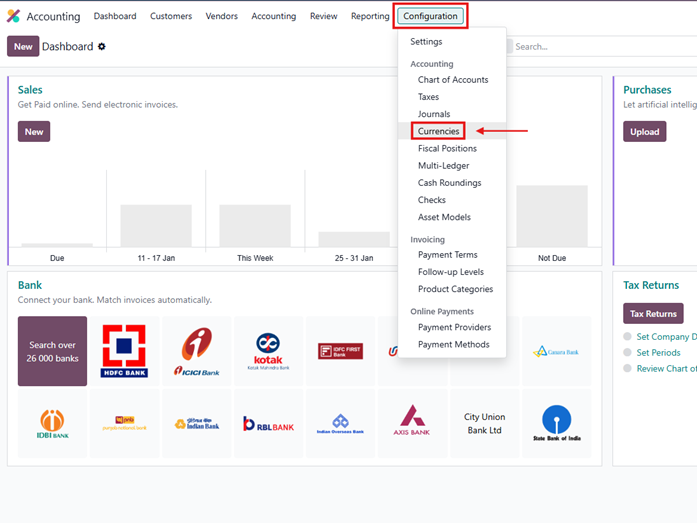
Step 1: Click on the Accounting app icon shown on the screen.
Step 2: After clicking the Accounting icon, the Accounting page will open. Click on Configuration, then from the list, click on Currencies.
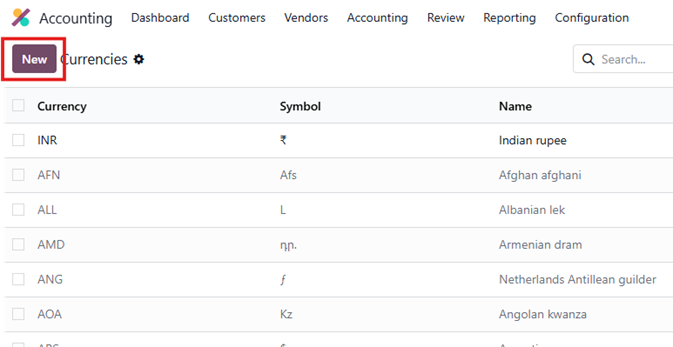
Step 3: Click on the + New button to add a new currency. A new window will open.
Step 4: Enter the currency details:
Currency Name (for example: USD – United States Dollar)
Currency Symbol (for example: $ for USD)
Fill in all required fields in the form.
Step 5: Activate the Currency
Turn Active = ON.
Only active currencies can be used in transactions.
Step 6: Currency Unit and Subunit
Currency Unit → Dollar
Currency Subunit → Cent
These fields are informational and do not affect calculations.
Step 7: Set Symbol Position
Choose After Amount.
Example: 100 $
(You can also select Before Amount if required.)
Step 8: Add Exchange Rate (Rates Section)
In the Rates section, click Add a line, select the date, and enter the exchange rate.
Example:
Date: 01-02-2026
INR per Unit: 83
(Meaning: 1 USD = 83 INR)
The system will automatically calculate Unit per INR.
Step 9: Save and Add Future Rates
Save the rate.
Whenever the exchange rate changes, add a new line with a new date and rate.
Do not delete old rates.
Step 10: Use Currency in Transactions
Now you can create:
Customer invoices in USD
Vendor bills in USD
Payments in USD

As you can see, the USD currency is now available on the screen.
The system converts amounts into INR automatically and records forex gain or loss.
Currency setup allows accurate foreign currency accounting by applying correct exchange rates based on transaction dates.
Important:
Once transactions are created, changing the main currency can affect accounting data, so it should be done carefully, preferably at the beginning.