

How to Install Docker on Linux
Installing Docker on Linux is a bit of a different process, and depending on the distribution you’re on, it may vary even more. But to be honest, the installation is just as easy (if not easier) as the other two platforms.
The Docker Desktop package on Windows or Mac is a collection of tools like Docker Engine, Docker Compose, Docker Dashboard, Kubernetes and a few other goodies.
On Linux however, you don’t get such a bundle. Instead you install all the necessary tools you need manually. Installation procedures for different distributions are as follows:
For other distributions, installation per distro guides are available on the official docs.
• If you’re on a distribution that is not listed in the docs, you may follow the Install Docker Engine from binaries instead.
• Regardless of the procedure you follow, you’ll have to go through some Post-installation steps for Linux which are very important.
• Once you’re done with the docker installation, you’ll have to install another tool named Docker Compose. You may follow the Install Docker Compose guide from the official docs.
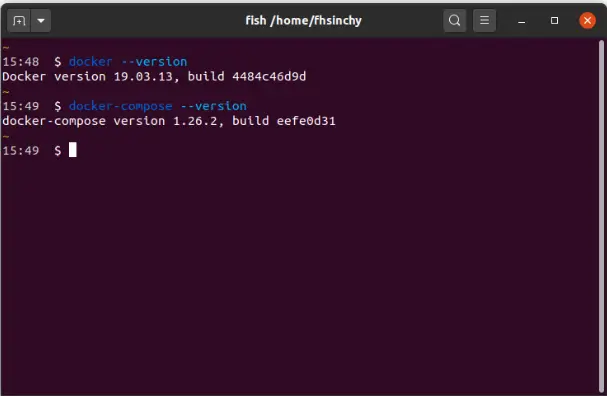
Once the installation is done, open up the terminal and execute docker –version and docker-compose –version to ensure the success of the installation.
Although Docker performs quite well regardless of the platform you’re on, I prefer Linux over the others. Throughout the book, I’ll be switching between my Ubuntu 20.10 and Fedora 33 workstations.
Another thing that I would like to clarify right from the get go, is that I won’t be using any GUI tool for working with Docker throughout the entire book.
I’m I’m aware of the nice GUI tools available for different platforms, but learning the common docker commands is one of the primary goals of this book.
Basic Command of Linux Which Are Useful in Docker
ls Command:
The ls command is commonly used to identify the files and directories in the working directory. This command is one of the many often-used Linux commands that you should know.
ls [OPTIONS] [FILES]
command allows you to create fresh directories in the terminal itself. The default syntax is mkdir <directory name> and the new directory will be created.
For example, if you want to create a directory as “Iqra Tech” then the basic syntax would be,
mkdir Iqra-Tech
mv command:
The mv command is generally used for renaming the files in Linux.
ls
mv first.text renamed.text
ls
Here we used the ls command to check the directories and then used mv <file name> <Renamed file name> to rename the files, and then again we used the ls command to view the renamed file as you can see in the output screenshot.
rm command:
rm command in Linux is generally used to delete the files created in the directory.
ls
rm renamed.text
ls
You can see as we wrote the ls command to view the files in the terminal and then rm <file name> to delete the files and again we had the ls command to check the update.
uname command:
The uname command is used to check the complete OS information of the system. Check out the command and the output below.
Uname/
Cd command:
The cd command is used to navigate between directories. It requires either the full path or the directory name, depending on your current working directory. If you run this command without any options, it will take you to your home folder. Keep in mind that it can only be executed by users with sudo privileges.
pwd
cd iqra-tech
pwd
Here we used pwd to view the current directory for reference and then we used cd iqra-tech to switch the directory and with again pwd command we can see the output is the switched directory, i.e – iqra-tech.
locate command:
The locate command is generally used to locate the files in the database. Use an asterisk (*) to search for content that contains two or more words. As an example: locate first*file. This command will search the database for the files that contain these two names first and file.
rm first.text
locate first.text
