Receivables Dashboard
In this section, you’ll learn how to transform raw financial data into an interactive Power BI dashboard.
The Receivables Dashboard is a powerful tool designed to help businesses monitor outstanding invoices(unpaid bills), payments, and overdue amounts. It provides insights into customer payment behaviour, highlights overdue balances, and categorizes receivables based on aging. By tracking key metrics such as total receivables, overdue amounts, and payments received, this dashboard enables data-driven decisions for better cash flow management.
This dashboard simplifies understanding who owes money, how much is owed, and when payments are due—all in one place. Try it yourself first! Build the dashboard on your own, and if you face challenges, refer to the video for step-by-step guidance.
Connect Power BI to your data source, download this Excel Receivable Dataset.
1. Understand Tables of your data set, we have five tables in data set:
1. Invoice Header
• What it does: This table has basic information about the invoice (bill) a customer receives.
• Columns to know:
o Invoice ID: A unique number for each invoice.
o Customer ID: The customer who owes money for this invoice.
o Invoice Date: The date the invoice was created.
o Due Date: The date when the payment is due(last date for payment).
o Total Amount: The full amount of money the customer has to pay.
o Amount Due: How much money is still unpaid.
o Pending Invoice: Whether the invoice is paid, unpaid, or partially paid.
• Usage: Tracks individual invoices, their due dates, and the total amount billed.
2. Invoice Lines
• What it does: This table gives the details of each item or service sold to the customer in the invoice. In the Invoice Lines table, the Invoice ID can repeat because a single invoice (which is identified by the Invoice ID) can have multiple line items (services, products, or charges).
• For example, if a customer purchases multiple items or takes several services in one invoice, each item or service will be listed as a separate line with the same Invoice ID. So, one Invoice ID can appear multiple times in the Invoice Lines table, each time for a different product or service.
• Columns to know:
o Invoice Line ID: A unique number for each item or service on the invoice.
o Invoice ID: Connects this line to the main invoice.
o Item ID: The name or ID of the product sold.
o Quantity: How many products or services were sold.
o Unit Price: The price of one product or service.
o Line Amount: The total for this item (Quantity * Unit Price).
3. Customer
• What it does: This table has information about the customer who bought the products or services.
• Columns to know:
o Customer ID: A unique number for each customer.
o Customer Name: The name of the customer.
• Usage: Used to identify who owes money or purchased the service or product.
4. Receipt
• What it does: This table tracks the payments customers make to pay off their invoices.
• Columns to know:
o Receipt ID: A unique number for each payment.
o Invoice ID: Links this payment to a specific invoice.
o Customer ID: The customer who made the payment.
o Receipt Date: The date when the payment was made.
o Amount Paid: How much money the customer paid.
o Remaining Amount: How much money is still left to be paid on the invoice after the payment.
o Payment Status: Whether the payment is complete or still pending.
• Usage: Helps monitor which payments are due or overdue and categorizes them based on aging.
5. Applied Receipt
• What it does: This table shows which payments were applied to which invoices, so you know which invoice has been paid.
• Columns to know:
o Applied Receipt ID: A unique number for each record of payment applied to an invoice.
o Receipt ID: The receipt (payment) that is being applied to the invoice.
o Invoice ID: The invoice that the payment is for.
o Amount Applied: The part of the payment that is applied to this invoice.
o Application Date: The date when the payment was applied to the invoice.
2. Build relationships between different tables to show data connections.
1) Invoice Header to Invoice Lines:
Join Type: One-to-Many
Key: Invoice ID
Description: The Invoice ID connects the Invoice Header and Invoice Lines. Each invoice can have multiple line items, so it’s a one-to-many
relationship from Invoice Header to Invoice Lines.
2) Invoice Header to Customer:
Join Type: Many-to-Many
Key: Customer ID
Description: The Customer ID in the Invoice Header links to the Customer table, identifying which customer the invoice belongs to.
3) Applied Receipt to Receipt:
Join Type: Many-to-Many
Key: Receipt ID
Description: The Receipt ID in the Receipt table connects it to the Applied Receipt table on Applied Receipt ID, indicating how the payment is applied to
different invoices.
4) Applied Receipt to Invoice Header:
Join Type: One-to-Many
Key: Invoice ID
Description: The Applied Invoice ID in the Applied Receipt table links to the Invoice Header on Invoice ID, showing which invoices have been partially or
fully paid using the receipts.

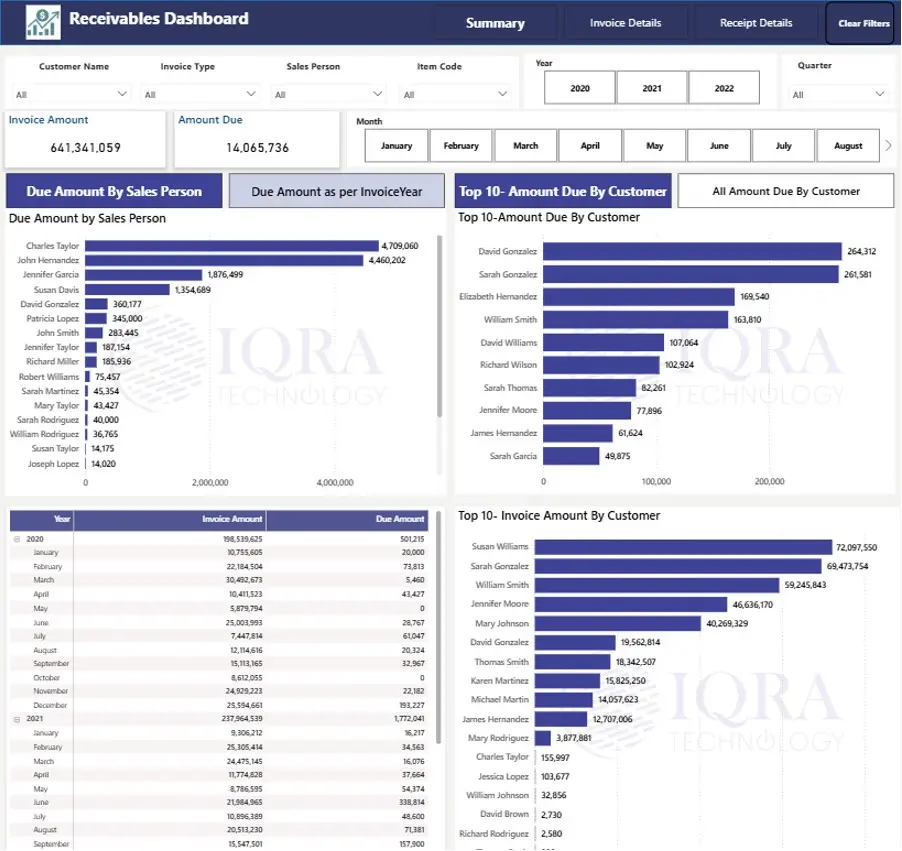
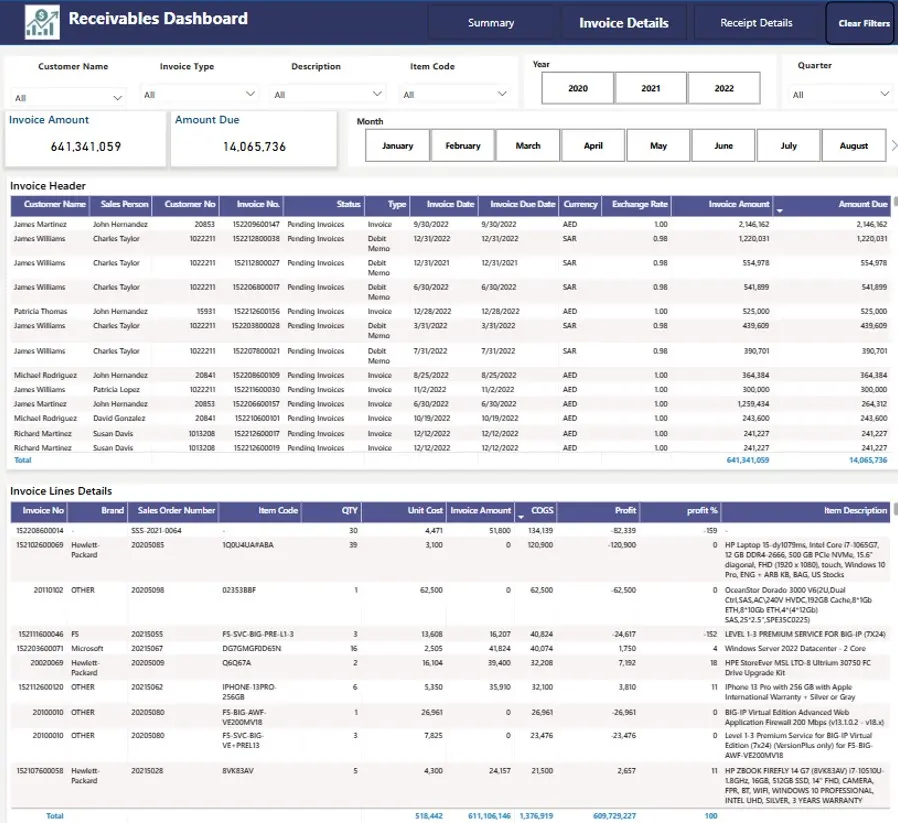
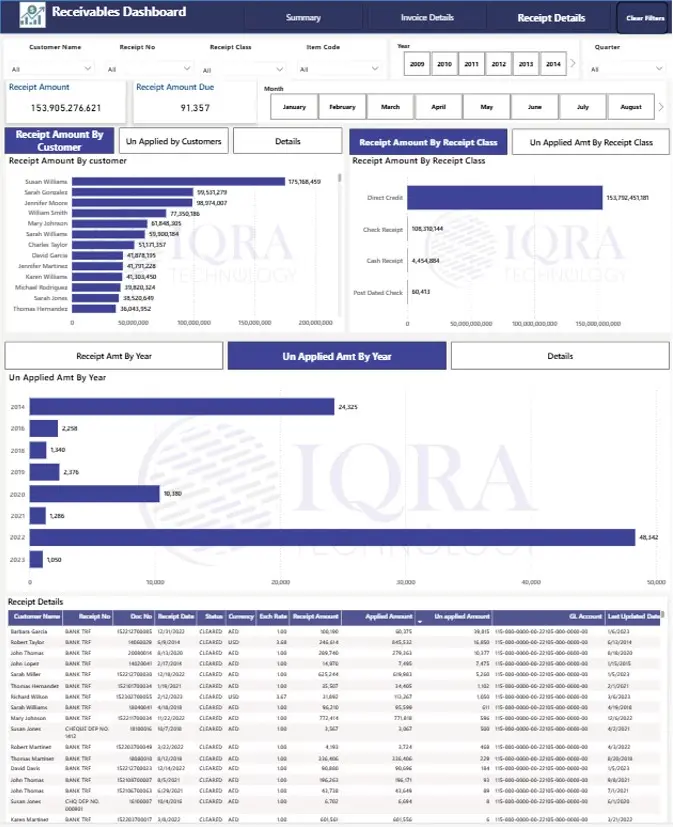
3. Create visualizations to display important information in charts, tables, and maps.
Your dashboard should match below layout.
Receivables Dashboard