

Power BI Security
Power BI is a powerful business analytics tool, and like any system handling data, ensuring security is essential. This module covers all key aspects of Power BI Security to help students understand how to protect data, control access, and apply best practices.
What is Power BI Security?
Power BI Security refers to the set of tools and practices used to control access to data, reports, and dashboards within the Power BI environment. It ensures that sensitive information is only accessible to authorized individuals and that each user only sees the data relevant to them.
For example, if you’re creating a report on student performance, you may want teachers to have access to all student data, while individual students should only be able to view their own results.
Security Types in Power BI:
1-Workspace-Level Security
2-Sharing & Access Permissions
3-Row-Level Security (RLS)
1. Workspace-Level Security
Workspaces are collaborative environments within Power BI where multiple users can manage reports and datasets. Security is role-based. Admin can share specific workspaces to specific users and assign them one of the below roles:
| Role | Permissions |
|---|---|
| Admin | Full access: manage, edit, delete content, and assign roles |
| Member | Can edit content but cannot manage roles and cannot delete workspace |
| Contributor | Can add and modify publish content but not delete it. |
| Viewer | Read-only access to reports and dashboards |
1. Create a User by Using Admin User
Before granting access to a Power BI workspace, we need to create the user who will be given access. This can be done by the Admin, who manages Power BI settings.
Steps:
1. Log in to the Microsoft Admin
Center (admin.microsoft.com).
2. Click Users > Active Users.
3. Click Add a user.
4. Enter the new user’s details(like name and email).
5. Choose a Power BI license (Pro or Free).
6. Click Save to create the user.
Steps to Configure Workspace Security:
1. Go to Power BI Service (https://app.powerbi.com)
2. Click on Workspaces → Select your workspace
3. Click on the three dots (…) → Workspace access

4. Click Add people or group and assign them roles:
• Type email
• Select role: Admin, Member, Contributor, Viewer
5. Click Add.

2. Sharing and Access Permissions
Controls how reports are shared and what recipients can do with them.
Steps to Share Reports Securely:
1. In Power BI Service, open the report
2. Click on Share
3. Enter user or group email addresses
4. Click on three dots, manage permissions.

5. Click on plus sign next to Direct Access and set below permissions:
• ✅ Allow recipient to share report
• ✅ Allow recipient to build content with the dataset (optional)

6. Click Send
Tip: Turn OFF the reshare and download options for sensitive reports.
3.Row-Level Security
Row-Level Security (RLS) is a feature in Power BI that restricts data access for users at the row level, based on filters defined in the data model. It ensures that users can only see the data that is relevant or assigned to them, even if everyone is using the same report or dashboard.
Why Use RLS?
• Prevents unauthorized access to sensitive data
• Enables secure sharing of reports with multiple users
• Ensures data visibility is based on roles or attributes like department, region, employee ID, etc.
Example: Departments in an Organization
Scenario:
You are building a Power BI report for a company that has multiple departments — HR, Finance, and Sales. Each department manager should only see data related to their own department.
Steps to Implement RLS
Step 1: Define Roles
1. Go to the Modelling tab. Click Manage Roles.

2. Click Create and name the role (e.g., “HR Manager”).
3. Select the table where the Department column exists.
4. Add a filter:
• For HR Manager: Department = “HR”
• For Finance Manager: Department = “Finance”
• For Sales Manager: Department = “Sales”
Repeat this for each department role.

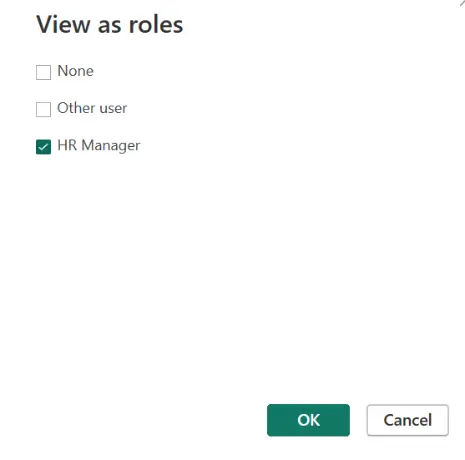
Step 2: Test Roles
1. Click View As Role (also in the Modelling tab).
2. Select a role (e.g., Sales Manager) and verify that only Sales data is visible.
Step 3: Publish to Power BI Service
1. Click Publish and select the target workspace.
Step 4: Assign Users to Roles (in Power BI Service)
1. Go to Semantic Model in the workspace.
2. Click More Options (⋯) next to the dataset → Select Security.

3. You will see the roles you created (HR Manager, Finance Manager, etc.).
4. Click on Add to add user email addresses under each role.
e.g., Add HR manager’s email to the HR Manager role.

| Role Name | Filter Applied | Assigned Users |
|---|---|---|
| HR Manager | Department = “HR” | hrmanager@example.com |
| Finance Manager | Department = “Finance” | financemanager@example.com |
| Sales Manager | Department = “Sales” | salesmanager@example.com |
Now, when the HR manager login service with their login email and accesses the report, they will only see HR data.
5. Right click on role names (ex. HR) and click Test as role to verify that only HR data is visible.
Course Video
A collection of reports and dashboards bundled for easy sharing and collaboration.
Create an App in a Workspace, add content, specify the audience, and publish it.
- Centralized access to multiple reports.
- Managed permissions and updates.
- Easy sharing with a link.
Assign roles (Admin, Member, Viewer) and control access during publishing.
It restricts data visibility based on user roles, defined in Power BI Desktop and assigned in the Service.
