

Handling API Requests in Django Rest Framework (DRF)

Updated books/views.py (add this extra view at the bottom)
from rest_framework.views import APIView
from rest_framework.response import Response
from rest_framework import status
from .models import Book
from .serializers import BookSerializer
class CustomBookCreateView(APIView):
def get (self, request, *args, **kwargs):
books = Book.objects.all()
serializer = BookSerializer(books, many=True)
return Response(serializer.data)
def post(self, request):
# Extracting data manually from request
title = request.data.get(‘title’)
author = request.data.get(‘author’)
price = request.data.get(‘price’)
published_date = request.data.get(‘published_date’)
# Simple validation
if not title or not author:
return Response({‘error’: ‘Title and author are required.’}, status=status.HTTP_400_BAD_REQUEST)
# Create book manually
book = Book.objects.create(
title=title,
author=author,
price=price,
published_date=published_date
)
# Serialize and return the created book
serializer = BookSerializer(book)
return Response(serializer.data, status=status.HTTP_201_CREATED)
books/urls.py (Add a path to call this custom view)
from .views import CustomBookCreateView
urlpatterns += [
path(‘books/custom-create/’, CustomBookCreateView.as_view()),
]
Explanation:
from rest_framework.views import APIView
→ APIView is a base class provided by DRF that allows you to define views like a typical class but with REST functionality (GET, POST, PUT, etc.).
from rest_framework.response import Response
→ Response is used to return structured API responses in JSON format.
from rest_framework import status
→ DRF provides HTTP status codes like 200 OK, 201 CREATED, 400 BAD REQUEST using status.
from .models import Book
→ Importing the Book model to work with the database.
from .serializers import BookSerializer
→ Importing the BookSerializer so we can convert model data into JSON format.
Custom View Class:
class CustomBookCreateView(APIView):
→ This class is a custom view to handle POST requests. It extends from APIView.
def get(self, request, *args, **kwargs):
→ This method handles GET requests to retrieve all books from the database.
→ request: Represents the HTTP request made by the client.
→ *args, **kwargs: These are used to handle any additional arguments (e.g., filtering options).
Fetching All Books:
books = Book.objects.all()
→ This fetches all records from the Book model (i.e., retrieves all books stored in the database).
Serializing the Data:
serializer = BookSerializer(books, many=True)
→ BookSerializer(books, many=True) converts the books queryset into JSON format.
→ many=True is required because we are serializing multiple objects (a list of books).
Returning the Response:
return Response(serializer.data)
→ This sends back the serialized book data as a JSON response.
→ The client (frontend or API consumer) will receive a structured list of books in JSON format.
def post(self, request):
→ This method will be executed when a POST request hits this view URL.
Extracting Data from Request:
title = request.data.get(‘title’)
author = request.data.get(‘author’)
price = request.data.get(‘price’)
published_date = request.data.get(‘published_date’)
→ We’re manually accessing each field from the incoming request data (which is usually in JSON format).
Manual Validation:
if not title or not author:
return Response({‘error’: ‘Title and author are required.’}, status=status.HTTP_400_BAD_REQUEST)
→ Basic validation: If either title or author is missing, return an error message with 400 Bad Request.
Creating the Book Record:
book = Book.objects.create(
title=title,
author=author,
price=price,
published_date=published_date
)
→ This line creates a new record in the database using the extracted data.
Serializing the Record and Returning Response:
serializer = BookSerializer(book)
→ After creating the book, we serialize it so that it can be returned as JSON.
Return Response(serializer.data, status=status.HTTP_201_CREATED)
→ We return the serialized data with status 201 Created indicating success.
Overview:
- GET Method: Fetches all books from the database and returns them in JSON format.
- POST Method: Accepts new book data, validates it, stores it in the database, and returns the created book.
urls.py Explanation:
from .views import CustomBookCreateView
→ Importing the new view.
urlpatterns += [
path(‘books/custom-create/’, CustomBookCreateView.as_view()),
]
→ Adding a new route /books/custom-create/ that will call our CustomBookCreateView class.
Summary:
In this section, you’ve learned how to:
- Create a POST API manually.
- Extract data from requests.
- Validate the input.
- Store it in the database.
- Return the response using serializers.
What Does This Code Do?
After implementing this code:
1. Creates a New API Endpoint
- The new URL /api/books/custom-create/ is added.
- This allows users to send a POST request to create a book.
- The new URL /api/books/custom-create/ is added.
2. Handles Incoming Data Manually
- It extracts data (title, author, price, published date) from the request.
- If title or author is missing, it returns an error response (400 Bad Request).
- It extracts data (title, author, price, published date) from the request.
3. Saves Data to the Database
- If data is valid, it creates a new book in the database using
- Book.objects.create().
4. Serializes and Returns the Data
- The created book is converted to JSON using BookSerializer.
- It sends the JSON response with status 201 (Created) to confirm success.
- The created book is converted to JSON using BookSerializer.
How Does It Work? (Step-by-Step Execution)
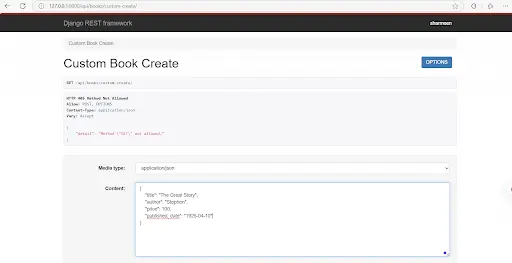
1. A user sends a POST request with book details.Like below:
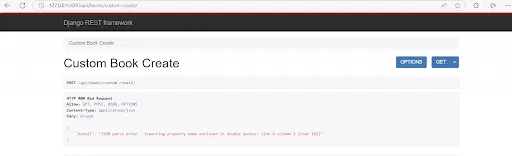
2. DRF extracts and validates the data.In case If you missed any of the field you will get an error as:
3. If valid, it creates a new book entry in the database.Like below:
4. The created book is serialized into JSON format.Like below:
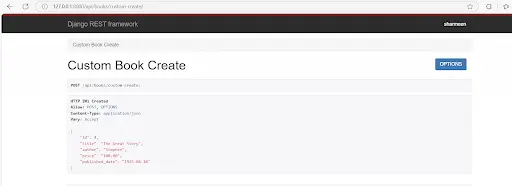
5. The API responds with the new book’s data and status 201 Created.
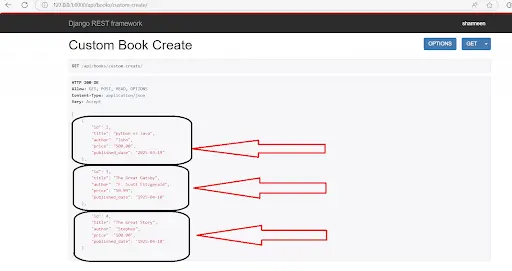
Also you can see the list of books in the JSON Format at the same endpoint below:
127.0.0.1.8000/api/books/custom-create/
Now, any client (like Postman, frontend apps, or other services) can use this API to add new books to the system.
Exercise:
- Create an API that accepts POST requests to register a new student.
- Try sending different data via Postman and observe how the API responds.
