

What is admin.py in Django?
admin.py is a special file in every Django app that lets you control how your models (database tables) appear in the Django Admin Panel — a built-in dashboard to manage your data (Add, Edit, Delete records).
By registering your model, you're telling Django:
“Hey! Show this model in the admin dashboard.”
Folder Structure:
bookstore/
├── bookstore/ → Project settings folder (urls.py, settings.py)
├── books/ → App folder
│ ├── admin.py → Register models here
│ ├── models.py → Define Book model
│ └── …
├── manage.py
Steps to Register and View Model in Admin Panel:
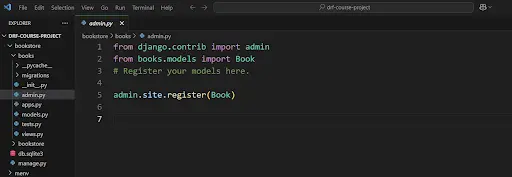
1. Open your admin.py file (inside your app folder, like books/admin.py)
2. Write this code:
from django.contrib import admin
from books.models import Book # Import your model from models.py
# Register your model here
admin.site.register(Book)
Explanation:
from django.contrib import admin
// This imports Django’s admin module.
It allows you to manage your app’s data (like adding, editing, or deleting records) through a user-friendly admin interface.
from books.models import Book
// This imports the Book model from your books app.
You need to tell Django which model you want to manage through the admin panel.
admin.site.register(Book)
// This registers the Book model with the admin site.
Once registered, the Book model will appear in the Django admin dashboard. You can now manage book records (add, update, delete) through the browser without writing extra code.
After doing this, just go to http://localhost:8000/admin, log in with a superuser account, and you’ll see the Book model listed there.
How to See the Admin Panel?
1. Run your server:
python manage.py runserver
Note: Make sure to run this command in the directory where your manage.py file is located.
2. Open your browser and go to:
http://127.0.0.1:8000/admin/
3. You’ll see a login page as:
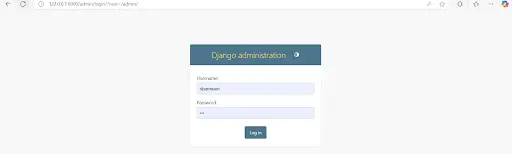
Login here using the username and password we created at the time of the setup. But if you haven’t created an admin user yet, then first create a superuser as we created during the setup.
After logged in successfully you will see your model as:
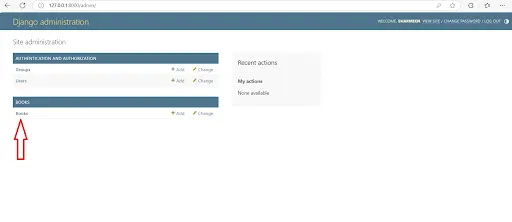
Now your Books model has been added successfully.
Exercise:
- Register the Student model in the admin panel.
- Try adding 2-3 students through the admin interface.
- Check how they appear in the Django admin list view.
