

Token Authentication (Login)
1. Create URL for Login
# books/urls.py
from django.urls import path
from rest_framework.authtoken.views import obtain_auth_token
urlpatterns = [
path(‘login/’, obtain_auth_token, name=’login’), # URL for login
]
Explanation:
→from django.urls import path
Imports the path function from django.urls, which is used to define URL patterns in Django.
It is essential for mapping URLs to specific view functions in your application.
→from rest_framework.authtoken.views import obtain_auth_token
Imports the obtain_auth_token view from Django REST Framework’s built-in authentication system.
obtain_auth_token is a pre-built view provided by DRF for generating authentication tokens.
When a user sends valid credentials (username & password), this view returns a token if the user is authenticated.
→urlpatterns = [
Defines a list called urlpatterns that contains all URL patterns for this app.
This is where you define the different URLs that will be accessible in your application.
→path(‘login/’, obtain_auth_token, name=’login’), # URL for login
Defines a URL pattern for login.
→ ‘login/’ – The URL path part. When you access http://127.0.0.1:8000/api/login/, this pattern is triggered.
→ obtain_auth_token – The view that handles the authentication process.
→ name=’login’ – A unique name given to this URL pattern for easy reference elsewhere in the application.
2. Apply Migrations
Create the required tables for storing authentication tokens.
python manage.py migrate
3. Testing with Postman
Now you can test the login endpoint using Postman.
Request Type: POST
URL:
http://127.0.0.1:8000/login/
Request Body (JSON):
{
“username”: “testuser”,
“password”: “testpassword”
}
Response (If successful):
{
“token”: “73adfe23434b3cd8fbc58b8dd78e8e2b….
}
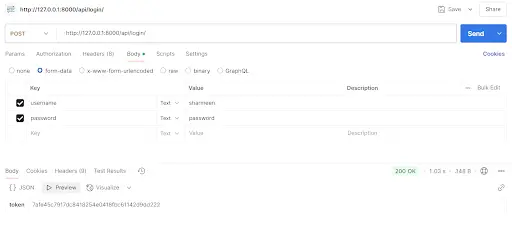
Here you will notice the token is the same every time for the same user until you delete it.
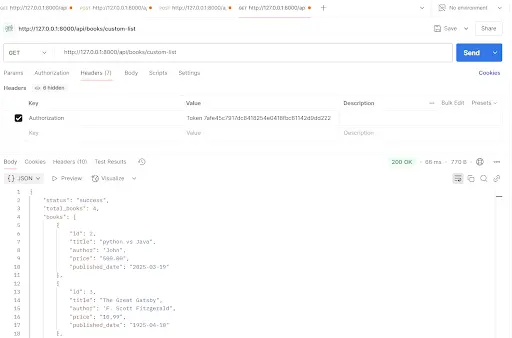
4. How to Use the Token
Once you have obtained the token, you can make authenticated requests by including the token in the header.=
Headers:
Authorization: Token 73adfe23434b3cd8fbc58b…..
Example Request (Authenticated)
5. Important Points to Note
1. The obtain_auth_token view only supports POST requests.
2. Tokens are stored in the database and can be manually created or deleted.
3. Only authenticated users with valid tokens can access protected endpoints.
Exercise:
- Use the /login/ endpoint to generate a token.
- Pass the token in Postman headers (Authorization: Token <your_token>) and test authenticated APIs.
