


Airline Management System
Project Overview
Objective:
Core Modules & Their Roles:
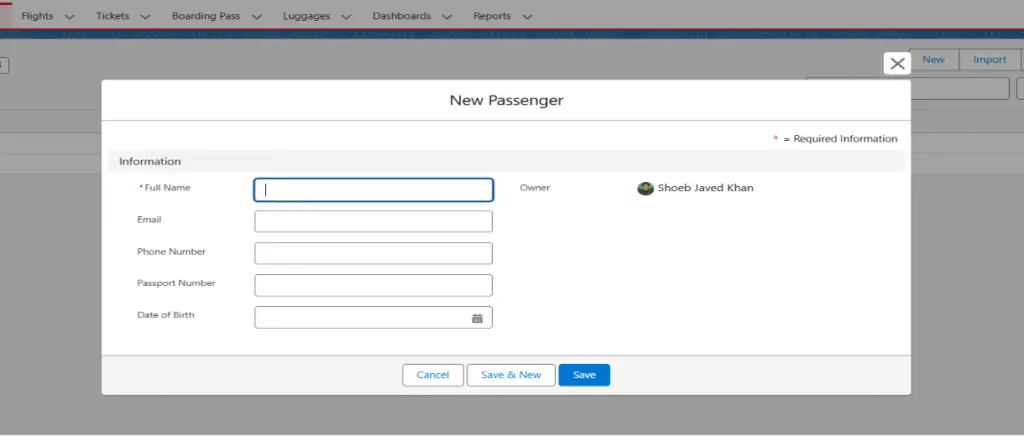
1. Passengers:
- Purpose: Store personal and travel-related information about passengers.
- Key Fields: Full Name, Email, Phone Number, Passport Number, Date of Birth.
- Functionality: Passengers can be searched and linked to tickets, flights, and luggage.
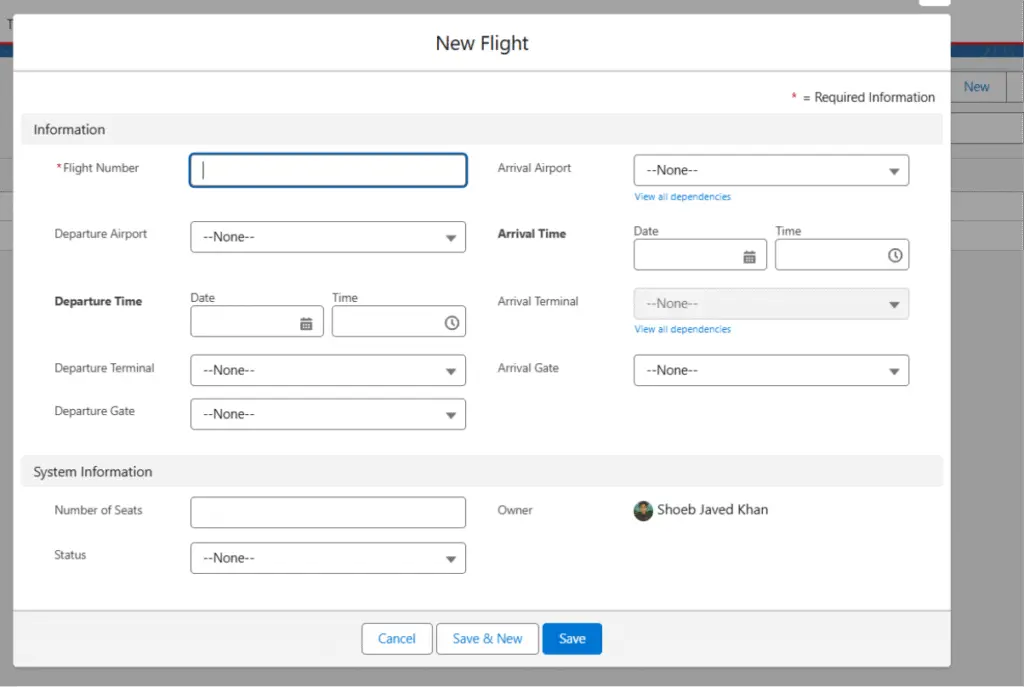
2. Flights:
- Purpose: Manage and track scheduled flights.
- Key Fields: Flight Number, Departure & Arrival Airports, Terminals, Gates, Times, Number of Seats, Status.
- Functionality: Helps airlines manage flight schedules and available seats for booking.
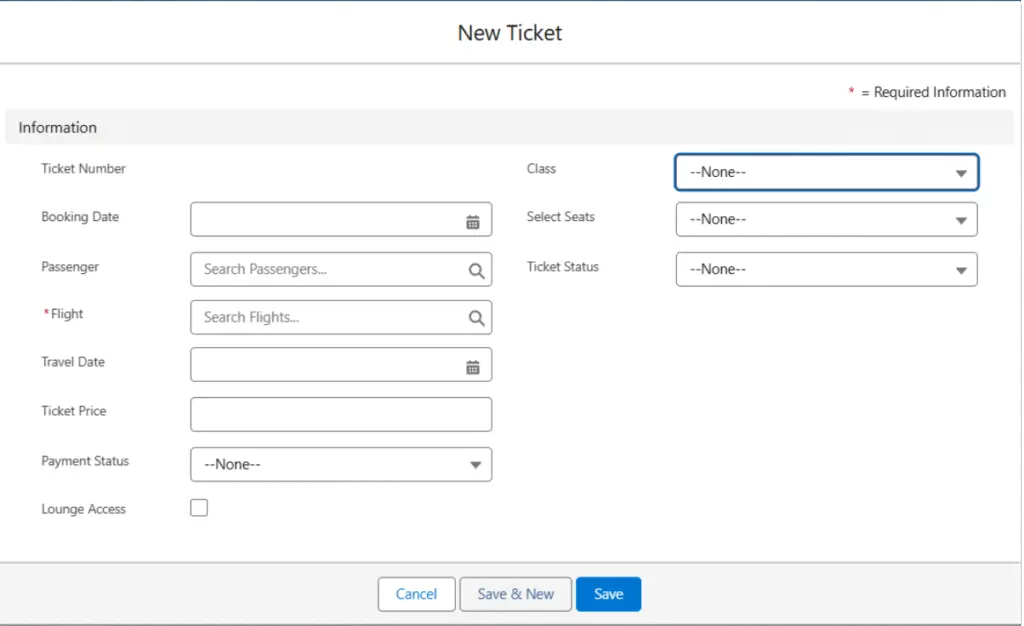
3. Tickets:
- Purpose: Handle bookings for each passenger.
- Key Fields: Ticket Number, Booking Date, Passenger, Flight, Travel Date, Class, Seat Selection, Price, Status.
- Functionality: Allows booking for flights, assigns seats, tracks payment and ticket status.
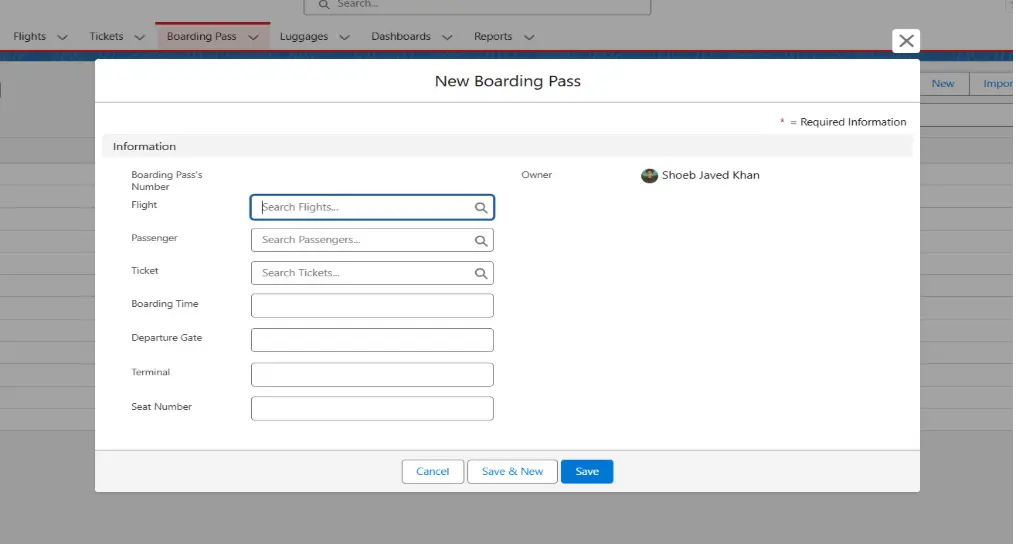
4. Boarding Pass:
- Purpose: Generate boarding passes for checked-in passengers.
- Key Fields: Linked Flight, Passenger, Ticket, Boarding Time, Gate, Terminal, Seat Number.
- Functionality: Automates boarding pass generation, can be enhanced with QR codes for scanning.
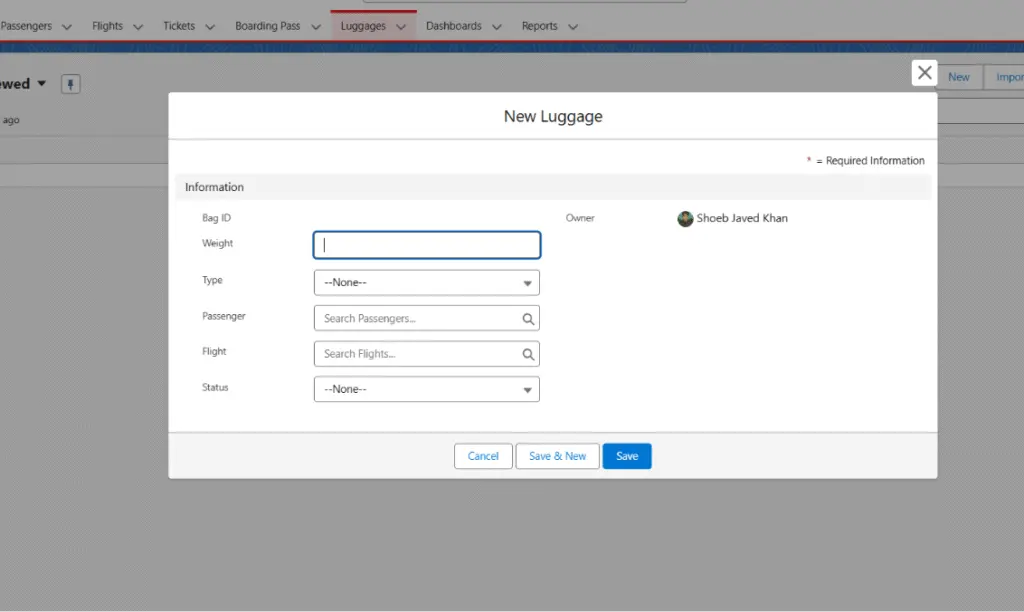
5. Luggage:
- Purpose: Manage passenger baggage details.
- Key Fields: Bag ID, Weight, Type, Linked Passenger, Linked Flight, Status.
- Functionality: Tracks checked baggage status and links it to respective passengers and flights.
Dashboards and Reports (Optional Add-on):
• Booking Trends: Show total tickets booked per day/week/month.
• Flight Occupancy: Display number of seats booked vs available.
• Passenger Overview: Track total registered passengers and most frequent flyers.
• Luggage Summary: Display total luggage loaded per flight.
• Revenue Dashboard: Track ticket prices and payments made.
Workflow Example:
1.Passenger Registration → Create a new passenger record.
2.Flight Scheduling → Admin sets up flights with seat availability.
3.Ticket Booking → Ticket is created linking passenger and flight.
4.Boarding Pass Issuance → Boarding pass is generated before travel.
5.Luggage Handling → Bags linked to passenger and flight are tagged and tracked.
Benefits:
• Centralized system for airline staff.
• Reduces manual errors and increases automation.
• Better passenger service with seamless booking to boarding process.
• Real-time tracking of luggage and ticket status.
• Insightful analytics through dashboards and reports.
• Here is a detailed explanation of each object in your Airline Management System project along with their fields:
Custom Objects:
• Passenger – Stores passenger details such as name, contact, passport, and date of birth.
• Flight – Manages flight schedules, including departure, arrival, and seat availability.
• Ticket – Handles ticket booking details like passenger, flight, seat, class, and payment.
• Boarding Pass – Contains boarding information linked to flight, ticket, and seat number.
• Luggage – Tracks baggage weight, type, and status assigned to passengers and flights.
Passenger Object
Purpose: To store and manage passenger information.
| Field Name | Type | Description |
|---|---|---|
| Full Name* | Text (Required) | Passenger’s full name. |
| Passenger’s email ID for communication. | ||
| Phone Number | Phone | Contact number of the passenger. |
| Passport Number | Text | Unique identification number for international travel. |
| Date of Birth | Date | Used for age verification and eligibility. |
Flight Object
Purpose: To manage flight details, schedules, and seat availability.
| Field Name | Type | Description |
|---|---|---|
| Flight Number* | Text (Required) | Unique identifier for the flight. |
| Departure Airport | Picklist/Lookup | The airport from which the flight departs. |
| Arrival Airport | Picklist/Lookup | The airport where the flight lands. |
| Departure Date & Time | DateTime | The scheduled time for takeoff. |
| Arrival Date & Time | DateTime | The expected landing time. |
| Departure Terminal | Next | Terminal number at the departure airport |
| Arrival Terminal | Text | Terminal number at the arrival airport. |
| Departure Gate | Text | Gate number for boarding. |
| Arrival Gate | Text | Gate number after landing. |
| Number of Seats | Number | Total seat capacity on the flight. |
| Status | Picklist | Options like Scheduled, Delayed, Cancelled, Completed. |
Ticket Object
Purpose: To manage passenger bookings.
| Field Name | Type | Description |
|---|---|---|
| Ticket Number | Auto Number/Text | Unique identifier for the ticket. |
| Booking Date | Date | Date when the ticket was booked. |
| Flight* | Lookup (Flight) | The flight the passenger is booking. |
| Passenger | Lookup (Passenger) | The person who is traveling. |
| Travel Date | Date | The date of the flight. |
| Ticket Price | Currency | Total cost of the ticket. |
| Class | Picklist | Economy, Business, First Class, etc. |
| Select Seats | Picklist/Text | Seat number or preference. |
| Ticket Status | Picklist | Booked, Cancelled, Rescheduled, Checked-In. |
| Payment Status | Picklist | Paid, Unpaid, Refunded, Partial. |
| Lunge Excess | Checkbox | True or False |
Boarding Pass Object
Purpose: To issue boarding passes after booking and check-in.
| Field Name | Type | Description |
|---|---|---|
| Boarding Pass Number | Auto Number/Text | Unique number for boarding pass. |
| Flight | Lookup (Flight) | The flight the boarding pass is issued for. |
| Passenger | Lookup (Passenger) | Linked passenger. |
| Ticket | Lookup (Ticket) | Linked ticket details. |
| Boarding Time | DateTime | Time when boarding starts. |
| Departure Gate | Text | Boarding gate number. |
| Terminal | Text | Terminal number for boarding. |
| Seat Number | Text | Final assigned seat number. |
Luggage Object
Purpose: To track checked-in baggage for each flight.
| Filed Name | Type | Description |
|---|---|---|
| Bag ID | Auto Number/Text | Unique identification of each bag. |
| Weight | Number | Weight of the bag (in kg/lbs). |
| Type | Picklist | Carry-on, Checked-in, Oversized, etc. |
| Passenger | Lookup (Passenger) | The owner of the luggage. |
| Flight | Lookup (Flight) | The flight on which the bag is carried. |
| Status | Picklist | Checked-In, Lost, Delivered, On Hold, Damaged. |
• Report and Dashboard
How to Create a Report in Salesforce
1.Go to Reports tab
2.Click on “New Report”
3.Choose the report type (e.g., Visit, Patient, Hospital Invoice)
4.Click Continue
5.Use filters and add columns
6.Click Run
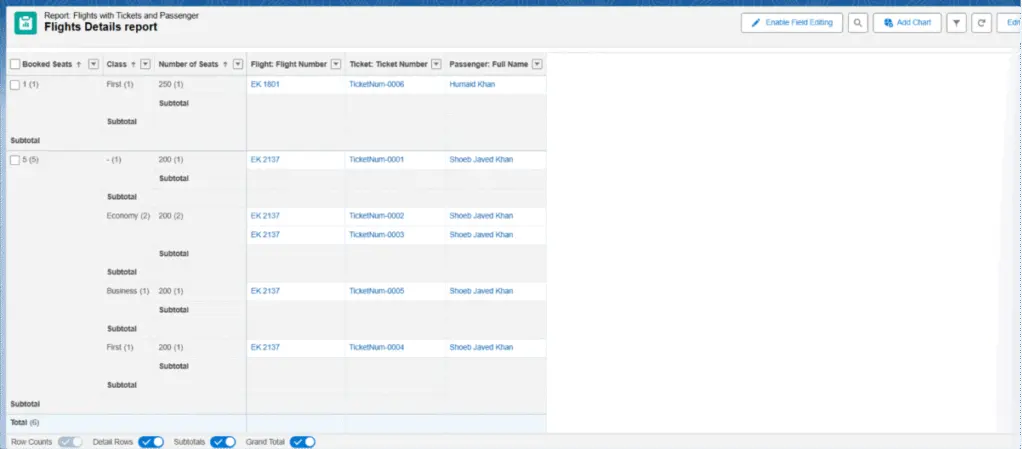
Click Save & Name the report
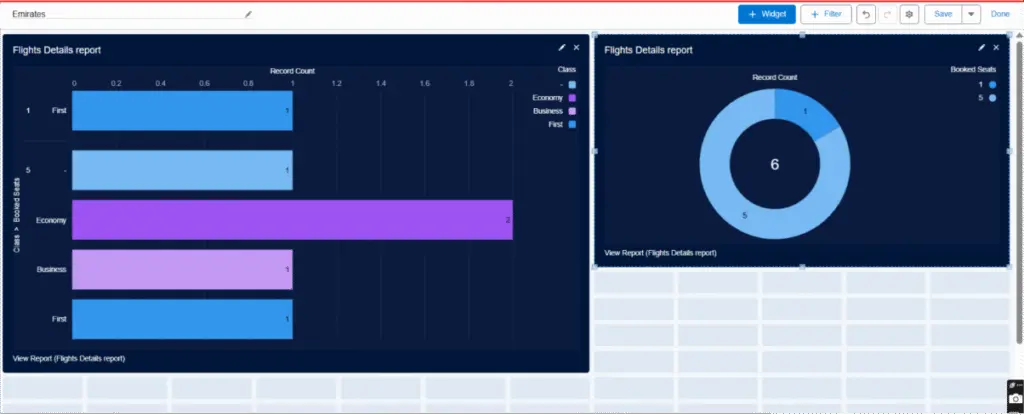
How to Create a Dashboard in Salesforce
1.Go to Dashboards tab
2.Click on “Create New Dashboard”
3.Add a name and folder, then click Create
4.Click +Component
5.Select a report
6.Choose a chart type (bar, pie, metric, etc.)
7.Add multiple components as needed
8.Click Save and then Done
Conclusion – Emirates Project
The Emirates Airline Management System project has successfully automated and streamlined the core operations of airline management, including passenger registration, flight scheduling, ticket booking, boarding pass generation, and luggage handling. With a centralized and user-friendly Salesforce interface, this system enhances data accuracy, operational efficiency, and customer service.
By integrating key objects such as Passenger, Flight, Ticket, Boarding Pass, and Luggage, the system provides a complete lifecycle view of an airline journey — from booking to boarding. Additional automation features like QR code generation for boarding passes and real-time seat tracking further improve usability and reduce manual errors.
Overall, this project demonstrates how low-code platforms like Salesforce can be leveraged to build a scalable, reliable, and efficient solution for the airline industry — ensuring a smoother experience for both airline staff and passengers.