Automation (About Flows)
1. Submit Job Application
Type: Screen Flow
– Purpose: Allows a candidate to apply for a job, and create a new Job_Application__c record.
– Steps:
1. Select Job Position
• Click on +, Select Screen
• Label: Select Job Position
• API Name: Select_Job_Position
• Select Lookup from Components (Left-side) click on it
• API Name: SelectPosition, Field API Name: JobPosition1__c, Label: Select Job Position, Object API
Name: Job_Application1__C

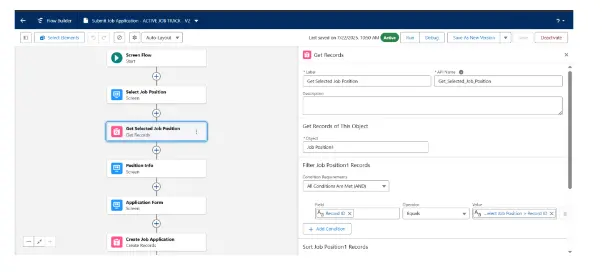
2. Get Selected Job Position
• Click on +, Select Get Records
• Label: Get Selected Job Position
• API Name: Get_Selected_Job_Position
• Select Object Job Position1
• Filter: Record ID equals to Select Job Position.Record ID
3. Position Info
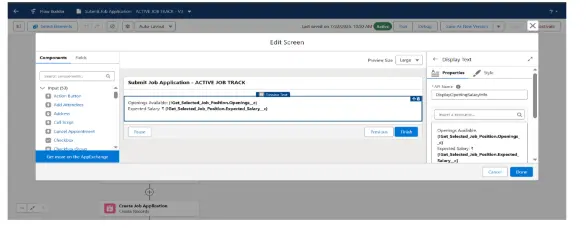
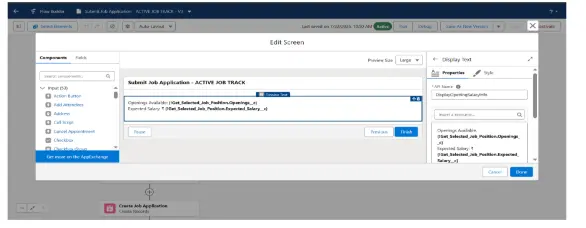
• Click on +, Select Screen
• Label: Position Info
• API Name: Position_Info
• Select Display Text from Components (Left-side) click on it
• API Name: DisplayOpeningSalaryInfo
• Display Text Message: Openings Available: {!Get_Selected_Job_Position.Openings__c} Expected
Salary: ₹ {!Get_Selected_Job_Position.Expected_Salary__c}
4. Application Form
• Click on +, Select Screen
• Label: Application Form
• API Name: Application_Form
• Select Lookup from Candidates (Left-side) click on it
• API Name: SelectCandidateName, Label: Select Candidate Name, Field API Name:
CandidateApplication__c, Object API Name: Job_Application1__c
• Select Email from Candidates (Left-side) click on it
• Label: Email, API Name: Email
• Select Phone from Candidates (Left-side) click on it
• Label: Phone, API Name: Phone
• Select Currency from Candidates (Left-side) click on it
• Label: Expected Salary, API Name: Expected_Salary
5. Create Job Application
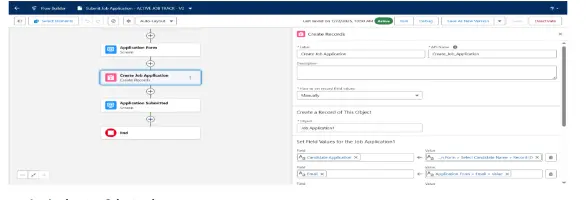
• Click on +, Select Create Record
• Label: Create Job Application, API Name: Create_Job_Application
• How to set record field values: Manually
• Object: Job Application1
• Candidate Application: Application Form.Select Candidate Name.Record ID, Email: Application
Form.Email.Value, Expected Salary: Application Form.Expected Salary, Job Position1: Select Job
Position.Record ID, Phone: Application Form.Phone, Status: Submitted
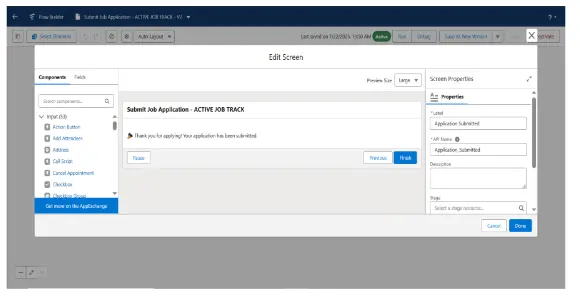
6. Application Submitted
• Click on +, Select Screen
• Label: Application Submitted, API Name: Application_Submitted
• Select Display Text from Components (Left-side) click on it
• Save & Activate
Video
2. Decrease Openings on Offer Acceptance
– Type: Record-Triggered Flow (After Update on Job_Offer1__c)
– Purpose: When a job offer is accepted, reduce Job_Position1__c.Openings__c by 1
– Steps:
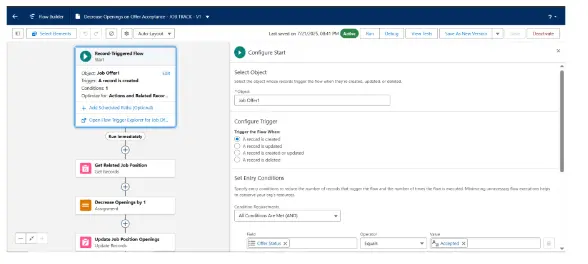
1. Record Triggered Flow
• Select Object: Object- Job Offer1, Configure Trigger: A record is created, Set Entry Conditions: Offer
Status equals to Accepted
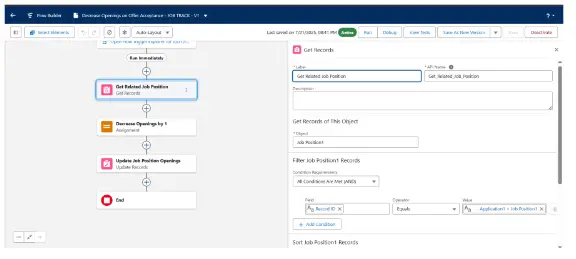
2. Get Related Job Position
• Click on +, Select Get Records
• Label: Get Related Job Position, API Name: Get_Related_Job_Position, Object: Job Position1, Filter:
Record ID equals to Triggering Job_Offer1__c. Job Application1.Job Position1
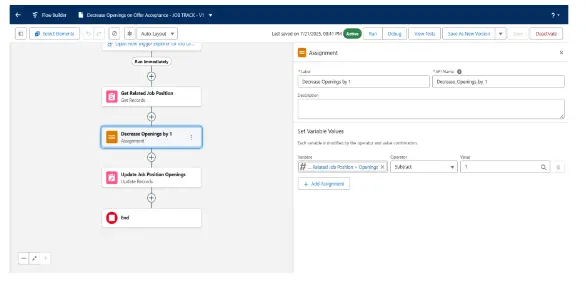
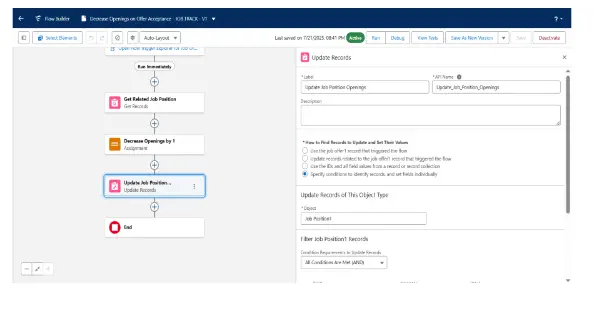
3. Decrease Openings by 1
• Click on +, Select Assigment
• Label: Decrease Openings by 1, API Name: Decrease_Openings_by_1, Set Variable Values: Job
Position1 from Get Related Job Position.Openings Subtract to 1
4. Update Job Position Openings
• Click on +, Select Update Records
• Label: Update Job Position Openings, API Name: Update_Job_Position_Openings, How To Find
Record: Specify conditions to identify records, and set fields individually, Object: Job Position1,
Filter Job Position1 Records: Record ID equals to Job Position1from Get Related Job Position.Record
ID, Set Field Values: Openings: Job Position1from Get Related Job Position.Openings
• Save & Activate
Video
3. Generate Job Offer
– Type: Screen Flow (button on Job Application1)
– Purpose: HR enters offer details, creates Job_Offer__c record, and updates application status
– Steps:
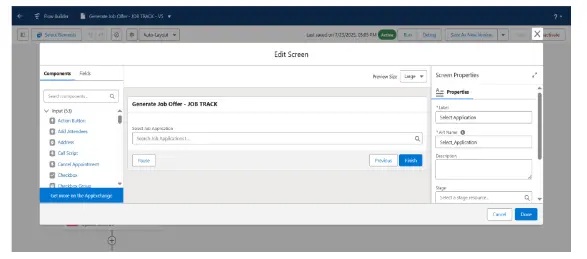
1. Select Job Application
• Click on +, Select Screen
• Label: Select Application, API Name: Select_Application
• Select Lookup from Components
• API Name: SelectJobApplication, Field API Name: Job_Application1__c, Label: Select Job Application,
Object API Name: Job_Offer1__c
2. Enter Offer Details
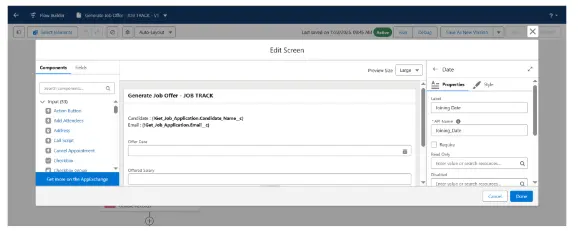
• Click on +, Select Screen
• Label: Enter Offer Details, API Name: Enter_Offer_Details
• Search Display Text from Components (Left-side), click on it, API Name: Text, Message: Candidate :
{!Get_Job_Application.Candidate_Name__c} Email : {!Get_Job_Application.Email__c}
• Select Date from Components (Left-side), click on it, Label: Offer Date, API Name: Offer_Date
• Select Currency from Components (Left-side), click on it, Label: Offered Salary, API Name:
Offered_Salary
• Select Date from Components (Left-side), click on it, Label: Joining Date, API Name: Joining_Date
3. Create Job Offer
• Click on +, Select Create Records
• Label: Create Job Offer, API Name: Create_Job_Offer, How to set record: Manually
• Set Field Value:
• Job Application1 -> varJobApplicationId
• Joining Date -> Enter Offer Details.Joining Date
• Offer Date -> Enter Offer Details.Offer Date
• Offer Status -> Accepted

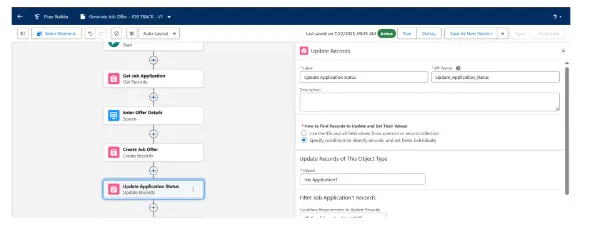
4. Update Application Status
• Click on +, Select Update Records
• Label: Update Application Status, API Name: Update_Application_Status
• How to find record: Specify conditions to identify records, and set fields individually
• Object: Job Application1
• Filter: Record ID equals to varJobApplicatioId
• Set Field Value: Status -> Offered
• Save & Activate
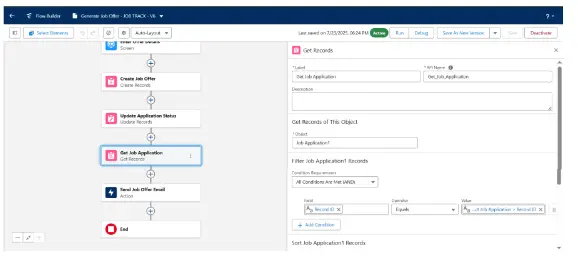
5. Get Job Application
• Click on +, Select Get Records
• Label: Get Job Application, API Name: Get_Job_Application, Object: Job Application1
• Filter: Record ID equals to Select Application.Select Job Application.Record ID
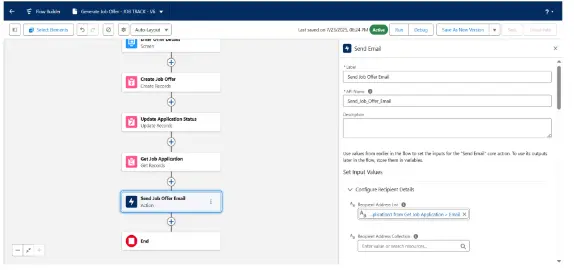
6. Send Email Interview
• Click on +, Select Action, Send Email
• Label: Send Email Interview, API Name: SendEmailInterview
• Recipient Address List: Job Application1 from Get Job Application.Email
• Configure Email Content: Compose Email Content
• Subject: Congratulations! Here’s Your Job Offer Details, Body: Hi
{!Get_Job_Application.Candidate_Name__c}, Congratulations! We are pleased to offer you the
position for {!Get_Job_Application.JobPosition1__r.Name}. Here are your offer details: – Offer Date:
{!Offer_Date} – Offered Salary: {!Offered_Salary} – Joining Date: {!Joining_Date} Please review the
offer and let us know your response. Best regards,
Video
4. Schedule Interview from Application
– Type: Screen Flow (launched from Job Application)
– Purpose: Hiring manager enters interview details and updates application status
– Steps:
1. Select Job Application
• Click on +, Select Screen
• Label: Select Application, API Name: Select_Application
• Select Lookup from Components
• API Name: SelectJobApplication, Field API Name: Job_Application1__c, Label: Select Job Application,
Object API Name: Job_Offer1__c

2. Interview Details
• Click on +, Select Screen
• Label: Interview Details, API Name: Interview_Details
• Search Date form Components (Left-side), click on it, Label: Interview Date, API Name:
Interview_Date
• Search Picklist from Components (Left-side), click on it, Label: Interview Type, API Name: Interview
Type
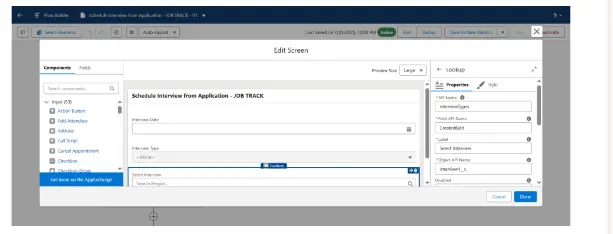
• Search Lookup from Components (Left-side), click on it, API Name: InterviewTypes, Field API
Name: CreatedById, Label: Select Interview, Object API Name: Interview1__c
3. Create Interview
• Click on +, Select Create Records
• Label: Create Interview, API Name: Create_Interview
• How to set record field value: Manually
• Object: Interview1
• Field Value:
• Interview Date -> Interview Details.Interview Date
• Interview Type -> Interview Details.Interview Type
• Interviewer -> Interview Details.Select Interview.Record ID
• Job Application1 -> varJobApplicationId

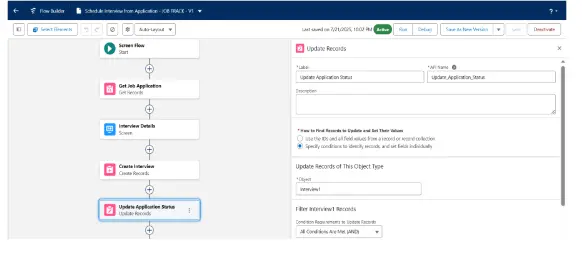
4. Update Application Status
• Click on +, Select Update Records
• Label: Update Application Status, API Name: Update_Application_Status
• How to find records: Specify conditions to identify records, and set fields individually
• Object: Interview1
• Filter: Record ID equals to varJobApplicationId
• Set Field Value: Interview Status -> Scheduled
• Save & Activate
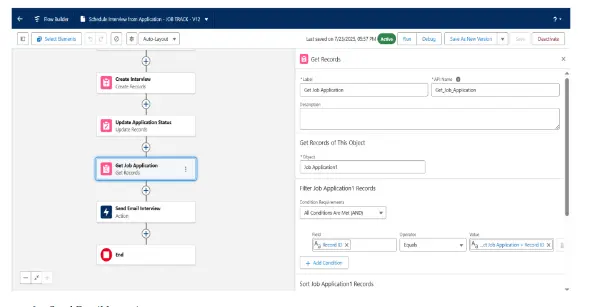
5. Get Job Application
• Click on +, Select Get Records
• Label: Get Job Application, API Name: Get_Job_Application, Object: Job Application1
• Filter: Record ID equals to Select Application.Select Job Application.Record ID
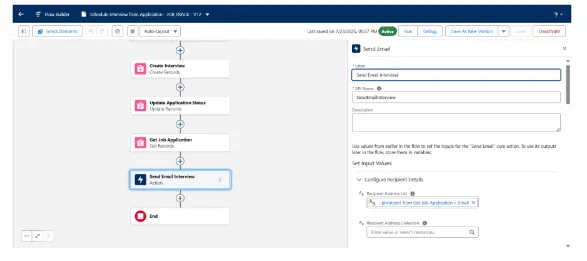
6. Send Email Interview
• Click on +, Select Action, Send Email
• Label: Send Email Interview, API Name: SendEmailInterview
• Recipient Address List: Job Application1 from Get Job Application.Email
• Configure Email Content: Compose Email Content
• Subject: Interview Scheduled, Body: Hello {!InterviewTypes.recordName}, An interview has been
scheduled on {!Interview_Date} for the application {!Get_Job_Application.JobPosition1__r.Name}
Interview Type {!Interview_Type} Regards, Recruitment Team
Video
5. Prevent Application When No Openings
– Type: Record-Triggered Flow (Before Create on Job_Application1__c)
– Purpose: Prevents creation of a Job Application if the related Job Position has no openings left
– Steps:
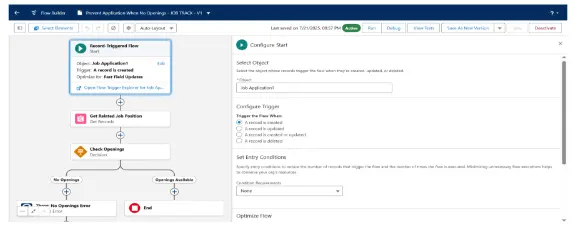
1. Record Triggered
• Object: Job Application1, Trigger Flow When: A record is created, Condition: None, Optimize Flow:
Fast Field Updates
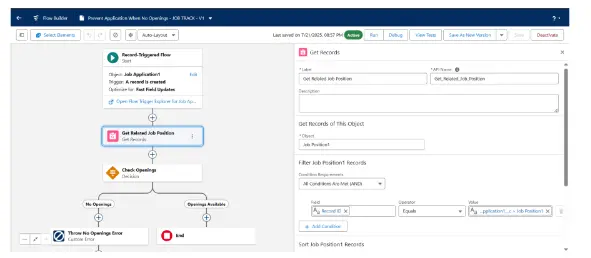
2. Get Related Job Position
• Click on +, Select Get Records
• Label: Get Related Job Position, API Name: Get_Related_Job_Position, Object: Job Position1, Filter:
Record ID equals to Job Application1.Job Position1
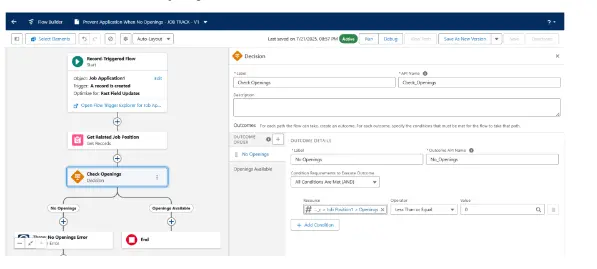
3. Check Openings
• Label: Check Openings, API Name: Check_Openings
• Outcome Order: Label: No Openings, Condition: All Condition Are Met (And) Job Application1.Job
Position1.Openings less than or equal to 0
• Outcome Order: Openings Available
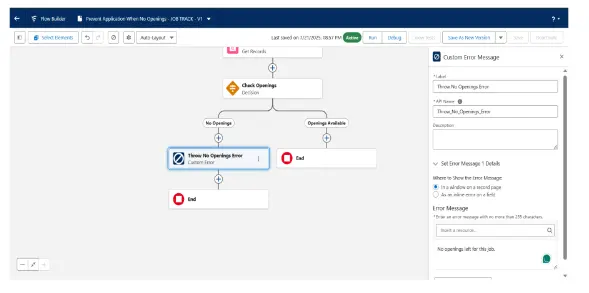
4. No Openings – Throw No Openings Error
• Click on +, Select Custom Error Message
• Label: Throw No Openings Error, API Name: Throw_No_Openings_Error
• Where to Show the Error Message: In a window on a record page, Error Message: No openings left
for this job.
• Save & Activate
Video
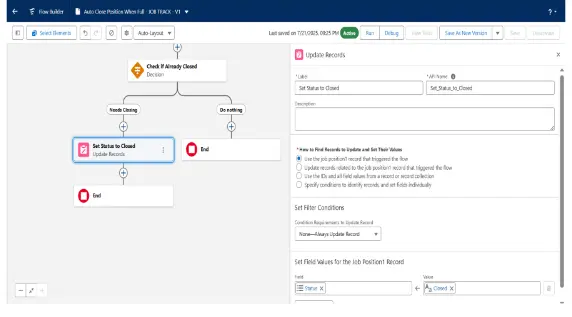
6. Auto Close Position When Full
– Type: Record-Triggered Flow (After Update on Job_Position1__c)
– Purpose: Automatically sets the status of a Job Position to “Closed” when Openings = 0, preventing it from being
used for new applications
– Steps:
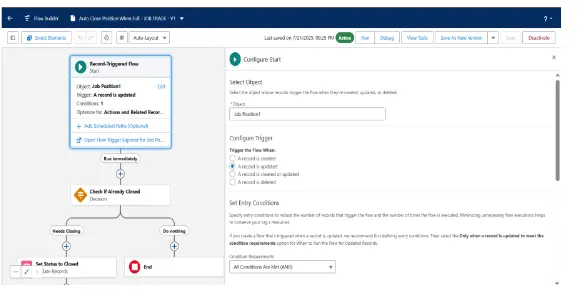
1. Record Triggered
• Object: Job Position1, Trigger the Flow When: A record is updated, Condition: All Condition Are
Meet (And) Openings equals to 0
2. Check if Already Closed
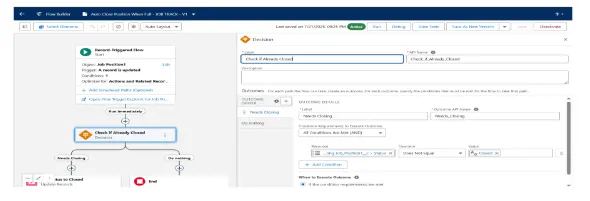
• Click on +, Select Decision
• Label: Check if Already Closed, API Name: Check_if_Already_Closed
• Outcome Order:
• Label: Needs Closing, API Name: Needs_Closing, Condition: All Conditions Are Meet (And) Job
Position1.Status does not equal to Closed
• Label: Do nothing
3. Needs Closing – Set Status to Closed
• Click on +, Select Update Records
• Label: Set Status to Closed, API Name: Set_Status_to_Closed, How to find records to update: Use the
job position1 record that triggered the flow, Condition: None, Field Value: Status -> Closed
• Save & Activate
Video
7. Send Candidate Email
– Type: Record-Triggered Flow (After Create on Candidate__c)
– Purpose: Automatically sends a confirmation email to the candidate when they register by creating a new
Candidate record. The email includes a welcome message and confirms that their profile has been received. This
improves communication and enhances the candidate experience.
– Steps:
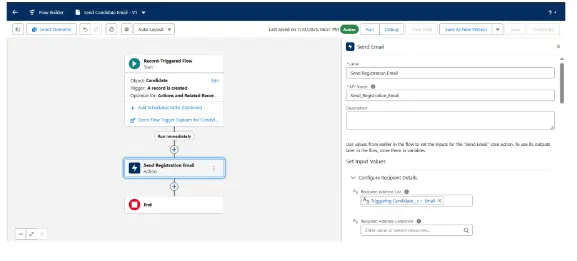
1. Record Triggered Flow
• Object: Candidate, Configure Trigger: A record is created, Set Entry Conditions: None
2. Send Registration Email
• Label: Send Registration Email, API Name: Send_Registration_Email, Recipient Address List:
Candidate.Email, Configure Email Content: Compose Email Content
• Subject: Thanks for Registering
• Body: Hi {!$Record.Name}, Thank you for registering with us. We’ve received your profile and look
forward to reviewing your application. We’ll be in touch shortly if there’s a match. Regards,
Recruitment Team
Dashboard
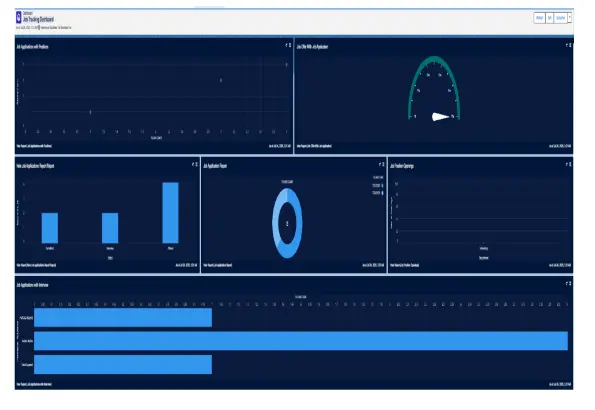
Dashboard Name: Job Tracking Dashboard
• Job Applications by Status
• Job Applications by Job Position
• Offers Made vs. Accepted
• Interviews Scheduled per Recruiter/Manager
• Job Positions with No Openings
• Applications Received per Week
Conclusion
The Job Application Tracking System is a custom Salesforce app designed to manage the full recruitment lifecycle
— from job posting to offer acceptance. It uses standard and custom objects with automated flows to streamline
applications, interviews, and hiring. With dashboards and list views, HR and recruiters can easily monitor statuses,
openings, and candidate progress.


