3. Automation (About Flows)
1. Book A Car
- Type: Screen Flow
- Purpose: Allows users to select a car and enter booking details like dates and locations. Creates a Car Booking record and updates the car’s availability to “Booked”.
- Steps:
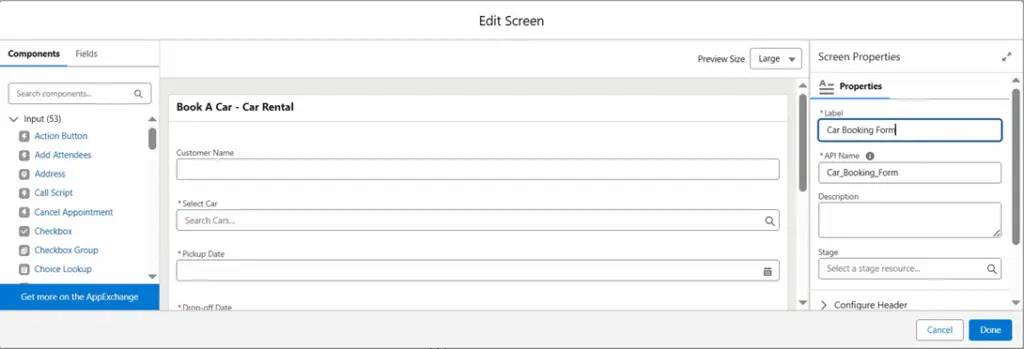
1. Get Car Booking Data
- Click on + icon, select screen
- Label: Car Booking Form
- Select Text from Components
– label it as Customer Name
- Select Lookup from Components – Label it as Select Car
- Field API Name it as Car
- Object API Name it as Car Booking
- Select Date from Components
– Label it as Pickup Date
- Select Date from Components
– Label it as Drop-off Date
- Select Text from Components
- Label it as Pickup Location
Select Text from Components
- Label it as Drop-off Location
- Select Long Text Area from Components
– Label it as Special Instructions
2. Create Booking
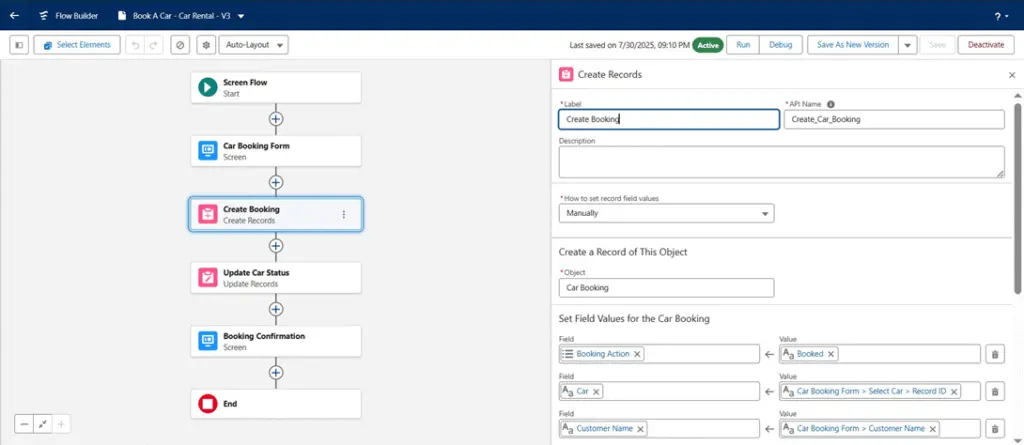
- Click on + icon, select create records
- Label it as Create Booking
- How to set record field values it as Manually
- Create a record of This Object
– Object as Car Booking
- Set Field Values for the Car Booking
- Booking Action as Booked
- Car as Car Booking Form.Select Car.Record ID
- Customer Name as Car Booking Form.Customer Name
- Drop-off Date as Car Booking Form.Drop-off Date
- Drop-off Location as Car Booking Form.Drop-off Location
- Special Instructions as Car Booking Form.Special Instructions
- Pickup Date as Car Booking Form.Pickup Date
- Pickup Location as Car Booking Form.Pickup Location
3. Update Car Status
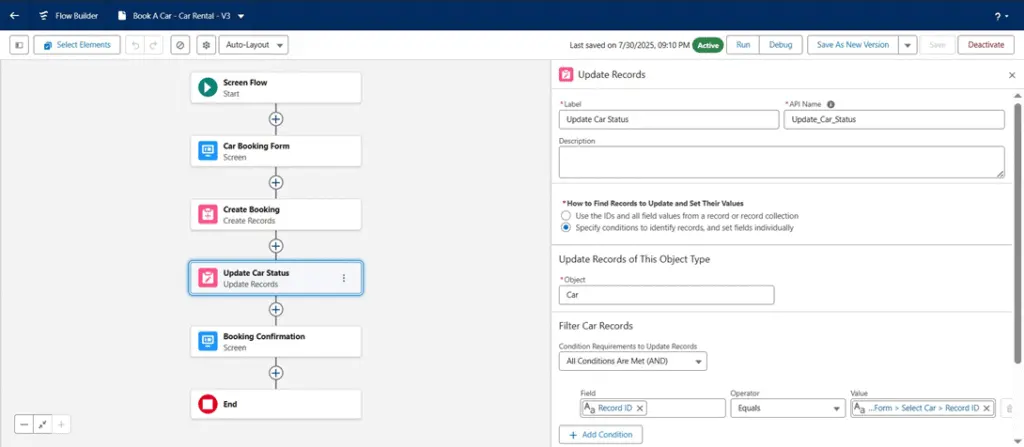
- Click on + icon, select update records
Label it as Update Car Status
- How to find records to update and set their values it as specify conditions to identify records, and set fields individually
- Object it as Car
- Filter car records
– Record ID equals to Car Booking Form.Select Car.Record ID
- Set field values for the car records
– Availability it as Booked
4. Booking Confirmation
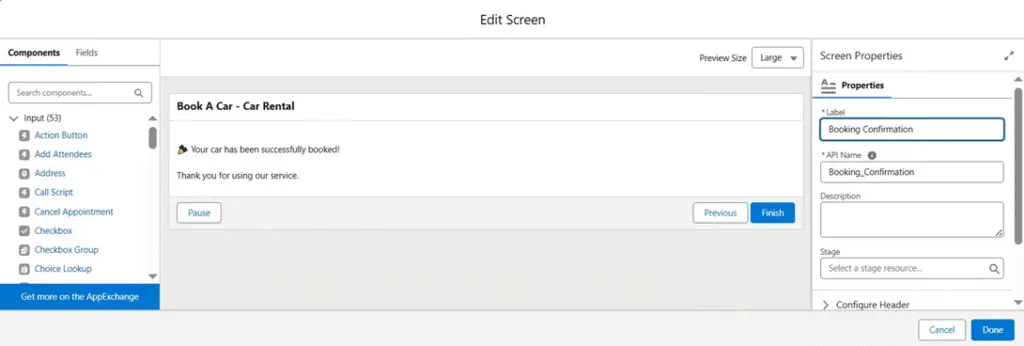
- Click on + icon, select screen
– Label it as Booking Confirmation
- Select Display Text from components
- API Name: confimationMessage
- Message: Your can has been successfully booked! Thank you for using our service.
Book a car
2. Return Vehicle -
Type: Screen Flow
- Purpose: Captures return details such as condition, return date, and fines if applicable. Creates a Vehicle Return record and updates the booking and car status.
- Steps:
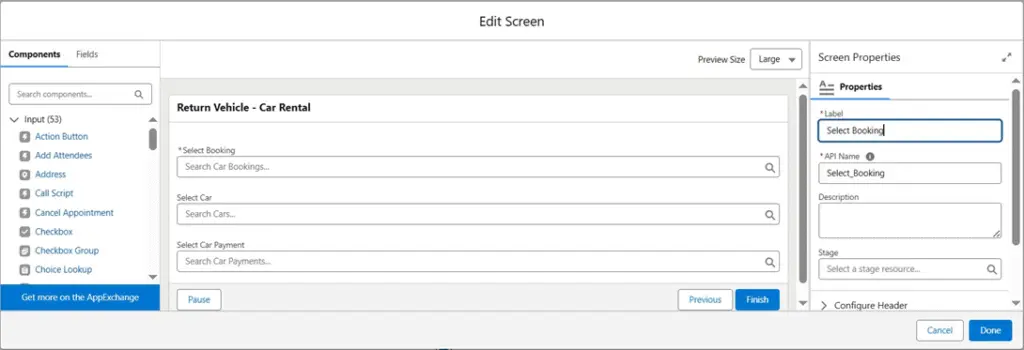
1.Get Car Booking Data
Click on + icon, select screen
– Label it as Select Booking
- Select Lookup from Components – Label it as Select Booking
- Field API Name it as Booking
- Object API Name it as Rental Agreement
- Select Lookup from Components – Label it as Select Car
- Field API Name it as Car
- Object API Name it as Car Booking
- Select Lookup from Components
- Label it as Select Car Payment
- Field API Name it as Car Payment
- Object API Name it as Return
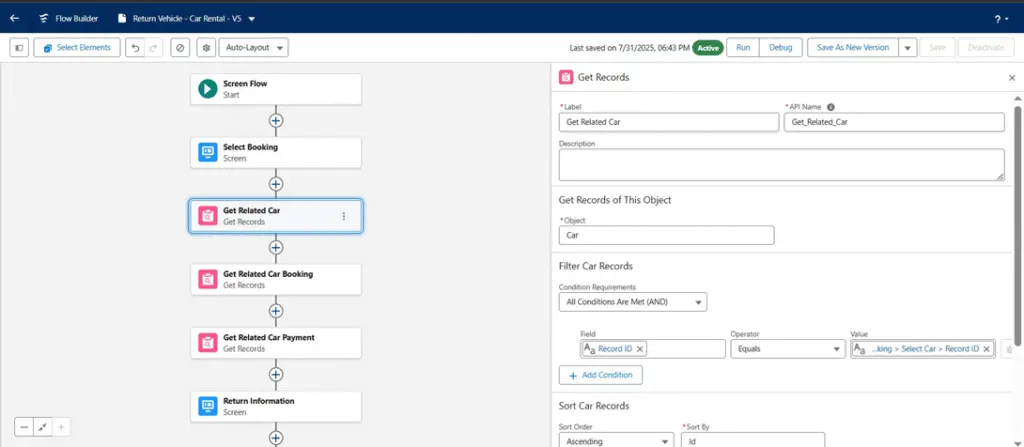
2. Get Related Car
- Label it as Get Related Car
- Object as Car
- Filter Car Records
- Record ID equals to Select Booking.Select Car.Record ID
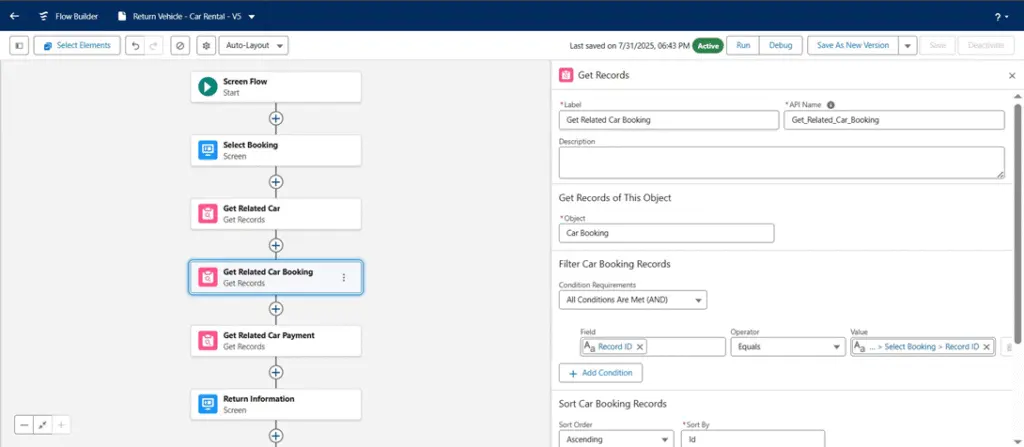
3. Get Related Car Booking
– Label it as Get Related Car Booking
Object as Car Booking
- Filter Car Booking Records
- Record ID equals to Select Booking.Select Booking.Record ID
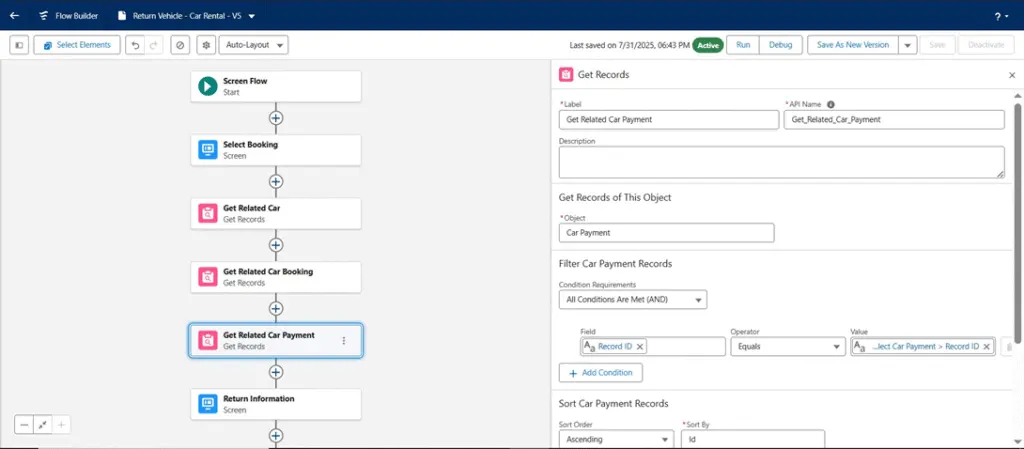
4. Get Related Car Payment
- Label it as Get Related Car Payment
- Object as Car Payment
- Filter Car Payment Records
- Record ID equals to Select Booking.Select Car Payment.Record ID
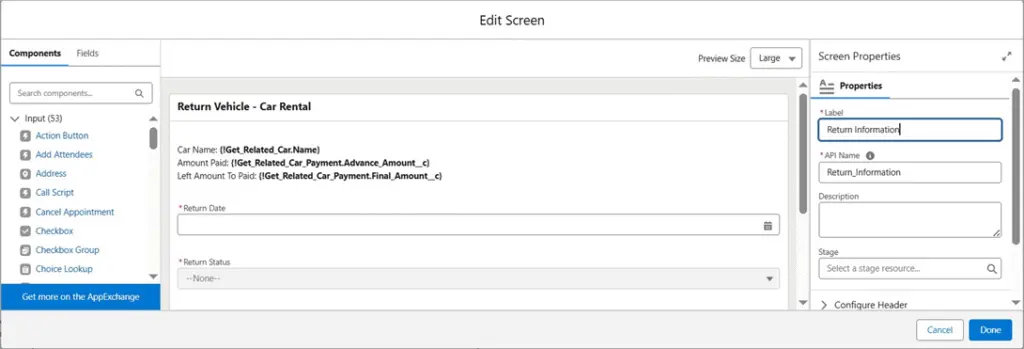
5. Return Information
- Click on + icon, select screen
- Label it as Return Information
- Select Display Text from Components
- API Name as returnCarName
- Message: Car Name: {Get Related Car.Name} Amount Paid: {Get Related Car Payment.Advance Amount} Left Amount To Paid: {Get Related Car Payment.Final Amount}
- Select Date from Components
- Label it as Return Date
Select Pickup list from Components
- Label it as Return Status
- Scroll Drown to choice section click on input box to select
- API Name as returnStatus
- Object as Vehicle Return
- Data Type as Picklist
- Field as Status
- Click on Done
- Select Pickup list from Components
- Label it as Return Condition
- Scroll Down to choice section click on input box to select
- API Name as returnCondition
- Object as Vehicle Return
- Data Type as Picklist
- Field as Condition on Return
- Click on Done
- Select Long Text Area from Components
- Label it as Return Notes
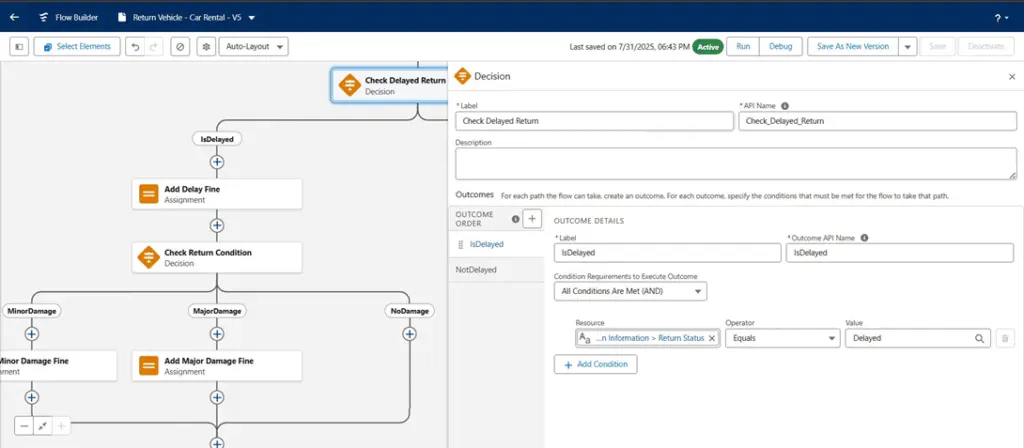
6.Check Delayed Return
– Label it as Check Delayed Return
- OUTCOME ORDER
- isDelayed
- Return Information.Return Status equals to Delayed
- NotDelayed
- On isDelayed
- Click on + icon, select assignment
- Label as Add Delay Fine
- Create Variable first
- API Name as FineAmount
- Data Type as Number
- Decimal Places as 2
- FineAmount Add 1000
- Click on + icon, select decision
- Label it as Check Return Condition
- OUTCOME ORDER
- MinorDamage
Return Information.Return Condition equals to Check Return Condition.Minor Damage
- MajorDamage
- Return Information.Return Condition equals to Check Return Condition.Major Damage
- NoDamage
- On MinorDamage
- Click on + icon, select assignment
- Label it as Add Minor Damage Fine
- FineAmount Add 500
- On MajorDamage
- Click on + icon, select assignment
- Label it as Add Major Damage Fine
- Fine Amount Add 2000
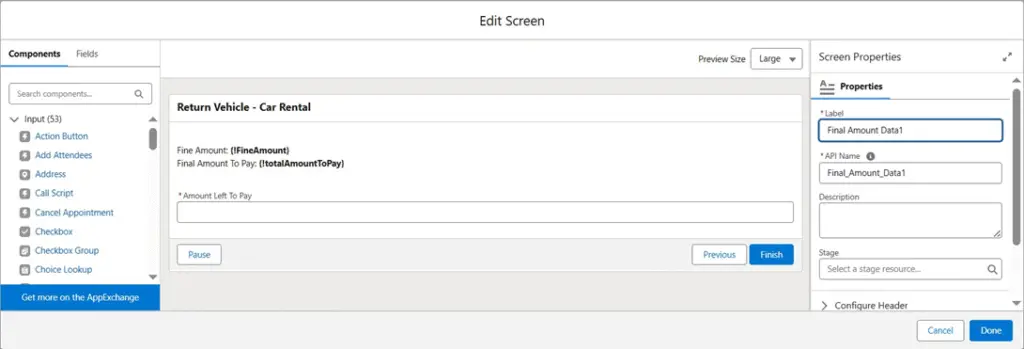
7. Final Amount Data1
- Click on + icon, select screen
– Label it as Fine Amount Data1
- Select Display Text from Components
- API Name it as AmountInfo
- Create a formula variable
- API Name as totalAmountToPay
- Data Type as Currency
- Decimal Places as 2
- Formula as {FineAmount} + {Get Related Car Payment.Final Amount}
- Message: Fine Amount: {FineAmount} Final Amount To Pay: {totalAmountToPay}
- Select Currency from Components
- Label it as Amount Left To Pay
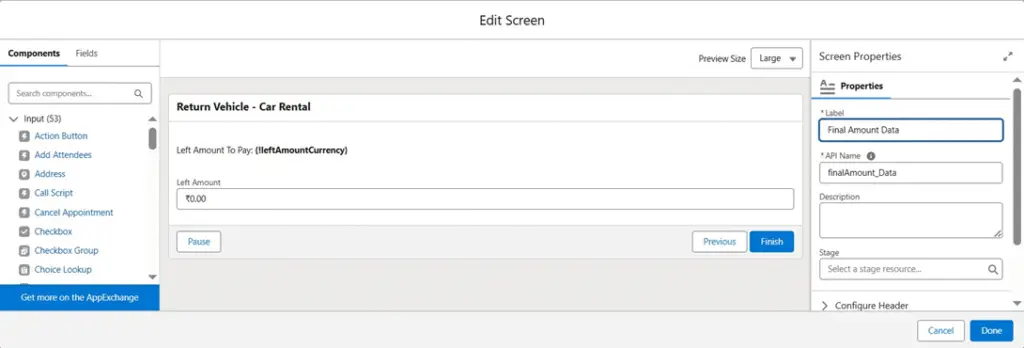
8. Final Amount Data
- Click on + icon, select screen
- Label it as Final Amount Data
- Select Display Text from Components
- API Name as leftAmountData
- Create a formula variable
- API Name as leftAmountCurrency
- Data Type as Currency
- Decimal Places as 2
- Formula as {totalAmountToPay} – {Amount Left ToPay}
- Message: Left Amount To Pay: {leftAmountCurrency}
- Select Currency from Components
- Label it as Left Amount
9. Create Vehicle Return
- Click on + icon, select create records
- Label it as Create Vehicle Return
- How to set record field values as Manually
- Object as Vehicle Return
- Set field values for the vehicle return
- Amount Paid as Final Amount Data1.Amount Left To Pay
- Booking as Select Booking.Select Booking.Record ID
- Car as Car from Get Related Car.Record ID
- Condition on Return as Return Information.Return Condition
- Fine Amount as FineAmount
- Left Amount To Pay as leftAmountCurrency
Notes as Return Information.Return Notes
- Return Date as Return Information.Return Date
- Return Status as Return Information.Return Status
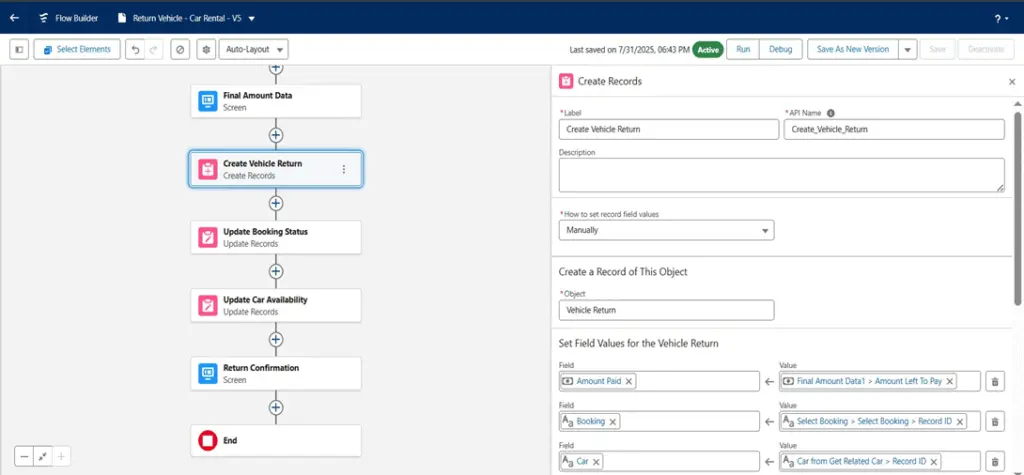
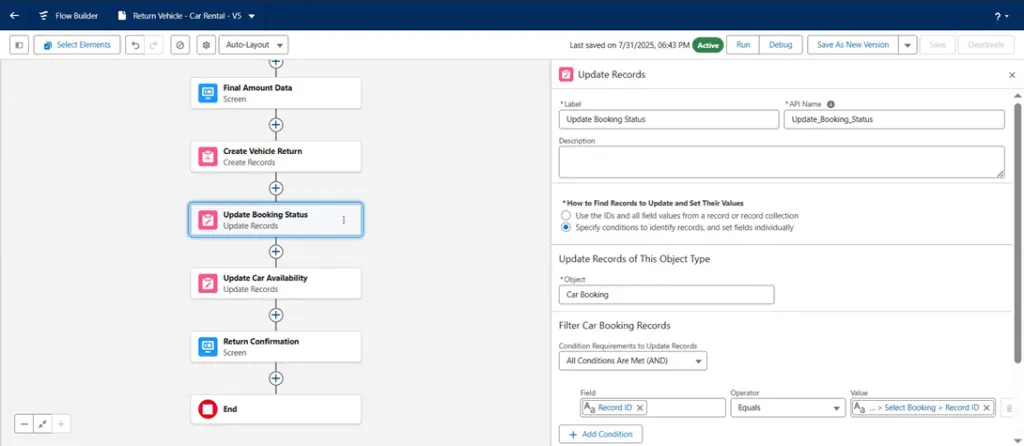
10. Update Booking Status
- Click on + icon, select update records
- Label it as Update Booking Status
- How to Find Records to Update and Set Their Values as Specify conditions to identify records, and set fields individually
- Object as Car Booking
- Filter Car Booking Records
- Record ID equals to Select Booking.Select Booking.Record ID
- Set Field Values for the Car Booking Records
- Status as Returned
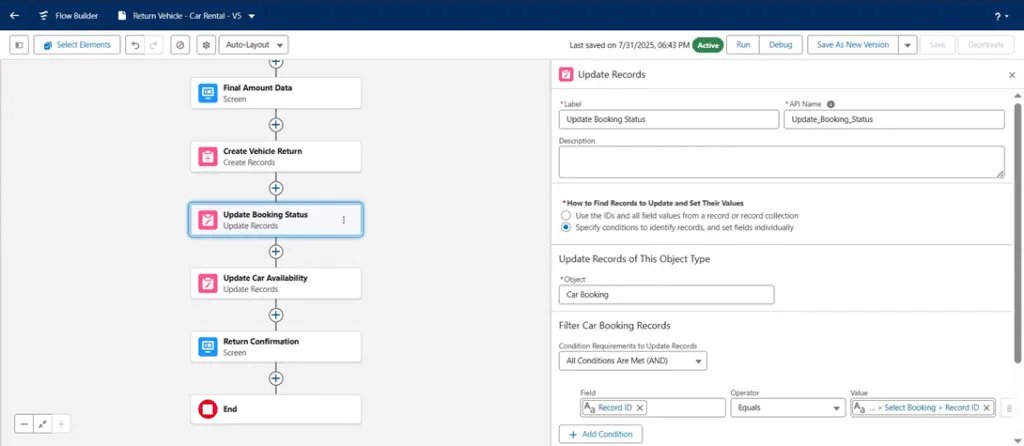
11. Update Car Availability
- Click on + icon, select update records
- Label it as Update Car Availability
How to Find Records to Update and Set Their Values as Specify conditions to identify records, and set fields individually
- Object as Car
- Filter Cat Records
- Record ID equals to Car from Get Related Car.Record ID
- Set Field Values for the Car Records
- Availability as Available
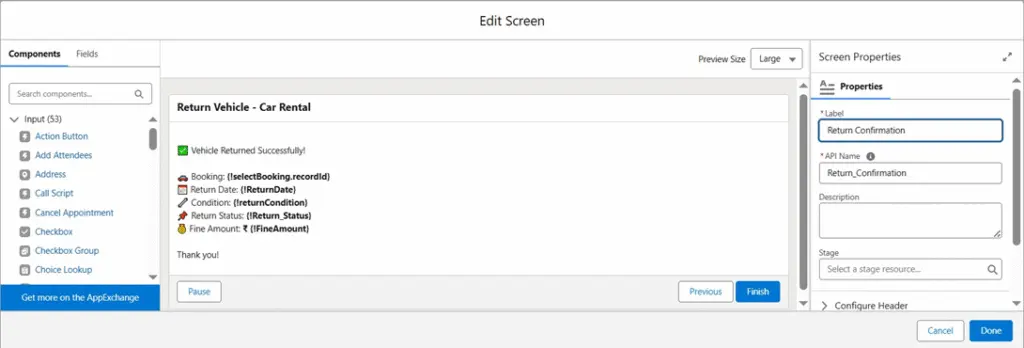
12. Return Confirmation
- Click on + icon, select screen
- Label it as Return Confirmation
- Select Display Text from Components
- API Name it as returnConfirmation
- Message: Vehicle Returned Successfully! 🚗 Booking: {selectBooking.recordId} 📅 Return Date: {ReturnDate} 🔧 Condition: {returnCondition} 📌 Return Status: {Return_Status} 💰 Fine Amount: ₹ {FineAmount} Thank you!
Vehicle return
3. Generate Rental Agreement
- Type: Screen Flow
- Purpose: Collects agreement details like start/end dates and links it to a booking. Creates a Rental Agreement record and marks the agreement as active.
- Steps:
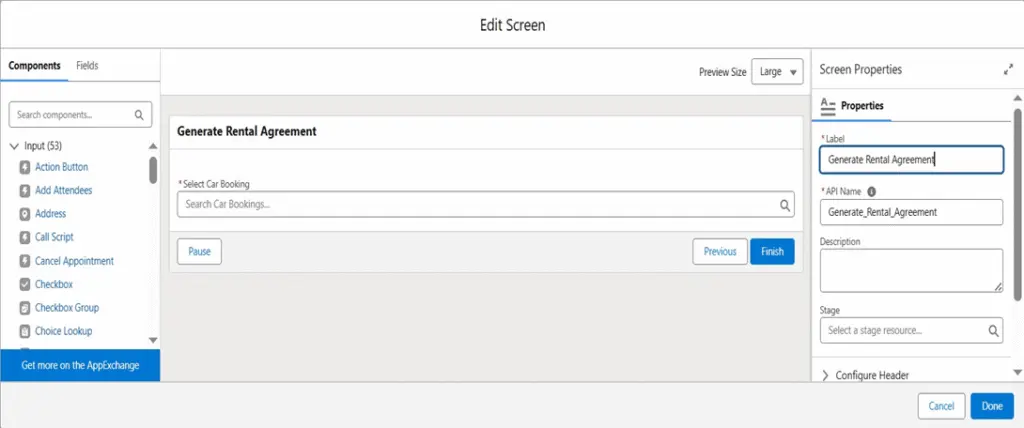
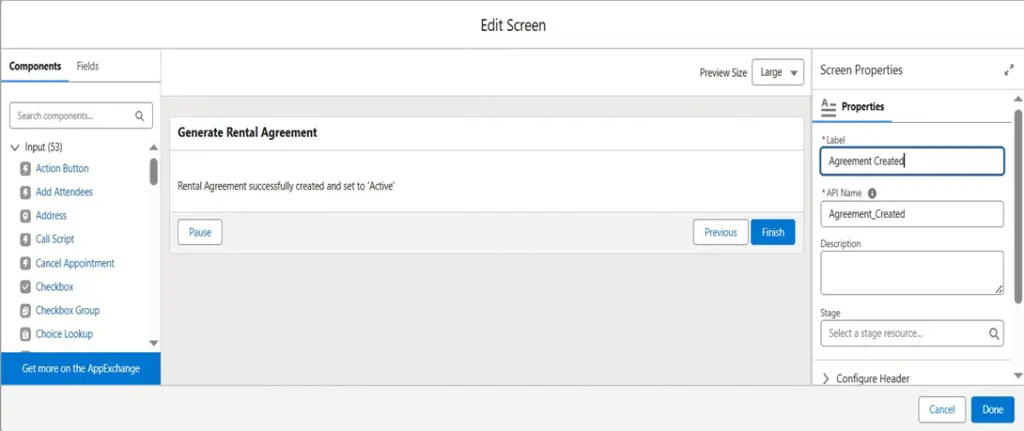
1. Generate Rental Agreement Click on + icon, select screen
Label it as Generate Rental Agreement
- Select Lookup from Components
- Label it as Select Car Booking
- Field API Name as Booking
- Object API Name as Rental Agreement
- Click on Done to close
2. Enter Agreement Details
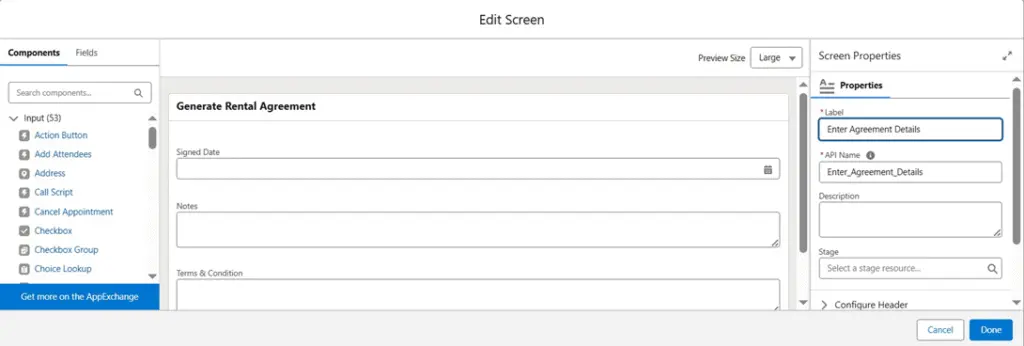
- Click on + icon, select screen
– Enter Agreement Details
- Select Date from Components
– Label it as Signed Date
- Select Long Text Area from Components – Label it as Note
- Select Long Text Area from Components
- Label it as Terms & Condition
- Click on Done to close
3. Select Booking
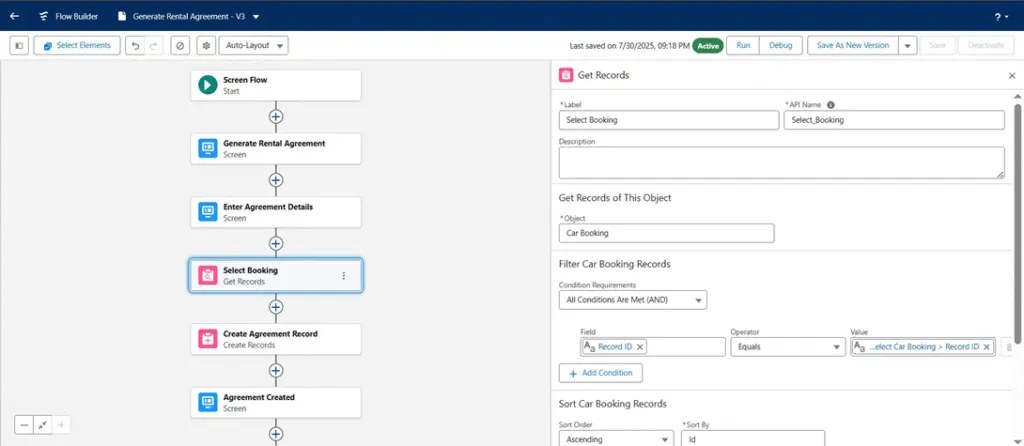
- Click on + icon, select get records
- Label it as Select Booking – Object as Car Booking
Filter Car Booking Records
- Record ID equals to Generate Rental Agreement.Select Car Booking.Record ID
4. Create Agreement Record
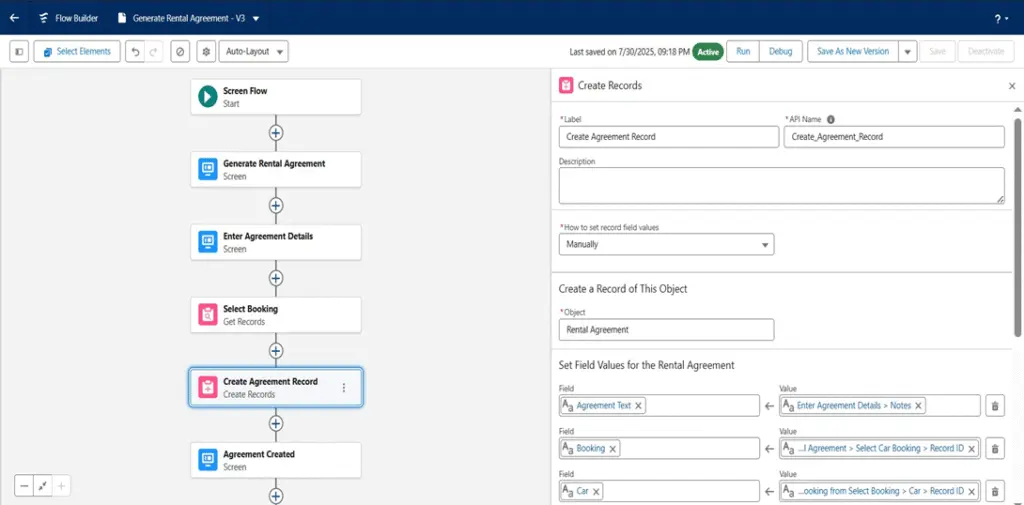
- Click on + icon, select create records
- Label it as Create Agreement Record
- How to set record field values as Manually
- Object as Rental Agreement
- Set field values for the rental agreement
- Agreement Text as Enter Agreement Details.Notes
- Booking as Generate Rental Agreement.Select Car Booking.Record ID
- Car as Car Booking from Select Booking.Car.Record ID
- Rental End Date as Car Booking from Select Booking.Drop-off Date
- Signed Date as Car Booking from Select Booking.Pickup Date
- Rental Start Date as Car Booking from Select Booking.Pickup Date
- Agreement Status as Active
- Terms and Conditions as Enter Agreement Details.Terms & Condition
5. Agreement Created
Click on + icon, select screen
Label it as Agreement Created
- Select Display Text from Components
- API Name as RentalMessage
- Message: Rental Agreement successfully created and set to ‘Active’ – Click on done to close
Rental agreement
4. Generate Car Payment
- Type: Screen Flow
- Purpose: Calculates rental cost based on duration, with optional discounts or charges. Creates a Car Payment record and sets the status to Paid or Pending.
- Steps:
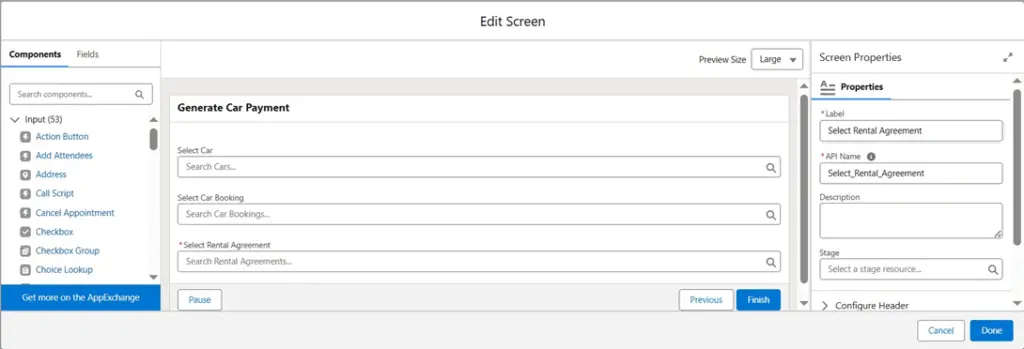
1. Select Rental Agreement
- Click on + icon, select screen
- Select Lookup from components – Label it as Select Car
- Field API Name as Car
- Object API Name as Rental Agreement
- Select Lookup from components
- Label it as Select Car Booking
- Field API Name as Booking
- Object API Name as Rental Agreement
- Select Rental Agreement
- Label it as Select Rental Agreement
- Field API Name as Rental Agreement
- Object API Name as Car Payment
- Click on Done to close
2. Get Selected Rental Agreement
- Click on + icon, select get records
- Label it as Get Selected Rental Agreement
- Object as Rental Agreement
- Filter Rental Agreement Records
– Record ID equals to Select Rental Agreement.Select Rental Agreement.Record ID

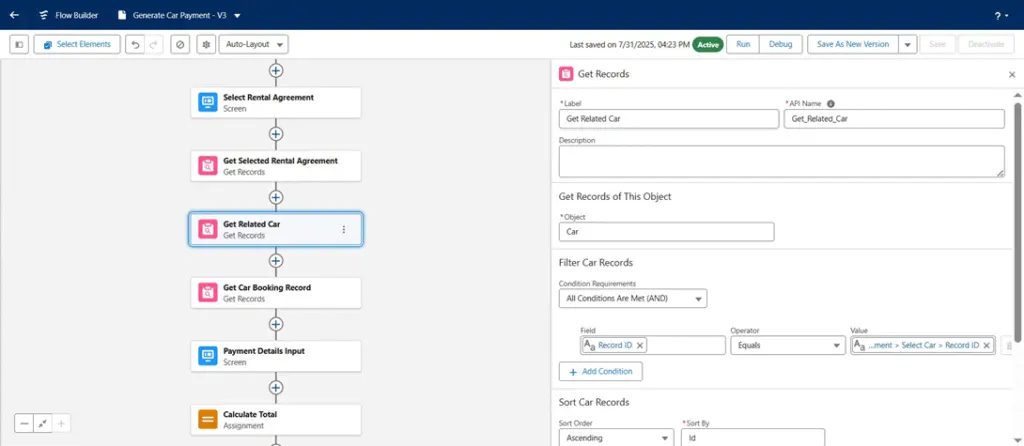
3. Get Related Car
- Click on + icon, select get records – Label it as Get Related Car
– Object as Car
- Filter Car Records
– Record ID equals to Select Rental Agreement.Select Car.Record ID
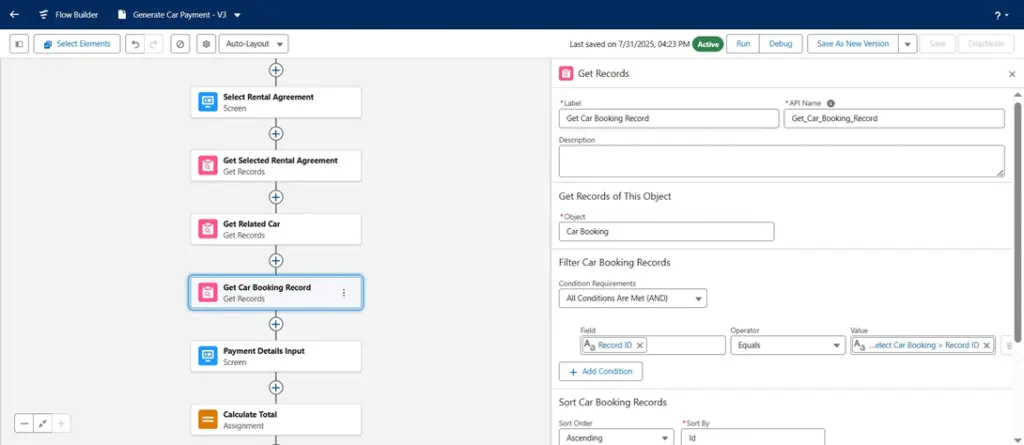
4. Get Car Booking Record
- Click on + icon, select get records
- Label it as Get Car Booking Record
- Object as Car Booking
- Filter Car Booking Records
– Record ID equals to Select Rental Agreement.Select Car Booking.Record ID
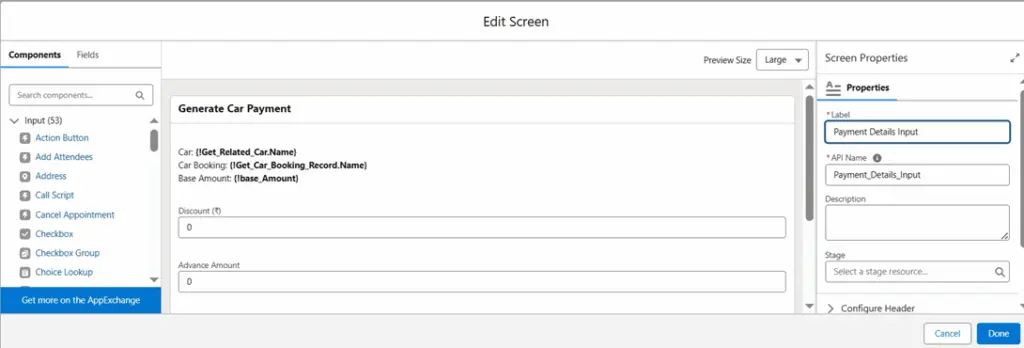
5. Payment Details Input
- Click on + icon, select screen
– Label it as Payment Details Input
- Select Display Text from Components – API Name as baseAmount
- Create a formula variable
- API Name as base_Amount
- Data Type as Currency
- Decimal Places as 2
- Formula as {Get Car Booking Record.Total Rental Days} * {Get Related Car.Daily Rate}
- Click on Done to close
- Message: Car: {Get Related Car.Name} Car Booking: {Get Car Booking Record.Name} Base Amount: {base_Amount}
- Select Number from Components – Label it as Discount
- Select Number from Components
– Label it as Advance Amount
- Select Picklist from Components
- Label it as Payment Mode
- Scroll down to select choice check on input
- API Name as paymentMode
- Object as Car Payment
- Data Type as Picklist
- Field as Payment Mode
- Select Date from Components
- Label it as Payment Date
- Click on Done to close
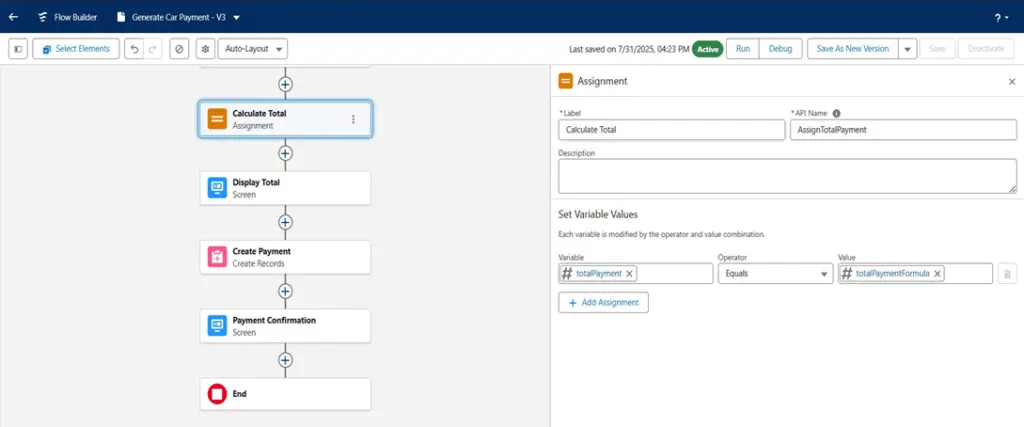
6. Calculate Total
- Label as Calculate Total
- Create a formula variable
- API Name as totalPaymentFormula
- Data Type as Number
- Decimal Places as 0
- Formula: {base_Amount} – ({discount} + {extraCharges})
- totalPayment equals to totalPaymentFormula
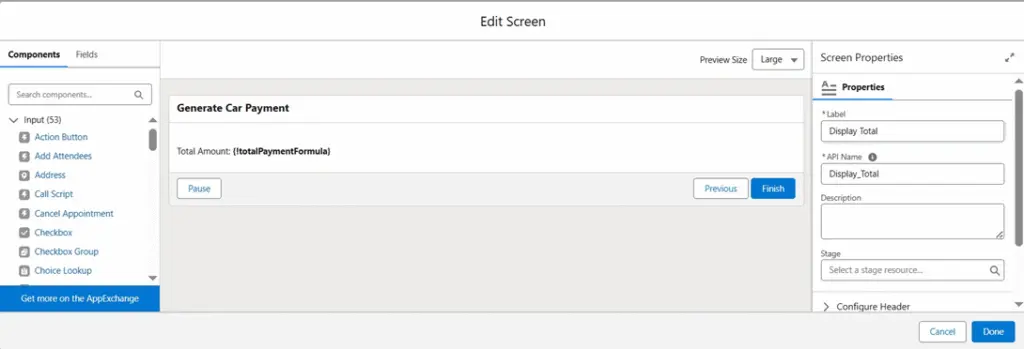
7. Display Total
- Click on + icon, select screen
– Label it as Display Total
- Select Display Text from Components
- API Name as totalAmountPaid
- Message: Total Amount: {totalPaymentFormula}
- Click on Done to close
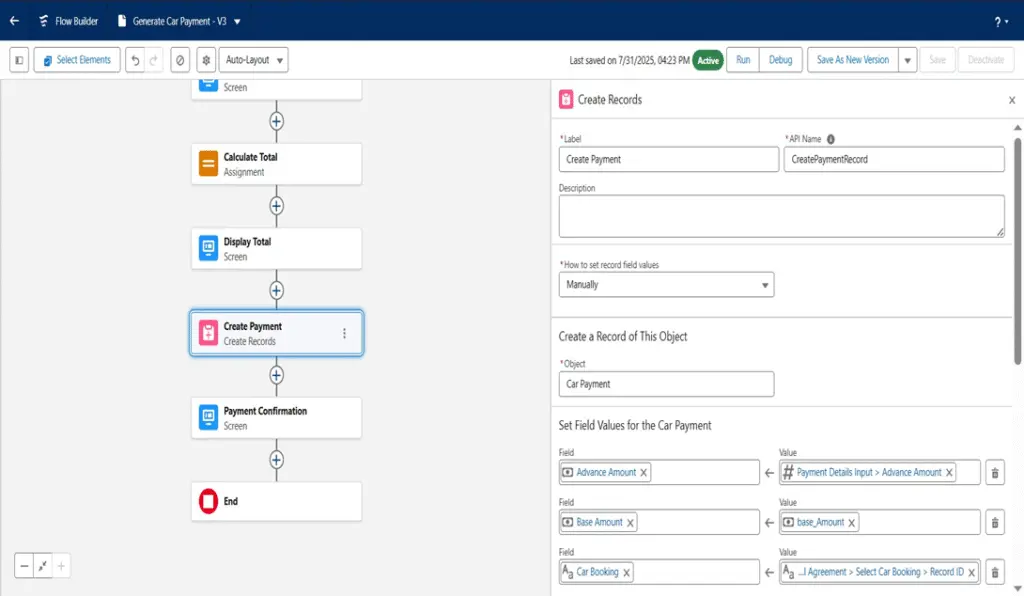
8. Create Payment
- Click on + icon, select create records
- Label it as Create Payment
- How to set record field values as Manually
- Object as Car Payment
- Set field values for the car payment
- Advance Amount as Payment Details Input.Advance Amount
- Base Amount as base_Amount
- Car Booking as Select Rental Agreement.Select Car Booking.Record ID
- Car as Select Rental Agreement.Select Car.Record ID
- Discount as Payment Details Input.Discount
- Final Amount as totalPaymentFormula
- Payment Date as Payment Details Input.Payment Date
- Payment Mode as Payment Details Input.Payment Mode
- Related Agreement as Select Rental Agreement.Select Rental Agreement.Record ID
- Payment Status as Paid
9. Payment Confirmation
- Click on + icon, select screen
– Label it as Payment Confirmation
- Select Display Text from Components
- API Name as paymentSuccess
- Message: Payment record has been created successfully.
- Click on Done to close
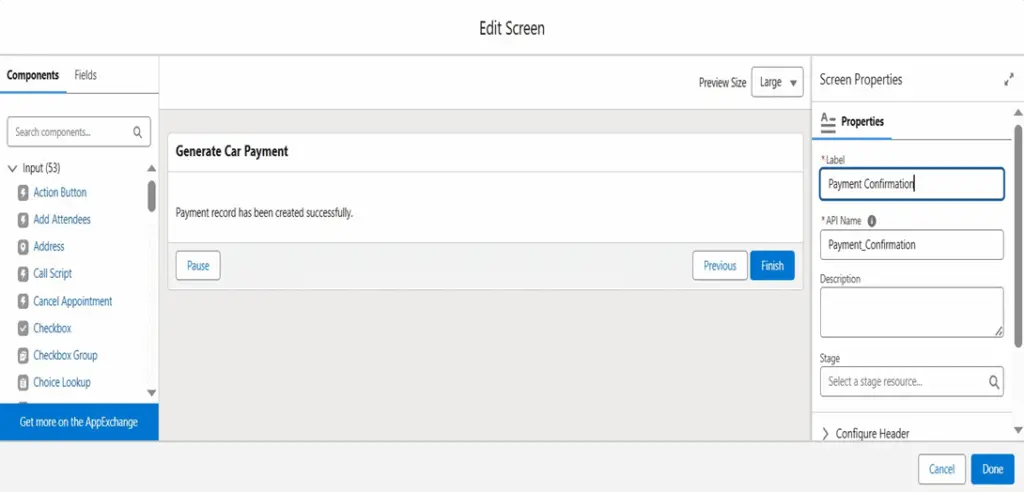
Generate car payment
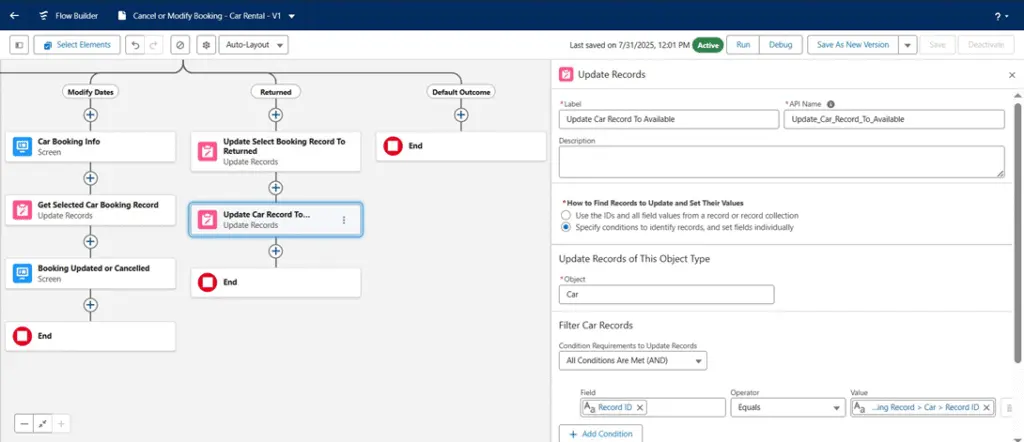
5. Cancel or Modify Booking
- Type: Screen Flow
- Purpose: Lets users cancel a booking or change the rental dates as needed. Updates the booking and car availability, with optional email notification.
- Steps:
1. Get Car Booking
- Click on + icon, select screen
- Label it as Get Car Booking
- Select Lookup from Components – Label it as Select Booking
- API Name as Booking
- Object API Name as Rental Agreement
- Click on Done to close
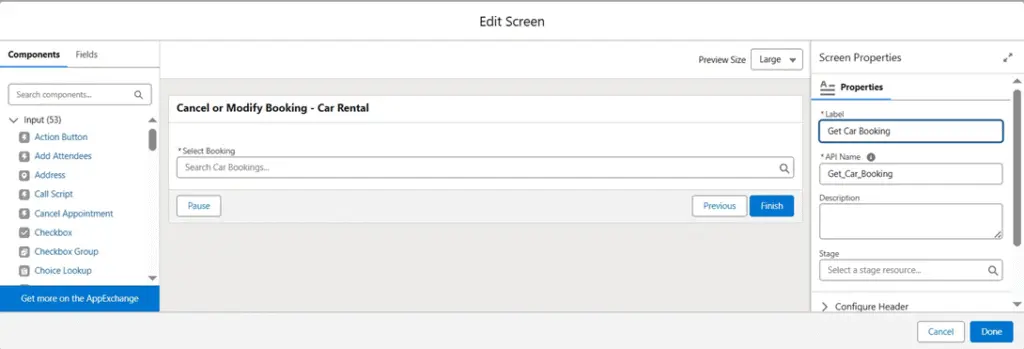
2. Get Car Booking Record
- Click on + icon, select get records
- Label it as Get Car Booking Record
- Object as Car Booking
- Filter Car Booking Records
- Record ID equals to Get Car Booking.Select Booking.Record ID
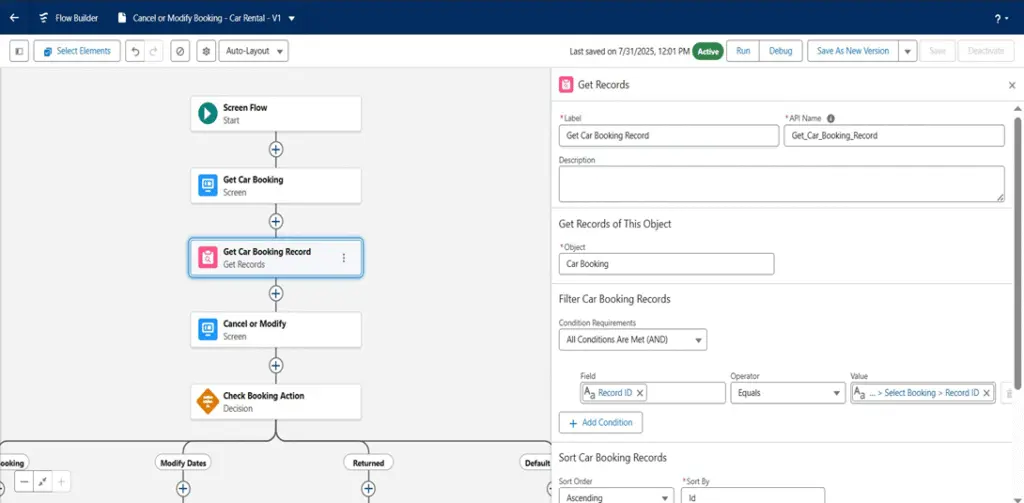
3. Cancel or Modify
- Click on + icon, select screen
- Label it as Cancel or Modify
- Select Radio Buttons from Components
- Label it as Booking Action
- Scroll down to choice and click on input box
- API Name as bookingActionValue
- Object as Car Booking
- Data Type as Picklist
- Field as Booking Action
- Click on Done to close
- Select Date from Components
- Label it as New Pickup Date
- Select Date from Components
- Label it as New Dropoff Date
- Click on Done to close this
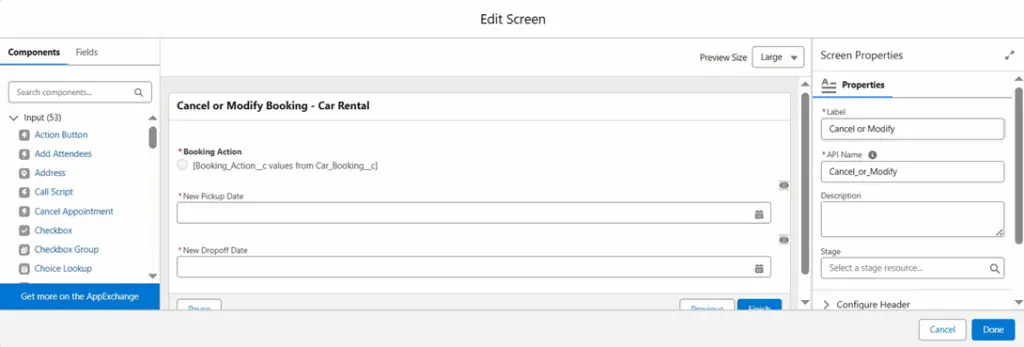
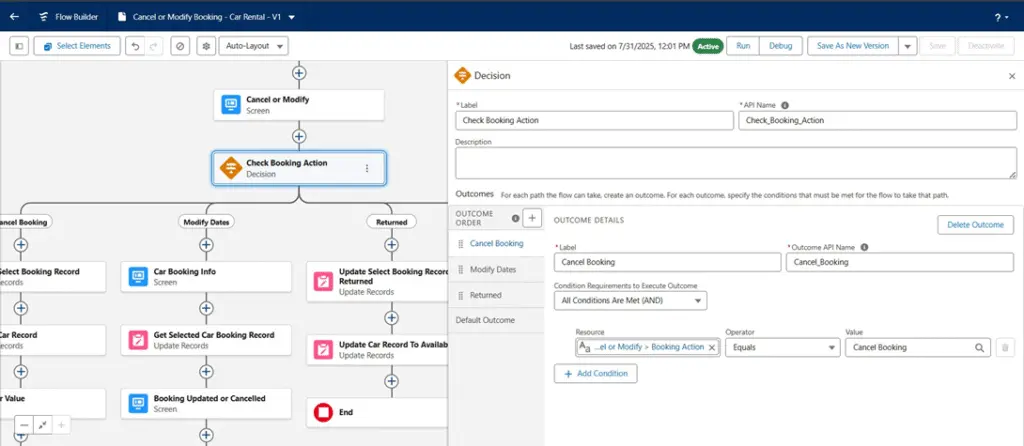
4. Check Booking Action
- Click on + icon, select decision
- Label it as Check Booking Action
- OUTCOME ORDER
- Cancel Booking
- Label it as Cancel Booking
- Cancel or Modify.Booking Action equals to Cancel Booking
- Modify Dates
- Label it as Modify Dates
- Cancel or Modify.Booking Action equals to Modify Dates
- Returned
- Label it as Returned
- Cancel or Modify.Booking Action equals to Returned
- On Cancel Booking
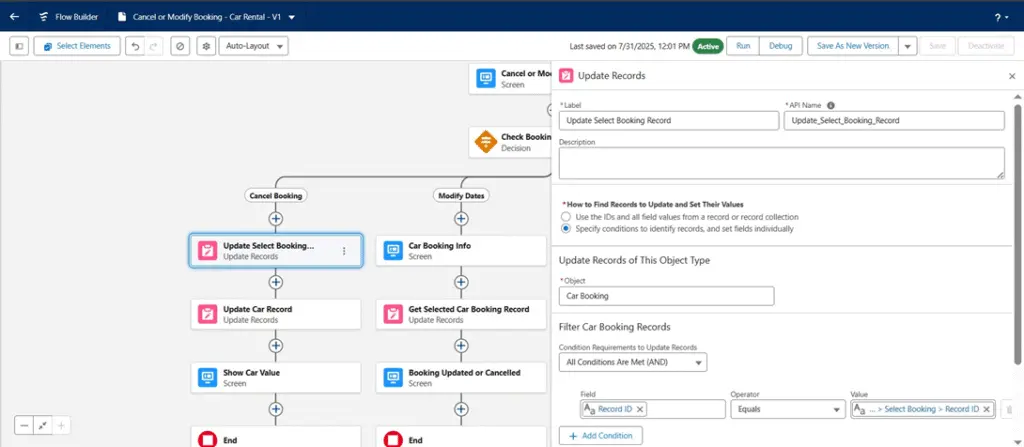
1. Update Select Booking Record
- Click on + icon, select update records
- Label it as Update Select Booking Record
- How to Find Records to Update and Set Their Values as Specify conditions to identify records, and set fields individually
- Object as Car Booking
- Filter Car Booking Records
– Record ID equals to Get Car Booking.Select Booking.Record ID
- Set Field Values for the Car Booking Records
– Booking Action as Cancel Booking
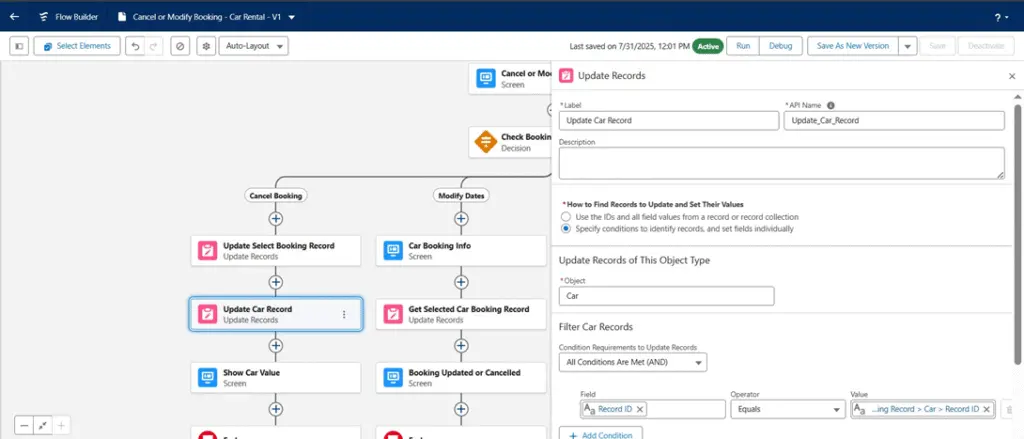
2. Update Car Record
- Click on + icon, select update records
- Label it as Update Car Record
- How to Find Records to Update and Set Their Values as Specify conditions to identify records, and set fields individually
- Object as Car
- Filter Car Records
– Record ID equals to Car Booking from Get Car Booking Reecord.Car.Record ID
- Set Field Values for the Car Records
– Availability as Available
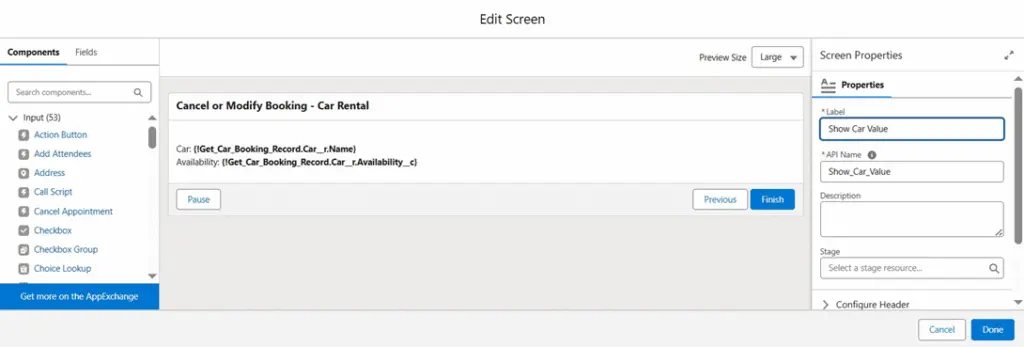
3. Show Car Value
- Click on + icon, select screen
– Label it as Show Car Value
- Select Display Text from Components
- API Name as carValue
- Message: Car: {Get Car Booking Record.Car.Name} Availability: {Get Car Booking Record.Car.Availability}
- On Modify Dates
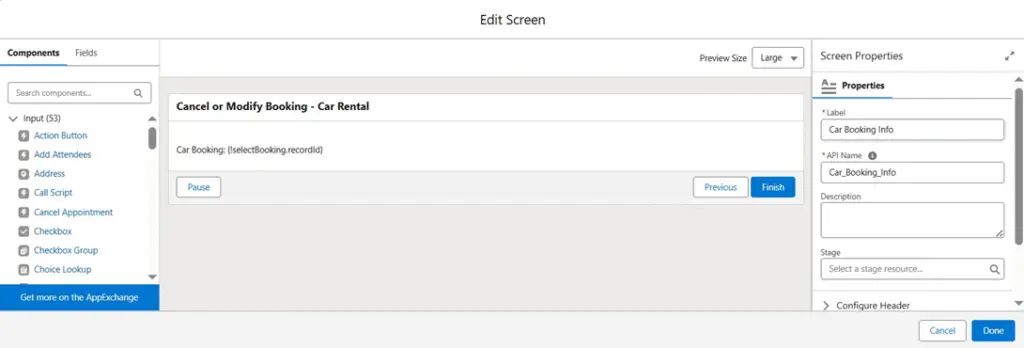
- Car Booking Info
- Click on + icon, select screen
– Label it as Car Booking Info
- Select Display Text from Components
- API Name as bookingInfo
- Message: Car Booking: {recordId}
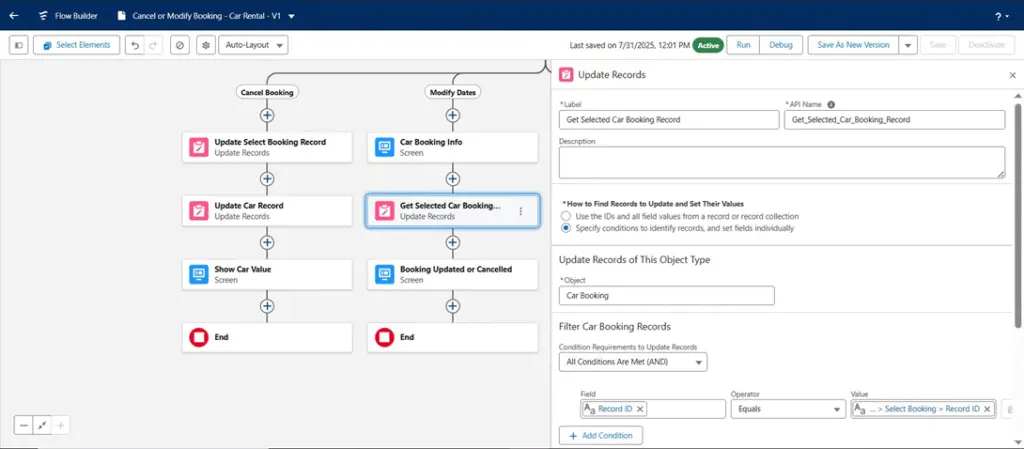
- Get Selected Car Booking Record
- Lebel it as Get Selected Car Booking Record
- How to Find Records to Update and Set Their Values as Specify conditions to identify records, and set fields individually
- Object as Car Booking
- Filter Car Booking Records
– Record ID equals to Get Car Booking.Select Booking.Record ID
- Set Field Values for the Car Booking Records
- Drop-off Date as Cancel or Modify.New Dropoff Date
- Pickup Date as Cancel or Modify.New Pickup Date
- Status as Modified
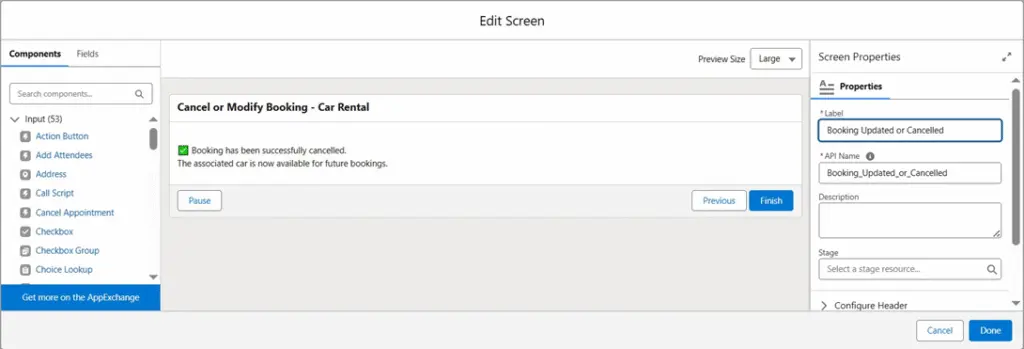
- Booking Updated or Cancelled
- Click on + icon, select screen
– Label it as Booking Updated or Cancelled
- Select Display Text from Components
- API Name as SuccessMessage_Cancelled
- Message: Booking has been successfully cancelled. The associated car is now available for future bookings. – Click on Done to close
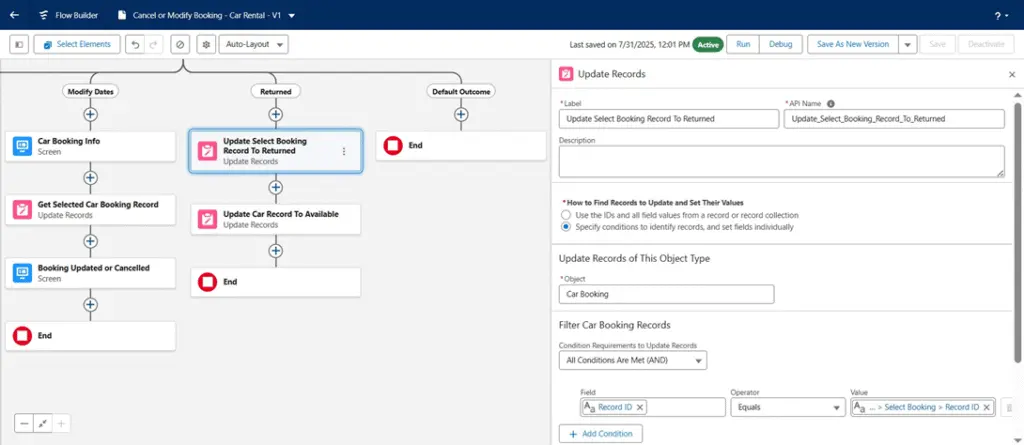
- On Returned
- Update Select Booking Record To Returned
- Click on + icon, select update records
- Label it as Update Select Booking Record To Returned
- How to Find Records to Update and Set Their Values as Specify conditions to identify records, and set fields individually
- Object as Car Booking
- Update Select Booking Record To Returned
- Filter Car Booking Records
– Record ID equals to Get Car Booking.Select Booking.Record ID
- Set Field Values for the Car Booking Records
– Booking Action as Returned
2. Update Car Record To Available
- Click on + icon, select update records
- Label it as Update Car Record To Available
- How to Find Records to Update and Set Their Values as Specify conditions to identify records, and set fields individually
- Object as Car
- Filter Car Records
– Record ID equals to Car Booking from Get Car Booking Record.Car.Record ID
- Set Field Values for the Car Records – Availability as Available
Cancel or modify
4. Dashboard
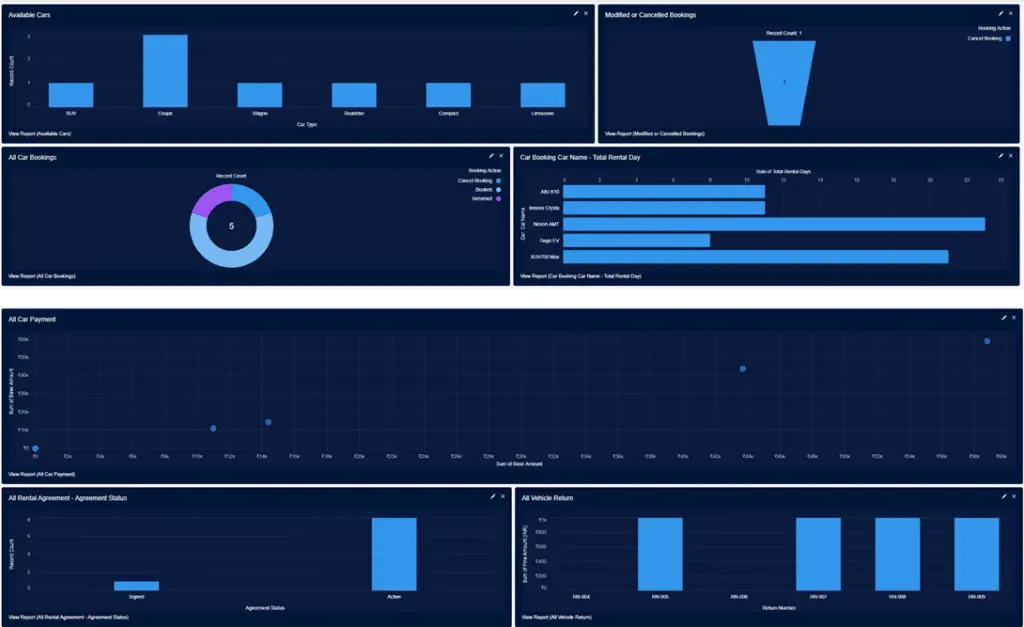
Dashboard Name: CityDrive
- Available Cars
- Modified or Cancelled Bookings
- All Car Bookings
- Car Booking Car Name – Total Rental Day
- All Car Payment
- All Rental Agreement – Agreement Status
- All Vehicle Return
- Available Cars
- Group Rows by Car Type
- Add Columns: Car Name, Brand, Fuel Type, Transmission, Availability – Filter: Availability equals to Available
- Modified or Cancelled Bookings
- Group Rows by Booking Action
- Add Columns: Booking Name, Pickup Date, Drop-off Date, Last Modified Date
- Filter: Booking Action equals to Modify Dates, Cancel Booking
- All Car Bookings
- Group Rows by Booking Action
- Add Columns: Booking Name, Car Name, Customer Name, Pickup Date, Dropoff Date
- Filter: Show me – All car bookings
- Car Booking Car Name – Total Rental Day
- Group Rows by Car Name
- Add Columns: Booking Name, Customer Name, Pickup Date, Drop-off Date,
Total Rental Days, Booking Action
- All Car Payment
- Group Rows by Payment Number
- Add Columns: Agreement Number, Car Name, Discount, Base Amount, Final Amount, Advance Amount, Payment Status
- Filter: Payment Status not equal to blank
- All Rental Agreement – Agreement Status
- Group Rows by Agreement Status
- Add Columns: Agreement Number, Car Name, Customer Name, Rental Start
Date, Rental End Date
- All Vehicle Return
- Group Rows by Return Number
- Add Columns: Car Name, Booking Name, Return Date, Return Status,
Condition on Return, Fine Amount
- Filter: Return Status not equal to blank
5. Conclusion
The Car Rental Application is a complete Salesforce-based system tailored to manage the full lifecycle of vehicle rentals. It streamlines bookings, agreements, payments, returns, and cancellations using custom objects and guided flows. With automated availability checks, rental cost calculations, and return condition tracking, it reduces manual work and improves accuracy. Each process—from car booking to return—is linked for full traceability and compliance. The application is ideal for internal staff, enabling better vehicle utilization and customer service.


