

CSS Padding
What is CSS Padding?
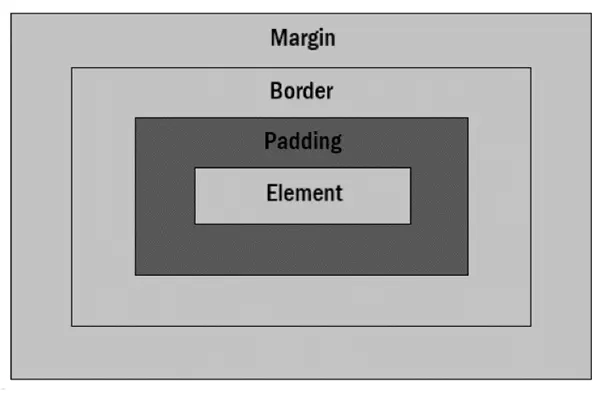
CSS padding is used to create space inside an element, between its content and its border. The padding adds space within the element, pushing the content away from the edges, and is essential for creating well-spaced and visually appealing designs.
Basic Properties for CSS Padding:
1. padding
The padding property is a shorthand for setting padding on all four sides of an element: top, right, bottom, and left.
Example:
Output:

In this example:
1. div Styles:
• border: 2px solid black;: Adds a 2px solid black border around all div elements.
• margin: 10px;: Applies a 10px margin around all sides of the div elements, creating space between the div and surrounding elements.
2. .box Styles:
• padding: 20px;: Adds 20px padding inside the .box element on all sides. Padding is the space between the content of the element and its border.
2. padding-top
This property sets the padding space at the top of an element.
Example:
<head>
<style>
div{
border: 2px solid black;
margin: 10px;
}
.box {
padding-top: 20px;
}
</style>
</head>
<body>
<div>div with no padding</div>
<div class=”box”>Content with 20px padding only on top side</div>
</body>
Output:

In this example:
1. div Styles:
• border: 2px solid black;: Adds a 2px solid black border around all div elements.
• margin: 10px;: Applies a 10px margin around all sides of the div elements, creating space between the div and surrounding elements.
2. .box Styles:
• padding-top: 20px;: Adds 20px of padding to the top of the .box element. Padding is the space between the content of the element and its border, but here it affects only the top.
3. padding-right
This property sets the padding space at the top of an element.
Example:
<head>
<style>
div{
border: 2px solid black;
margin:10px;
}
.box {
padding-right: 20px;
}
</style>
</head>
<body>
<div>div with no padding</div>
<div class=”box”>Content with 20px padding only on right side</div>
</body>
Output:

In this example:
1. div Styles:
• border: 2px solid black;: Adds a 2px solid black border around all div elements.
• margin: 10px;: Applies a 10px margin around all sides of the div elements, creating space between the div and surrounding elements.
2. .box Styles:
• padding-right: 20px;: Adds 20px of padding to the right side of the .box element. Padding is the space between the content of the element and its border, but here it affects only the right side.
4. padding-bottom
This property sets the padding space at the bottom of an element.
Example:
<head>
<style>
div{
border: 2px solid black;
margin: 10px;
}
.box {
padding-bottom: 20px;
}
</style>
</head>
<body>
<div>div with no padding</div>
<div class=”box”>Content with 20px padding only on bottom side</div>
</body>
Output:

In this example:
1. div Styles:
• border: 2px solid black;: Adds a 2px solid black border around all div elements.
• margin: 10px;: Applies a 10px margin around all sides of the div elements, creating space between the div and surrounding elements.
2. .box Styles:
• padding-bottom: 20px;: Adds 20px of padding to the bottom side of the .box element. Padding is the space between the content of the element and its border. Here, it affects only the bottom side.
5. padding-left
This property sets the padding space to the left of an element.
Example:
<head>
<style>
div{
border: 2px solid black;
margin: 10px;
}
.box {
padding-left: 20px;
}
</style>
</head>
<body>
<div>div with no padding</div>
<div class=”box”>Content with 20px padding only on left side</div>
</body>
Output:

In this example:
1. div Styles:
• border: 2px solid black;: Applies a 2px solid black border to all div elements.
• margin: 10px;: Adds a 10px margin around all sides of the div elements.
2. .box Styles:
• padding-left: 20px;: Adds 20px of padding to the left side of the .box element. The padding creates space between the content and the border inside the element. Here, it affects only the left side.
Basic Properties for CSS Padding:
You can set different padding values for each side using the padding shorthand property with multiple values:
1. One Value:
Applies to all four sides.
Example:
<head>
<style>
div{
border: 2px solid black;
margin: 10px;
}
.box {
padding: 20px;
}
</style>
</head>
<body>
<div>div with no padding</div>
<div class=”box”>Content with 20px padding on all sides</div>
</body>
Output:

In this example:
1. div Styles:
• border: 2px solid black;: Adds a 2px solid black border around all div elements.
• margin: 10px;: Applies a 10px margin around all sides of the div elements, creating space between the div and surrounding elements.
2. .box Styles:
• padding: 20px;: Adds 20px padding inside the .box element on all sides. Padding is the space between the content of the element and its border
2. Two Values
The first value applies to the top and bottom, the second to the left and right.
Example:
<head>
<style>
div{
border: 2px solid black;
margin: 10px;
}
.box {
padding: 20px 30px;
}
</style>
</head>
<body>
<div>div with no padding</div>
<div class=”box”>Content with 20px padding on top and bottom side and 30px padding on right and left</div>
</body>
Output:

In this example:
1. div Styles:
• border: 2px solid black;: Applies a 2px solid black border around all div elements.
• margin: 10px;: Adds a 10px margin around all sides of the div elements.
2. .box Styles:
• padding: 20px 30px;: Applies padding to the .box class elements:
• 20px for the top and bottom sides.
• 30px for the right and left sides.
3. Three Values:
The first value applies to the top, the second to the left and right, and the third to the bottom.
Example:
<head>
<style>
div{
border: 2px solid black;
margin: 10px;
}
.box {
padding: 10px 20px 30px;
}
</style>
</head>
<body>
<div>div with no padding</div>
<div class=”box”>Content with 10px padding on top, 20px padding on right and left, and 30px padding on bottom</div>
</body>
Output:

In this example:
1. div Styles:
• border: 2px solid black;: Applies a 2px solid black border around all div elements.
• margin: 10px;: Adds a 10px margin around all sides of the div elements.
2. .box Styles:
• padding: 10px 20px 30px;: Applies padding to the .box class elements:
• 10px for the top padding.
• 20px for the right and left padding.
• 30px for the bottom padding.
4. Four Values
The first value applies to the top, the second to the left and right, and the third to the bottom.
Example:
<head>
<style>
div{
border: 2px solid black;
margin: 10px;
}
.box {
padding: 10px 20px 30px 40px;
}
</style>
</head>
<body>
<div>div with no padding</div>
<div class=”box”>Content with 10px padding on top, 20px padding on right, 30px padding on bottom, and 40px padding on left</div>
</body>
Output:

In this example:
1. div Styles:
• border: 2px solid black;: Applies a 2px solid black border around all div elements.
• margin: 10px;: Adds a 10px margin around all sides of the div elements.
2. .box Styles:
• padding: 10px 20px 30px 40px;: Applies padding to the .box class elements:
• 10px for the top padding.
• 20px for the right padding.
• 30px for the bottom padding.
• 40px for the left padding.
Conclusion
CSS padding is crucial for controlling the space inside elements, ensuring that content is not too close to the edges of its container. By adjusting padding, you can enhance the readability and layout of your web page, making it more visually appealing.
Course Video
Course Video In English
YouTube Reference :
1) CSS Padding In Hindi/Urdu
Practice Scenarios
Scenario 1: Basic Padding
Objective: Add padding inside a div element.
Expected Output: A div element with space between its content and its border.
Output:

Scenario 2: Padding for Specific Sides
Objective: Apply padding to specific sides of an element.
Expected Output: A div element with different padding values on each side.
Output:

Scenario 3: Padding Shorthand
Objective: Use shorthand notation to set padding on all four sides in one line.
Expected Output: A div element with padding set using shorthand notation.
Output:

Scenario 4: Padding and Background Color
Objective: Add padding and a background color to an element.
Expected Output: A div element with padding and a background color.
Output:

Scenario 5: Padding with Borders and Margins
Objective: Apply padding, borders, and margins to a div element.
Expected Output: A div element with padding, borders, and margins.
Output:

This module provides a comprehensive guide to CSS padding, explaining how to create space inside an element between its content and its border to control layout and spacing on web pages.
Yes, it includes examples demonstrating how to apply padding to all sides of an element, as well as setting individual padding for top, right, bottom, and left sides.
Yes, exercises involve applying various padding properties to HTML elements, helping to reinforce the concepts learned.
Yes, it’s designed for beginners with clear explanations and step-by-step examples.
Yes, it clarifies the distinction between padding (space inside the element’s border) and margin (space outside the element’s border), and their respective roles in layout design.
Yes, the training is self-paced and accessible online anytime.
Yes, it explains how to use shorthand properties to set padding for all sides of an element in a concise manner.
It typically takes a few hours to complete, depending on your learning pace.
Yes, this “CSS Padding” training is completely free on Iqra Technology Academy’s website.
