Automations
1. Create Feedback Record after Case is Closed
1. Set Start Trigger
• Object = Case
• Trigger = A record is created or updated
• Condition: Status Equals Closed

2. Create Feedback Record
• Click + on the canvas → Choose Create Records
• Object = Feedback__c
• Mapping: Case__c = $Record.Id

3. Save and Activate Flow
• Click Save, give flow a name
• Then click Activate
4. Test the Flow
• Open a Case, change Status to “Closed”
• Navigate to Feedback__c tab.
2. Auto-Assign High Priority Cases to Manager
1. Go to Flow Builder
• Go to Setup → Flows
• Click New Flow

2. Select Record-Triggered Flow
• Choose Record-Triggered Flow.

3. Set Start Trigger
Object – Case
Trigger – A record is created or updated
Condition – Priority Equals High
Optimize the Flow – Actions and Related Records
Enable: – Only when the record is updated to meet condition requirements

Add Element – Update Record
• Click + → Choose “Update Records”
• Label it: Assign Case to Manager
• How to find records to update? → Use the record that triggered the flow
Set Field Values:
| Field | Value |
|---|---|
| OwnerId | User ID of Manager or Queue ID |

Save and Activate
• Name: Auto Assign High Priority Cases
• Click Save
• Click Activate
Testing the Flow
1.Go to Cases → Create a new Case.
2.Set Priority = High
3.Save
4.Case should automatically get assigned to the Manager (check Owner field)
Create Email Alert on Case Closure
Automatically send an email to the customer when a Case status changes to Closed.
Steps to Create Email Alert on Case Closure
Step 1: Go to Flow Builder
Go to Setup → Search “Flows” → Click “New Flow”.
Choose “Record-Triggered Flow” → Click Create.
Step 2: Configure the Start Trigger
Object: Case
Trigger the Flow When: A record is created or updated
Condition Requirements:
Field: Status
Operator: Equals
Value: Closed
Enable: ✅ Only when a record is updated to meet the condition requirements
Click Done.


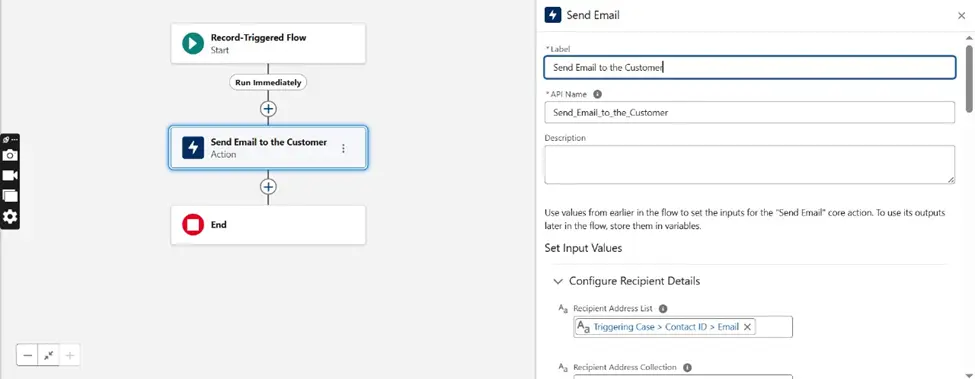
Step 3: Add Action – Send Email
Click the + icon → Choose “Action”
In Action Type, select Send Email (or use Send Email via Email Alert if you’ve created a template).
Label it: Send Closure Email to Customer
Fields to configure:
| Field | Value |
|---|---|
| Recipient Address | Record. Contact. Email (or Email field from Contact Lookup) |

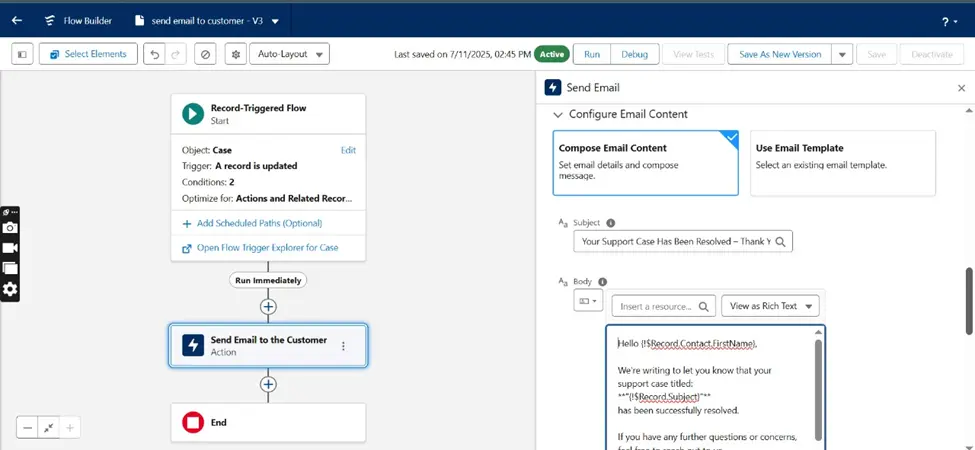
Your Support Case Has Been Resolved – Thank You for Reaching Out!
Subject
Body
Hello {!$Record.Contact.FirstName},
We’re writing to let you know that your support case titled:
**”{!$Record.Subject}”**
has been successfully resolved.
If you have any further questions or concerns, feel free to reach out to us.
We’d also love to hear your feedback on our service.
Thank you,
Support Team
(Or use a custom Email Template via Email Alert.)

Step 4: Connect and Save Flow
Connect Start → Send Email.
Click Save → Name: Case Closure Email Notification
Click Activate.
Testing Steps
Go to any existing Case record.
Set the Status = Closed.
Click Save.
Check the email inbox of the related Contact to confirm the email is received.
Report And Dashboard
Visualize and monitor customer complaints, case trends, and feedback data in real-time using Salesforce standard reports and dashboards.
Reports:
• Open vs Closed Cases
• Complaint Type Trends
• High Priority Tracker
• Customer Satisfaction Summary
• Feedback Comments Review
1.Open vs Closed Cases
Purpose: Compare the number of currently open vs resolved cases.
• Go to Reports → Click New Report
• Select “Cases” as the report type
• Click Continue
• In filters, set Show Me: All Cases, Date Range: All Time
• Group rows by Status
• Add a Row Count summary
• Save as: Open vs Closed Cases
2. Complaint Type Trends
Purpose: Analyze what types of complaints are raised most often.
Steps:
• New Report → Choose Cases
• Group rows by Complaint Type (Picklist field)
• Add Row Count
• Optional: Add a chart (bar or donut)
• Save as: Complaint Type Trends
3. High Priority Tracker
Purpose: Track high priority cases separately.
Steps:
• New Report → Choose Cases
• Set filter: Priority = High
• Add filters for Open status if needed
• Add fields like Subject, Owner, Created Date
• Save as: High Priority Tracker
4️. Customer Satisfaction Summary
Purpose: Measure how satisfied customers are after a case is closed.
Steps:
• New Report → Choose Feedback__c object
• Display fields: Case Number, Rating, Created Date
• Group by Rating
• Add Average or Count
• Save as: Customer Satisfaction Summary
5️. Feedback Comments Review
Purpose: Review actual comments submitted by customers.
Steps:
• New Report → Feedback__c
• Add columns: Case Number, Comments, Rating, Created Date
• Filter: Comments not equal to blank
• Save as: Feedback Comments Review
Dashboard:
Dashboard Name: Customer Complaint Insights
Components:
• Status Overview
• Complaint Types
• Priority Case Trends
• Satisfaction Score
• Feedback Comments Table


